- Home
- Baby Crochet Pattern
- Baby Coverall
Crochet Baby Coverall.
A pattern and step-by-step instruction.
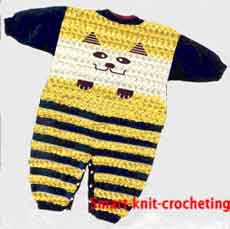
Baby coverall has always been extremely popular. It is a timeless classic style.
Babies love them. Coveralls are roomy and comfortable. They don't restrict baby's movements. There are no pants to fall down. Besides that you can make your baby even happier if you think in advance about possibilities of easy and quick changes.
This crocheted coverall has everything to become your baby's favorite. To design it, Pattern #2 from Baby Crochet Pattern Page was used as an inspiration motif.
Let's go through the features of the design and technology of this baby coverall. As usually, I'll present you all information which is critical for making this project. All the rest is a matter of your creativity: change colors and design elements, choose yarn , stitch pattern and a hook number you like. All of us are different. All of us have our likes, dislikes, and preferences. The more, everyone has her/his own style and density of crocheting. Consider my description as a general guide. Do your own calculations. I'll show you how.
1. Baby Coverall Pattern.
Unfortunately all manufacturers have different sizes for clothing. Here is a simplified European kind of chart for sizes, which I used for my calculations. It is simple, but allows you quickly to choose the coverall size you need.
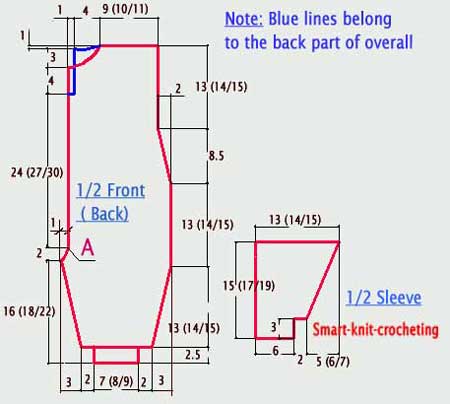
A pattern for the baby coverall is made for size 68. All
dimensions are in cm. Dimensions for sizes 74 and 80 are shown in
parentheses where it is necessary. Back and front parts should be
crocheted the same way except for the neck line and the slot for
the button bands at the top of the back part (see the blue
lines).
| SIZE | Baby's HEIGHT, cm | Baby's AGE, months | Baby's WEIGHT, kg |
| 68 | 63 - 68 | 6 | 5 - 7 |
| 74 | 69 - 74 | 9 | 7 - 9 |
| 80 | 75 - 80 | 12 | 9 - 11 |
For easy and quick change this baby coverall has 9 buttons on the pants (see the picture at the top). You will have to crochet additional button strips for them. Both front and back parts consist of two halves. Each half should be crocheted separately from the bottom till point "A". Starting from point "A", both halves should be connected together and worked as a single detail. Let's start to crochet our baby coverall.
2. How to Crochet Baby Coverall
MATERIALS:
400 - 500 g of yarn.
Size 3.5 mm (E/4) crochet hook.
GAUGE:
22 sts and 13 rows = 10 cm (4"). To make 1 cm of crochet
fabric:
22 sts / 10 cm = 2.2 st/cm.
13 rows / 10 cm = 1.3 rows/cm.
Important note: Do you have the same gauge like mine? If you don't, don't waste your time trying to make it match if you like the way your swatch looks like. You will make calculations for your own gauge and everything will match perfect. My example is made for size 68 (see the chart above). Follow the steps below with your numbers.
Right Front
Step 1: Number of stitches to begin.
Start from the bottom. Rectangular 7 cm x 2.5 cm.
To make 7 cm : 2.2 st/cm x 7 cm = 14.4 stitches (round to 14
sts).
Crochet 2.5cm : 1.3 rows/cm x 2.5 cm = 3.25 rows. Round to 4
rows.
In the 4th row increase number of stitches:
2 cm x 2.2 st/cm = 4.4 st (round to 5 sts). Total increase: 2 times
x 5 st = 10 sts. Distribute additional 10 stitches evenly along the
side of rectangular.
Step 2: Crochet Trapezium.
Lower base: 11 cm (24 sts). Upper base: 11 cm + 2
x 3 cm = 17 cm (38 sts). Height:16 cm - 2.5 cm = 13.5 cm (18
rows).
It means that we have to add: 38 sts - 24 sts = 14 sts (7 sts from
each side). They have to be distributed evenly through the 18 rows:
starting from the 4th row add 1st at the beginning and at the end
in each other row (7 times x 2 sts = 14 sts).
Step 3: Make a curve from the top of trapezium to point "A".
Number of stitches to decrease: 1 cm x 2.2 sts/cm = 2.2 sts
(round to 3).
Distribute stitches evenly through the height: 2 cm x 1.3 rows/cm =
2.6 rows (round to 3): 3 times x 1 stitch.
Put your work aside. Point "A" is the point where two front halves of the baby coverall have to be worked together.
Left Front Part
Crochet left front half as a mirror image of the right front till you reach point "A". Follow the steps below working left and right parts like a single piece.
Left + Right Front
Step 1: Crochet rectangular.
Height:13 cm - 2 cm = 11 cm (14 rows).
Width: (17 cm - 1 cm) x 2 = 32 cm (70 sts).
Step 2: Crochet Trapezium.
Lower base:32 cm (70 sts).Upper base: 32 cm - 2 x
2 cm = 28 cm (62 sts). Height:8.5 cm (11 rows).
Number of stitches to decrease:70 sts - 62 sts = 8 sts (4 sts from
each side). Distribute 4 decreases evenly through 11 rows.
Step 3: Crochet rectangular.
Width: 28cm (62 stitches).
Height:13 cm - 3 cm - 1 cm = 9 cm (12 rows).
Step 4: Crochet a neckline.
Left and right parts work separately. to form a neck line.
Rows: (3 cm + 1 cm ) x 1.3 sts/row =
5.2 rows (round to 5 rows).
Number of stitches to decrease: (1 cm + 4 cm) x 2.2 sts/cm =
11 sts.
Decreases: 1st row - 4 sts, 2nd row - 2sts, 3d row - 2 sts,
4th row - 3 sts.
Back
Crochet similar to the front part except for the neckline. Make your own calculations for the neck line using the front part example. To make a slot for the button strips at the top of the back part, work left and right back separately. Width of the slot on each back part : 1 cm x 2.2 st/cm = 2.2 stitches (round to 3 stitches).
Sleeves
Variant 1. Sew shoulder seams. From right side, work 13 cm x 2 x 2.2 sts/cm = 57 single crochets evenly across sleeve openings. Decrease number of stitches following the sleeve pattern. Make decreases for the cuff in one row evenly distributing them across the row. This way you will be able to lengthen the sleeves of the baby coverall easily in case it is necessary.
Variant 2. Start from the cuff. Make increases following the pattern. Sew a shoulder seams. Join sleeves to openings with the right sides together using a slip stitch.
3. Finishing Baby Coverall
Spread your work on the flat surface (better if you pin it to the full-scale pattern of the baby coverall). Cover with wet fabric and let it dry.
Neck line. For the button bands work 7 cm (15 sts) evenly across the slot from right side. Crochet 3 rows. Make 2 buttonholes on one side of the coverall back. Finish neck edge, including tops of button bands, with 1 - 2 rows of sc.
Button bands for pants. Work 34 cm (74 sts) evenly across both halves of the front parts of pants. Crochet 3 rows. Make 9 buttonholes (1st and 9th at the distance 1 cm from the edges, 5th - in the middle. 3 more place evenly between them symmetrically from both sides. Make a button band for the back part of the coverall. Sew 9 buttons to fit the buttonholes. Sew side seams.
Disclosure: This post contains affiliate links, which means if you make a purchase from one of these links I will get a small commission.

Hi, there, I'm Janice, the voice behind this website and avid knitter and crochet enthusiast. I want to share my passion with you and help you learn how to knit or crochet, smarter.


Most Popular Pages
How to Crochet the Second Row

Dog Sweater Patterns

Working with Alpaca Yarn

Free eBooks, Just for You
Get my beginner eBook guides to Knitting and Crocheting, just for signing up for my monthly newsletter.
Choose one or both when you sign up.


Thank you for visiting Smart-Knit-Crocheting. I hope this and all of my tutorials will give you the inspiration to continue your knit or crochet journey. For a complete list of all the pages on my site, please visit my table of contents.
I participant in the Amazon Services LLC Associates Program, an affiliate advertising program designed to provide a means for sites to earn advertising fees by advertising and linking to Amazon.com. “As an Amazon Associate I earn from qualifying purchases.” These earnings go towards supporting my website.

Home | Contact | About | Privacy Policy | Disclaimer
I DO NOT SELL ANY PERSONAL INFORMATION FROM THIS WEBSITE. PLEASE SEE MY PRIVACY POLICY FOR MORE DETAILS.
Copyright © 2006-2024 Smart Knit Crocheting. All Rights Reserved
Please Share
Remember, Sharing is Caring