How to Crochet a Doily from Motifs
Step-by-step Instruction
If you crochet a doily using motifs, some extra work is necessary to join them to each other. But all your hard work will be awarded tenfold once you see the results.

How to crochet a doily using motifs;
 Design # 1
 Design # 2
This technique of creating a doily pattern seems complicated from the first glance. I think that the most part of this impression comes from the look of the crocheted doilies. A doily made of motifs really looks pretty intricate.
Each of the crocheted doilies presented here is not the most complicated project to do, but all of them are different - from the first glance only.
If you analyze design of these doilies, you will realize that I used the ONLY motif pattern to crochet them. They look different because of the way motifs are assembled.
 Design # 3
First of all try to be creative. It is not really that necessary to copy someone else's pattern. Sure you can do it if you like that design so much. At the same time keep in mind that if you crochet your doily from "scratch", you will have much more variations of possible designs and changing them. Just follow these steps.
Step 1. Choose one or a few motifs to crochet a doily. Your possibilities are endless here: different designs and shapes of motifs, combinations of yarns, threads, their color and thickness, and etc.
Here is my motif, which I chose to crochet the doilies presented in the table. (Click for the chart of this doily pattern). Check the instructions about reading crochet pattern in charts if necessary.
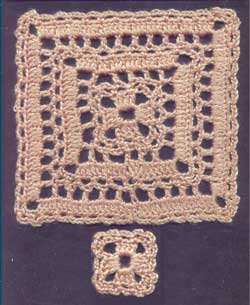
You can see that a small motif is just a three first rows of the large one. Usually it is not a bad idea to combine these kinds of motifs together. They organically compliment each other in models #1 and #2 and make a crocheted doily look very interesting.
Step 2. Crochet your first motif. Now it is time to make a decision how to join all motifs. There are no "incorrect" or "correct" ways to assemble them. You can choose the method of joining according to your preferences. Here are a few the most popular ways to do it while you crochet a doily:
- To use a yarn needle and sew all of the motifs together.
- Using a crochet hook join motifs by slip stitch, single crochet
or chain.
- Joining while working on the last round of motif
("Join-as-you-go" method). This type of connection is
preferable if you crochet a doily with lacy motifs, which have
arches on the outside edges. This way your connection will look the
least noticeable and decorative.
More detailed instructions and pictures about joining motifs
can be found at Crochet motifs page.
Step 3. Weave in the yarn tails back into your project. You can do it either using a crochet hook or a tapestry (or yarn) needle. A needle allows you to pull the ends inside the strand of yarn, not just behind the loops. It makes your work look neater and helps the yarn not hang loosened. Make sure that you leave about 6 inches of yarn to weave in your ends.
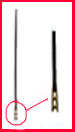
If you really want to save time and to make your life easier-:), I recommend you to use a special needle (see the picture) to weave in the ends.
You can buy them at the store which sells this kind of stuff, or on Amazon. This needle allows you just quickly to push the yarn into a needle without the most boring and time consuming operation - to pull the yarn tail trough the needle eye.
Step 4. Shaping and blocking
is that final operation which gives a finished look to your work
while you crochet a doily. This technique moves the stitches
into proper place, perfectly shapes a doily and gives your work a
polished appearance.

Sign Up for My Newsletter
Disclosure: This post contains affiliate links, which means if you make a purchase from one of these links I will get a small commission.

Hi, there, I'm Janice, the voice behind this website and avid knitter and crochet enthusiast. I want to share my passion with you and help you learn how to knit or crochet, smarter.

Most Popular Pages
How to Crochet the Second Row

Dog Sweater Patterns

Working with Alpaca Yarn

Free eBooks, Just for You
Get my beginner eBook guides to Knitting and Crocheting, just for signing up for my monthly newsletter.
Choose one or both when you sign up.


Thank you for visiting Smart-Knit-Crocheting. I hope this and all of my tutorials will give you the inspiration to continue your knit or crochet journey. For a complete list of all the pages on my site, please visit my table of contents.
I participant in the Amazon Services LLC Associates Program, an affiliate advertising program designed to provide a means for sites to earn advertising fees by advertising and linking to Amazon.com. “As an Amazon Associate I earn from qualifying purchases.” These earnings go towards supporting my website.

Home | Contact | About | Privacy Policy | Disclaimer
I DO NOT SELL ANY PERSONAL INFORMATION FROM THIS WEBSITE. PLEASE SEE MY PRIVACY POLICY FOR MORE DETAILS.
Copyright © 2006-2024 Smart Knit Crocheting. All Rights Reserved
Please Share
Remember, Sharing is Caring