- Home
- How to Crochet
- Crochet Basics: How to Calculate the Correct Size of a Sweater
Crocheting Basics:
How to calculate the correct size of a sweater
Updated 03-23-2024
Getting to know the crocheting basics means that you are ready to start a serious project.
For example, a sweater. Even if you are an experienced crocheter or knitter, sometimes it is not that easy to follow the instructions in order to make a project.

It becomes even more confusing if the instruction is written for a standard clothing size and you have to make some corrections to meet your requirements.
Meanwhile, you can make your life much easier if you don't mind making some simple calculations. Once you understand the logic of these simple calculations, it won't be a problem to design any pattern you need. I will show you how you can do it.
Crocheting Basics. Prepare two things:
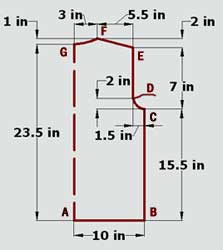
1. A pattern of a sweater for your project. Like this one in the picture below. It doesn't have to be a full-scaled pattern. A small sketch is quite enough.
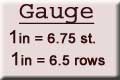
2. You should make a pattern swatch and calculate gauge. I explained how to do it at the Beginner Crochet page.
As an example, let's assume that our gauge is:
Crocheting Basics. Calculate the number of rows and stitches necessary for your project.
We will make calculations for the back of a simple sweater with set-in sleeves. On the picture, you can see one-half of the back pattern. Line AG is a middle line of the sweater back. Let us begin.
Line AB. 10 in long. To start a sweater, you will need :
2 x (10 in x 6.75 stitch/inch) = 135 stitches
Line BC. 15.5 in long. Crochet 135 stitches in 101 rows (100.75 rows are rounded):
15.5 in x 6.5 rows/inch = 100.75 rows.
Line CD. At point "C" a sweater has 135 stitches. At point "D" it should have 115 (rounded 114.75)stitches:
2 x (10 in - 1.5 in ) x 6.75 stitch/inch = 114.75 stitches.
Hence, from point "C" to point "D" you should decrease 20 stitches (10 stitches for the right sleeve opening and 10 stitches for the left one):
135 stitches - 115 stitches = 20 stitches.
From point "C" to point "D" you should crochet 13 rows:
2 in x 6.5 rows/inch = 13 rows.
Rows 1 - 10: decrease 1 stitch at the beginning and 1 stitch at the end of the row.
Rows 11 -13: No decreases.
Line DE. 5 in long: 7 in - 2 in = 5 in
From point "D" to point "E" crochet 115 stitches in 32 rows:
5 in x 6.5 rows/inch = 32.5 rows
Line EF. From point "E" to point "F" decrease 37 stitches
(5.5 in x 6.75 stitch/inch = 37.125 stitches) in 13 rows (2 in x 6.5 rows/inch = 13 rows):at the beginning of the rows 1,3,5,7,9,11 decrease 5 stitches (30 stitches total), at the beginning of the 13 row - 7 stitches.
Line FG (neck line). As a rule, decreases for the neck line begin at the 1/2 height of the shoulder line. For our case approximately 6 rows (1 in x 6.5 rows/inch = 6 rows). There are 41 stitches for the neck opening after the shoulder slopes are finished (115 stitches - 2 x 37 stitches = 41 stitches). Decrease 21 stitches symmetrically about the line "GA".
10 stitches = (41 - 21)/2 from each side of the neck opening (20 stitches total) have to be decreased in 6 rows. Once you decreased 21 stitches around the middle point "G", each shoulder slope should be crocheted separately.
Decreases: 1st row-3 st., 3nd row-3 st., 5th row-4 st.
Disclosure: This post contains affiliate links, which means if you make a purchase from one of these links I will get a small commission.

Hi, there, I'm Janice, the voice behind this website and avid knitter and crochet enthusiast. I want to share my passion with you and help you learn how to knit or crochet, smarter.

Most Popular Pages
How to Crochet the Second Row

Dog Sweater Patterns

Working with Alpaca Yarn

Free eBooks, Just for You
Get my beginner eBook guides to Knitting and Crocheting, just for signing up for my monthly newsletter.
Choose one or both when you sign up.


Thank you for visiting Smart-Knit-Crocheting. I hope this and all of my tutorials will give you the inspiration to continue your knit or crochet journey. For a complete list of all the pages on my site, please visit my table of contents.
I participant in the Amazon Services LLC Associates Program, an affiliate advertising program designed to provide a means for sites to earn advertising fees by advertising and linking to Amazon.com. “As an Amazon Associate I earn from qualifying purchases.” These earnings go towards supporting my website.

Home | Contact | About | Privacy Policy | Disclaimer
I DO NOT SELL ANY PERSONAL INFORMATION FROM THIS WEBSITE. PLEASE SEE MY PRIVACY POLICY FOR MORE DETAILS.
Copyright © 2006-2024 Smart Knit Crocheting. All Rights Reserved
Please Share
Remember, Sharing is Caring