- Home
- How to Knit a Scarf
- Easy Scarf Pattern
Easy Scarf Pattern
How to Knit a Scarf
Updated 06-18-2021
Perhaps, "easy scarf pattern" is one of the most requested knitting projects. "Easy" does not necessary has to mean "boring" and "unattractive".
Our project is a perfect example of a simple technique and creative final result. Is it really simple? What can be simpler than a project made with garter stitch?

How to Knit Our Easy Scarf Pattern

Materials. Fisherman's Wool Lion Brand
8 oz/ 227 g/ 465 yd.
Recommended needle US 9 / 5.5 mm.
I did not use recommended needles but 4.5 mm needles instead. It is a matter of your preferences since an exact gauge is not critical for this project.
Weight of the finished scarf is approximately 110 grams. In case you make part of scarf between triangle "A" and part "B" a little bit shorter, it will be enough yarn for one-ball - project (100 gr). Besides that, a shorter scarf will look more like adornment than a scarf.
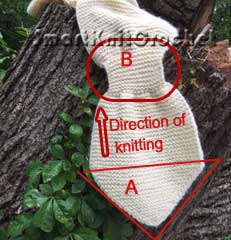
A regular scarf is just a simple rectangular. Our project is not an exception. It is a rectangular. :-) Except of the ends of a scarf (triangle A) and a loop where two ends of a scarf can be joined (rectangular B). Let's start.
Easy Scarf Pattern. Triangle "A".
Beginning and the end of our easy scarf pattern. Cast on 3 stitches on the needle. At the end of each row add one stitch. If you wish to have holes as a decorative edge, use "Yarn Over method" of increasing a stitch.
If a hole at the place of increase is not desirable, it is better to use "Make 1 (M1)" method. (See the link above).
Number of increases is equal to 33 stitches. When you finish to make increases, there will be 36 stitches on the needles.
Continue
your knitting without increases till your reach the area where joint
loop is located. (part "B"). There are 40 rows (or 20 ridges) between
triangle with increases and the joint loop.
Easy scarf pattern. Joint loop (rectangular "B").
 Stitch Holder
Split 36 stitches into two parts. The easiest way to do it is to use a stitch holders. If you do not have one, you can use a regular closed pin or additional knitting needle.
- Every odd stitch out of 36 stitches goes to the working needle.
- Every even stitch goes to a stitch holder.
Once you have two sets of stitches, continue to knit 20 rows (10 ridges) based on 18 stitches on the working needles. Then move them to another stitch holder.
18 stitches from the first stitch holder put on the working needles and work 20 rows (10 ridges). Now you have two small rectangles (18 stitches x 20 rows each) and they have to be moved to the working needle , to continue your knitting.
- First stitch to be moved we will slip from the stitch holder (a rectangular we knitted first).
- Second stitch has to be taken from the working needle (a rectangular we knitted second).
In other words, odd stitches you take from the first rectangular, even stitches from the second one. There will 36 stitches again on the needles.
Continue to knit 36 stitches in 130 rows (65 ridges).
Make another joint loop similar to the first one. Continue to knit 40 more rows.
Make 33 decreases : one decrease at the end of each row till you have 3 stitches on the needle. Bind them off.
You might like these
24 Best Stitches for Knitting Scarves
Here is my collection of the best stitches for knitting scarves for beginners along with free tutorials and directions to complete the projects.
Knit Dog Sweater Pattern: 6 Free Beginner Friendly Knit Dog Sweaters
For Beginner Knitters, here are 6 Knit Dog Sweater Patterns with instructions on how to measure and begin your project for that perfect fit.
Free Knit Purl Ridge Dishcloth Pattern: Complete Instructions
This free knit Purl Ridge Dishcloth Pattern is super easy and fun to make for the beginning knitter or for anyone that needs a quick hostess gift.


Disclosure: This post contains affiliate links, which means if you make a purchase from one of these links I will get a small commission.

Hi, there, I'm Janice, the voice behind this website and avid knitter and crochet enthusiast. I want to share my passion with you and help you learn how to knit or crochet, smarter.

Most Popular Pages
How to Crochet the Second Row

Dog Sweater Patterns

Working with Alpaca Yarn

Free eBooks, Just for You
Get my beginner eBook guides to Knitting and Crocheting, just for signing up for my monthly newsletter.
Choose one or both when you sign up.


Thank you for visiting Smart-Knit-Crocheting. I hope this and all of my tutorials will give you the inspiration to continue your knit or crochet journey. For a complete list of all the pages on my site, please visit my table of contents.
I participant in the Amazon Services LLC Associates Program, an affiliate advertising program designed to provide a means for sites to earn advertising fees by advertising and linking to Amazon.com. “As an Amazon Associate I earn from qualifying purchases.” These earnings go towards supporting my website.

Home | Contact | About | Privacy Policy | Disclaimer
I DO NOT SELL ANY PERSONAL INFORMATION FROM THIS WEBSITE. PLEASE SEE MY PRIVACY POLICY FOR MORE DETAILS.
Copyright © 2006-2024 Smart Knit Crocheting. All Rights Reserved
Please Share
Remember, Sharing is Caring