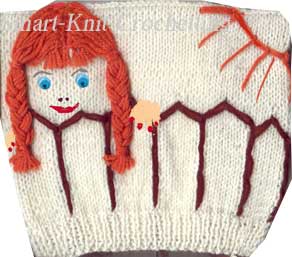
A Girl
Sweater
Easy to do and a lot of fun
Yes, it is a girl sweater, but as usually, I don't suggest you to follow instruction to the tee. It is an idea only which, I am sure, will make you smile.
You can change it in a way you want: to use different colors, add some elements, to change girl's hairdo to make her look like a boy.
Just be creative. It is a simple project, but you can make it grabbing every one's attention.
Where should you start to make this girl sweater? Follow the Steps described below, use reference URL's for calculations.
Step 1. Make a pattern sketch for your project
A step-by-step instruction about sweater patterns can be found at Make a Sweater Page.
A few notes about a sweater pattern you are going to use. It is quite traditional to use a simplified sweater pattern with drop shoulders for the kid's sweaters. Temptation is really pretty big. Two rectangulars and two trapeziums for sleeves - done. Besides that, it is very easy to make the sleeves longer when your kid becomes taller. But be careful with this kind of patterns.
Don't be surprised when your kid refuses to wear a wonderful sweater you made for her. She has a good reason for doing this. Problem is, that a line where the sleeve is connected to the body of a sweater will be located almost at the level of her elbow.
It will restrict freedom of her movements. The more, it can become a small nightmare if the fabric of the sweater is pretty thick. Would you wish to wear this kind of a sweater yourself?
If you are absolutely sure you want to use a simplified pattern for this girl sweater, find the way to move (to lift) the line where the sleeve is joined to the sweater body closer to the shoulder. It is possible. But you still should remember about the fabric thickness. It has to be pretty flexible.
The pattern which I used for this girl sweater is a simple stockinette stitch (knit one row of knit stitch, turn the work, and then work one row of purl stitch). Front part of the sweater where you can see the fence, and sleeves have the purl grooves at the distance of 7 stitches between them.
Step 2. Make a gauge swatch and calculate number of the stitches necessary to start each part of the sweater.
Use these links if necessary, to remember how to make a gauge and calculate the number of stitches necessary
Step 3. Decorate the front part of the girl sweater.
It's a fun part. You will need either a needle or a crochet hook to decorate the sweater. It's a matter of your preferences. Needles to say, needle work will make it look neater. There are a few decorating elements in this girl sweater. Lets begin.
Make a fence: Use a crochet hook or a needle. Embroider
the contour lines around the fence. Purl grooves will help you keep
the lines straight.
Embroider the sun on the shoulder: Use the same
technique your used for the fence contour. Slightly steam the fence
and sun to make them neat.
Make girl's hairdo: To use a crochet hook is the easiest
way to do it. Measure the distance necessary to cover her head and
make braid. Cut a piece of yarn twice as long as the distance
measured.

Using the picture (Step 1, Step 2...) for reference, make one strand of her hairdo. Is it long enough to cover her head the way you want? Good! You will need 8-12 strands for each side of hairdo depending of the sweater size.
Fix all strands together to the sweater at the upper part of the hairdo. Make braid, fix braid at the lower part, and trim it. Be prepared, kids will try to pull braids playing. :)
Use a needle to embroider a girl's face. It is not a bad
idea to use some bright buttons or eyes for dolls which you can
find at the local craft store. They will make the face more
expressive.
Step 4. Sew all pieces of
your girl sweater together.
You can do it by hands ( use a crochet hook or needle). I prefer to use a sewing machine. It makes the work look much more accurate. Of cause, it is up to you. Steam seams after you finish the sweater. Knitting sweater like this is a lot of fun.


