How to Crochet Doll( Part I)
A crochet doll presented on this page is my first experience of making dolls. My inspiration came from the dolls made by a talented Russian designer Nelly Bolgert. Her instruction (written in Russian, but has a lot of pictures) describes a basic design of a doll which can be used to create a whole family of the funny crochet toys.
The only reason I decided to make this additional page on my site is desire to help English-speaking visitors to understand some moments in the text which are not quite obvious from the pictures in case you can't read Russian.
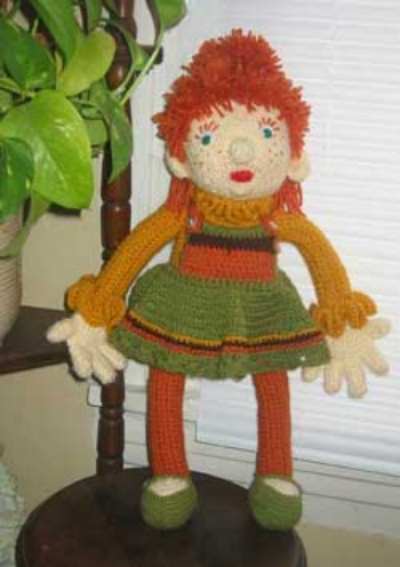
Here is my first "family member." Click to enlarge for detail picture. Now download Nelly's instruction and let's follow it step-by-step.
My explanation on this page is not exact translation, but only some major moments which are not obvious from the pictures. If you still have some questions, you can ask them through my contact form. Here is some information which will help you to follow instruction.
Crochet Doll Instruction.
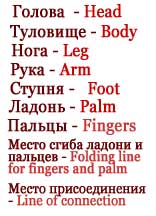
1. Basic information. A single crochet stitch (SC) is used for crocheting all parts of a doll. Thickness of yarn, its colors, number of a crochet hook are a matter of your preferences. A picture below is a small dictionary of the terms which will help you to understand description.
2. Body. Chain 6 stitches, join into the ring. Crochet a circle till its diameter is about 10 cm. Continue to crochet not adding the stitches. It will form an "egg" (see the picture below), about 10 cm long. Begin to decrease stitches to shape the top of the "egg". Stuff it before close the stitches.
3. Head. The same as body, but diameter of
the circle is about 8 cm. To form a doll chin, make a tiny "half-egg"
first. It is the beginning of a head.
4. Two Legs.Two rectangular pieces 20 cm x
10cm. To make the legs rigid, you can roll a piece of fabric and use it
as a stuffing instead of regular fillers.
5. Two Hands. The same as legs. Two rectangular pieces (13-15) cm x 8 cm.
6. Two Feet. Four ovals 8 cm x 15 cm. Sew two ovals together. Stuff them tight, to keep weight of a crochet doll.
7. Fingers and palms of the hands.
Begin from 15 chains and crochet two ovals 7 cm x 10 cm. Ten small ovals
for fingers: 7 cm x 2.5 cm (20 chains) - 4 pcs, 9 cm x 2.5 cm (24
chains) - 4 pcs, 10 cm x 2.5 cm (26 chains) - 2 pcs. Sew two hands -
see the pictures of Nelly's instruction.
8. Hair. Use the same principle like for the hair-do from a Girl Sweater picture. Make hair-do according to your imagination.
9. A crochet doll face. Use buttons, yarn, additional crochet details to make it look the way you like. The main thing is : a face has to be kind. :)
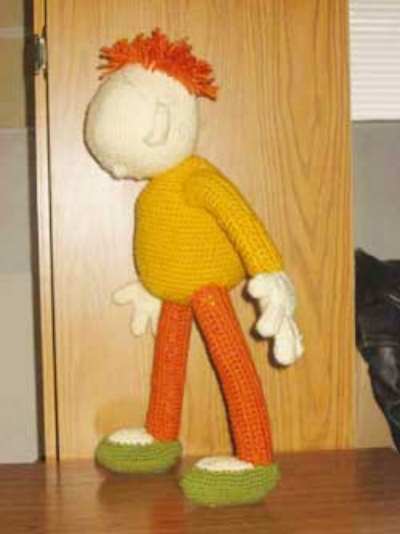
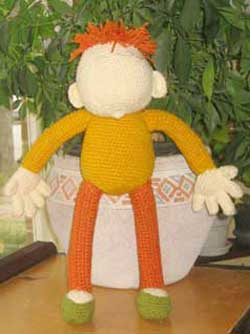
10. Assemble a doll. Sew all parts
together the way you see it in the pictures. Dress your doll sewing her
garments on the body or leave some parts of a doll undressed in case
you crocheted some parts of her body as a garment. See Part 2 instruction page for some ideas.
Disclosure: This post contains affiliate links, which means if you make a purchase from one of these links I will get a small commission.

Hi, there, I'm Janice, the voice behind this website and avid knitter and crochet enthusiast. I want to share my passion with you and help you learn how to knit or crochet, smarter.
Most Popular Pages
All Types of Crochet Stitches

36 Reversible Knit Stitch Glossary

How to Crochet the Second Row

Dog Sweater Patterns

Working with Alpaca Yarn

Free eBooks, Just for You
Get my beginner eBook guides to Knitting and Crocheting, just for signing up for my monthly newsletter.
Choose one or both when you sign up.


About the Author: Please allow me to Introduce myself

I'm Janice, the voice and writer behind Smart-Knit-Crocheting. I'm passionate about crocheting and knitting and I love being able to pass my passion onto my readers. I've been knitting and crocheting daily for about five years, but I first learned from my grandmother as a child, many years ago.
I'm a certified knitting and crochet instructor from the Craft Yarn Council and my goal is to present instructions and patterns in an easy way to understand for the absolute beginner. Always feel free to contact me (form below) if you have any questions, or just want to say hello.
Thank you for visiting Smart-Knit-Crocheting. I hope this and all of my tutorials will give you the inspiration to continue your knit or crochet journey. For a complete list of all the pages on my site, please visit my table of contents.
I participant in the Amazon Services LLC Associates Program, an affiliate advertising program designed to provide a means for sites to earn advertising fees by advertising and linking to Amazon.com. “As an Amazon Associate I earn from qualifying purchases.” These earnings go towards supporting my website.

Home | Contact | About | Privacy Policy | Disclaimer
I DO NOT SELL ANY PERSONAL INFORMATION FROM THIS WEBSITE. PLEASE SEE MY PRIVACY POLICY FOR MORE DETAILS.
Copyright © 2006-2025 Smart Knit Crocheting. All Rights Reserved
Please Share
Remember, Sharing is Caring