- Home
- How to Crochet
- Reading Crochet Patterns in Chart Form
How to Read Crochet Patterns in Chart Form
Crochet Patterns Updated by Janice Jones 07-20-2022
Crochet patterns can be described either in written form or in charts. It is a matter of personal preference which method to use. Both methods have their advantages and disadvantages. Many prefer patterns to be written out, row by row or round by round. A crochet written pattern has the advantage of explaining each step without the need to memorize symbols. They are normally written in the person's native language. But what do you do if you find a pattern written in a language you don't understand. That is where charts come in handy.
What is a Crochet Pattern Chart
Charts are designed to be read row by row or in the round. They are a pictorial representation of what the crocheter will need to do. Each stitch or action is designated on the chart with a specific pattern.
What are Some Crochet Chart Symbols
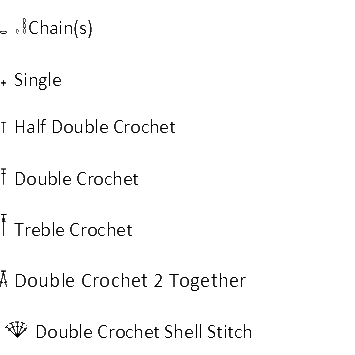
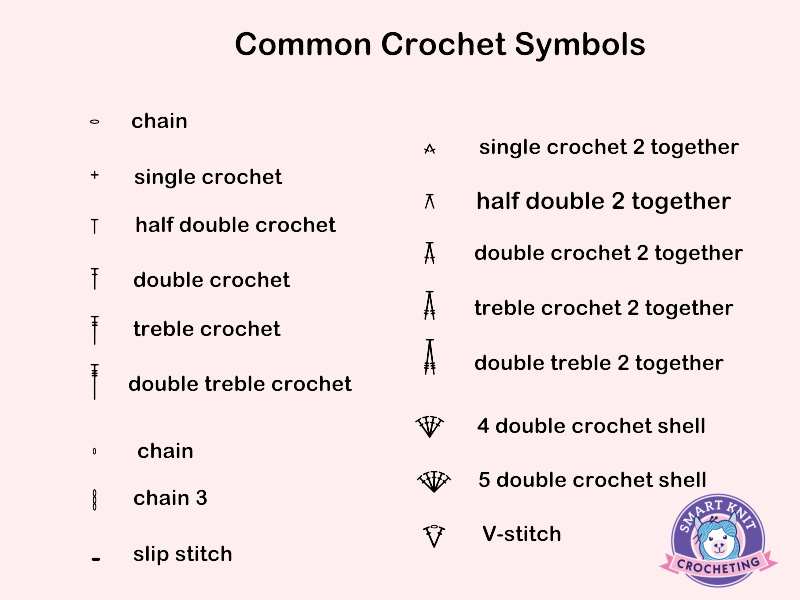
A complete list of common crochet chart symbols can be found at the Craft Yarn Council. Here are a few basic ones that all beginners should know.
Everybody can benefit from both the chart and written directions by using them together. The majority of people understand things better when they can visualize them. This page is for them - visual learners.
Let's look at the pattern below. I used different colors for alternate rows to make better understanding in which row every stitch is worked.
Different Types of Crochet Patterns in Chart Form
Granny Square Chart: Working in the Round

Crochet V-Stitch Working in Rows

There are some general rules to follow while you are reading crochet patterns in charts
- Each stitch in the pattern is represented by its symbol. There are three of them which were used in this chart: chain, single crochet, and double crochet.
- This pattern is written in rows.
- Pattern for crocheting in rows is charted row by row. It starts from the foundation chain. Rows are usually numbered. The very first row is always the bottom one.
- As you work, follow the odd rows from right to left. Follow the even rows from left to right. See the chart. If you are left handed, it is just the opposite.
- Patterns that are worked in the round normally start in the center of the chart.
- Very often a crochet pattern has a section which can be repeated as necessary for width. Repeats are indicated with a brackets below the section which needs to be repeated.
- Stitches in a pattern chart are placed over the stitches in which they have to be worked.
- There should be a key that explains what each symbol stands for.
Keeping in mind these general rules, let's read our pattern.
Work a foundation chain. Length of chain is equal to 50 + 3 (turning chain) chains.
More Complicated Crochet Patterns in Chart Form
Here is a bit more complicated chart, but still one that only uses five basic crochet stitches, chains, slip stitch, single, double and treble crochet stitches.

Here's the Same Directions, Written Out in Words
Row 1: Make 1 double crochet into the fourth chain from the hook, 2 chains, skip 2 chains,1 double crochet, 2 chains, 10 double crochets, 8 chains, 10 double crochets. Follow the pattern to the end of the row. Finish with 2 double crochets.
Row 2: 3 turning chains, 1 double crochet, 3 chains, 1 single crochet into 1 double crochet of the first row, 3 chains, 1 double crochet, 2 chains, 4 double crochets into 4,5,6,and 7 double crochets of the first row, 5 chains, 2 single crochets into 4 and 5 chains of the 1 st row, 5 chains. Follow the pattern to the end of the row. Finish with 2 double crochets.
Row 3: 3 turning chains, 1 double crochet, 7 chains, 1 double crochet into 1 double crochet, 2 chains, 1 double crochet, 5 chains, 6 single crochets into the 4, 5 chains, 2 single crochets, 1,2 chains of the 2 row, 8 chains. Finish with 2 double crochets.
Row 4: 3 turning chains, 1 double crochet, 2 chains, 1 single crochet into 1 single crochet, 2 chains, 1 double crochet, 2 chains, 4 double crochets into 1,2,3 chains, 5 chains, 2 single crochets into 3 and 4 single crochets, 5 chains. Follow the pattern to the end of the row. Finish with 2 double crochets.
Row 5: 3 turning chains, 1 double crochet, 3 chains, 1 single crochet into 1 single crochet, 3 chains, 10 double crochet, 8 chains, 10 double crochets. Follow the pattern to the end of the row. Finish with 2 double crochets.
Row 6: 3 turning chains, 1 double crochet, 8 chains, 1 double crochet into 1st double crochet, 2 chains, 4 double crochet into 4,5,6,7 double crochets, 5 chains, 2 single crochet into 4 and 5 chains, 5 chains. Follow the pattern to the end of the row. Finish with 2 double crochets.
Here is how our crochet pattern looks like.

Now you have the idea about the rules crochet patterns can be described in charts.
It will help you to save time while you are working on your projects. It doesn't really matter whether you are going to use written instructions or charts. The most important is your enjoyment from what you are doing.
You do not necessarily need to have complicated patterns to make your project. In most cases a real masterpiece is made with simple techniques, good taste, and basic crochet pattern.
Crochet Patterns Written in Chart Form
Pin for Future Reference

Disclosure: This post contains affiliate links, which means if you make a purchase from one of these links I will get a small commission.

Hi, there, I'm Janice, the voice behind this website and avid knitter and crochet enthusiast. I want to share my passion with you and help you learn how to knit or crochet, smarter.

Most Popular Pages
How to Crochet the Second Row

Dog Sweater Patterns

Working with Alpaca Yarn

Free eBooks, Just for You
Get my beginner eBook guides to Knitting and Crocheting, just for signing up for my monthly newsletter.
Choose one or both when you sign up.


Thank you for visiting Smart-Knit-Crocheting. I hope this and all of my tutorials will give you the inspiration to continue your knit or crochet journey. For a complete list of all the pages on my site, please visit my table of contents.
I participant in the Amazon Services LLC Associates Program, an affiliate advertising program designed to provide a means for sites to earn advertising fees by advertising and linking to Amazon.com. “As an Amazon Associate I earn from qualifying purchases.” These earnings go towards supporting my website.

Home | Contact | About | Privacy Policy | Disclaimer
I DO NOT SELL ANY PERSONAL INFORMATION FROM THIS WEBSITE. PLEASE SEE MY PRIVACY POLICY FOR MORE DETAILS.
Copyright © 2006-2024 Smart Knit Crocheting. All Rights Reserved
Please Share
Remember, Sharing is Caring