- Home
- How to Crochet
- Reading Crocheting Instructions
Reading Crocheting Instructions
Crocheting Instructions Updated by Janice Jones
If you are just getting started with crochet, you might be overwhelmed by the instructions that you see provided for you on that love hat pattern you want to make.
Even worse, after reading a line of crocheting instructions, you may decide that crocheting is just not for you.
Either way, I'm here to help because I too was totally dazed by the those instructions written by so called master crochet experts. It was so bad at first that all I did was make up my own patterns that worked for me. That is until learned a few things about crocheting instructions.
The Truth Behind Crocheting Instructions
Here a few things I learned that shocked me.
- No Standard Instructions: There's really no right and wrong way to write crocheting instructions (which means each designer can do whatever they want unless they work for a magazine or yarn company paying them for their design)
- Guidelines: There are basic guidelines available from the Craft Yarn Council, but even so, may designers choose not to follow the guidelines.
- More Than One Way To Say The Same Thing: There is always more than one way to write crocheting instructions (more about that below).
- Designers vary on their writing skills: Some designers write patterns that are just easier to understand.
- Designers will write patterns based on their audience: If they feel crocheters using their pattern are advanced, they write for advanced users. The opposite is true if their audience is beginners.
- Some Designers Make Up Rules: Some independent designers make up the rules as they go along.
- Some Patterns Contain More Info than Others: There is no requirement that designers use the same template so some patterns end up providing much more information than others.
- Names of Stitches Differ between US and UK: To make it even more confusing, names of stitches in US English are not the same as in UK English. It's left to the reader to figure out where the designer lives.
It's true, folks, this is not a strongly regulated industry which means that understanding crocheting instructions can be extremely frustrating for the average beginner.
How Does the Crochet Beginner Learn About Understanding Crocheting Instructions
I can't give you a black and white answer to this dilemma, but I can offer some solutions that helped me along my path to learning to crochet. Here's what I did.
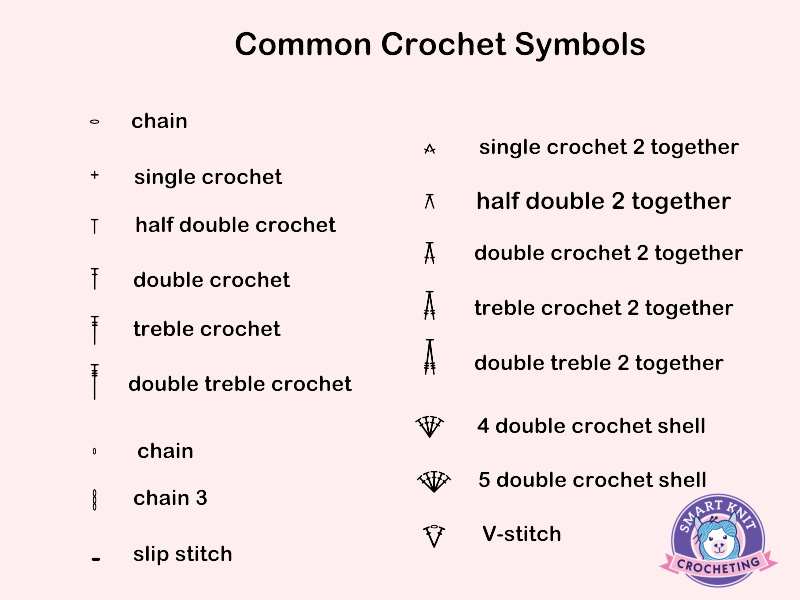
- Learn the names of basic stitches including their abbreviations and their symbols. For example single crochet is abbreviated sc and is pictured as a + or a x.
- Find Out Where the Pattern Was Written: Before falling in love with a project I had to crochet, I first found out where it was written. Well written patterns will state that all instructions are written in US terms or UK terms. Remember that the names of stitches are different depending on whether you live in the US or the UK.
- Check Out the Pattern Difficulty: If you are a beginner, look for the Craft Yarn Council designation as to the difficulty of the pattern. They provide guidelines for four basic skills levels from Basic, Easy, Intermediate, Advanced. (See below). Choose patterns marked as basic or easy.
- First Read the pattern thoroughly: Read through the entire pattern to see if you understand all the instructions. If most are understandable, proceed. If not, re-read and see if you can comprehend what the designer is trying to say.
Crocheting Instructions: Symbols and Abbreviations
Crochet instructions may seem like a foreign language when you first get started, but don't feel like you need to memorize a lot of abbreviations right away.
If you start off slowly, you will learn all the abbreviations you need to know in a more relaxed and less formal way. If you want to know to know those abbreviations now, click here for a downloadable document that you can keep in your crochet bag.
Crocheting Instructions: Where Was The Pattern Written?
The names of crochet stitches differ depending on where the designer lives. If the pattern was written in the US, there's a good chance it will contain US terminology. Likewise, if written in the UK, it will use UK terminology. Here are a few differences that might make this more understandable.
US Terminology
single crochet
half double crochet
double crochet
treble crochet
UK Terminology
double crochet
half treble crochet
treble crochet
double treble crochet
Hints:
- Check the notes in the pattern to see what terms it is using.
- If there are any indication of sc (single crochet stitches), you will know immediately that it was written in US Terms
- If you see mention of htr (half treble crochet) you know it was written in UK terms.
- More hints: Look for the words gauge and tension. If the pattern uses the term gauge, it's written in US terms, tension is usually used in UK patterns.
Crocheting Instructions: Ability Levels
All beginners should be aware that there are four basic ability levels that designers can use in the US. based on the Craft Yarn Council
- Basic: Projects using basic stitches. May include basic increases and decreases.

- Easy: Projects may include simple stitch patterns, color work, and/or shaping.

- Intermediate: Projects may include involved stitch patterns, color work, and/or shaping.

- Complex: Projects may include complex stitch patterns, color work, and or/shaping using a variety of techniques and stitches simultaneously.

Choose the level that best matches your ability and stick with it until your abilities improve.
Examples of Crocheting Instructions
Single Crochet : Worked from Written Instructions
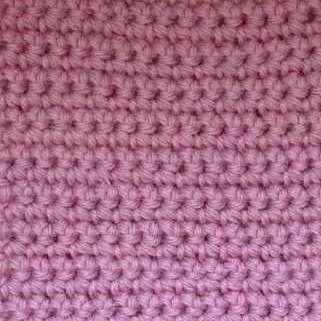
- Work a length of chain (foundation chain). For instance, 13 chains. (You do not count the loop on the hook). The number of chains should be equal the number of stitches required plus one stitch. Your 13 chains will make 12 stitches wide crochet fabric.
- Row 1. Skip the first chain stitch. The single crochet (sc) is placed in the 2nd chain from your hook. Continue working 1 single crochet (1 sc) into each chain stitch. At the end of the row you will have 12 single crochets (sc).
- Row 2. To begin a second row you will need to make 1 turning chain. Turn your work (the reverse side is facing). Continue working 1 single crochet (1 sc) into each stitch of the previous row.Count your stitches! It is easy to miss one. At the end of the row you will have to have 12 of them.
- Row 3. 1 turning chain. Repeat row 2. Continue your work till you have a desired length of fabric.
Reading Pattern Instructions with Charts and Symbols
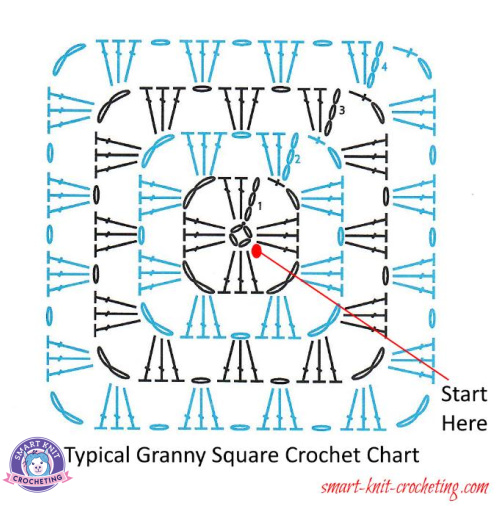
The same crocheting instructions can be presented as a chart. If you are a visual person (like the majority of people), you might like it better. Every stitch in a chart has it's own symbol.
Here are a few International Crochet Symbols. We will start from the most often used ones. I will introduce you to the new symbols every time when it is necessary.
With a little practice, you will be able to see the entire patterns at a glance and know exactly where you are in your pattern. Here is our crocheting instructions in symbols.
There are few simple rules to follow while reading a crocheting instructions in symbols. Let's practice.
Single Crochet in Rows
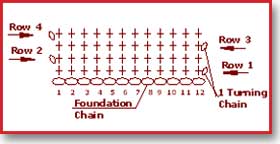
- Begin to read pattern from the bottom of the chart and move upward while crocheting in rows. See the chart.
- A project begins with a foundation chain. For the single crochet one extra chain has to be added to the foundation chain to form the height of the stitch. For example, if you want to end up with 12 single crochet stitches, you need to start with a foundation chain of 13.
- You work "back and forth" (see direction of arrows for each row on the chart) and turn at the end of the row to get you up to the next one.
- At the end of the row you always make 1 turning chain (ch 1) to keep the edges of your work even.
- You usually begin the next row in the first stitch after your turn.
Double Crochet in Rows
You can see that the chart for the double crocheting looks pretty much the same way as for the single crocheting. Just follow the chart. There are a few key points you have to remember when crocheting double crochet:
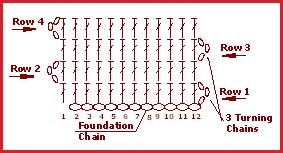
- A double crochet is "taller" than a single crochet. Hence, the number of chains of the foundation chain has to be equal the number of stitches required plus three. Your 15 chains will make 12 stitches.
- First stitch of the first row make into the fourth chain from the hook.
- At the end of each row make 3 turning chains. If you find there is a hole at the start of the rows, chain 2 instead of 3 to get the needed height.
