- Home
- How to Crochet (Start Here)
- Step-By-Step Granny Squares
Step by Step Granny Squares Tutorial
Step-by-Step Granny Squares
Updated by Janice Jones
One of the fun things about Granny's is the wide varieties of designs you can create using the very same basic technique.
There are endless possibilities just by changing colors or types of yarn, the type of stitch, or adding embellishments.
Large and small, dense and lacy, multicolored and plain. Granny Squares are just like snowflakes, no two are ever alike.
 Step by Step Granny Squares
Even though the idea of making Granny Squares is as old as crochet itself, perhaps your grandmother wouldn't recognize the Granny Square in some of their modern interpretations.
Techniques of crocheting don't stay static. Old and well-known Granny Square patterns follow progress. They have become stylish and fashionable. You've heard the saying, that what's old is new again and that adage is so true for granny squares.
Fifty or more years ago, granny squares were predominately used to make afghans or blankets of various sizes. Some creative souls also combined them to form types of clothing such as vests, jackets, or slippers. Granny squares made with thin cotton thread were crocheted in to doilies used to decorate tables and even sofas.
Today we have more uses for granny squares, and lucky for the beginner, granny squares are one of the easiest projects to make.
I can tell you that I learned to crochet by making granny squares. How about you?
Nevertheless, to crochet most of them the same old method is used. We call it crocheting in rounds. But that doesn't mean that granny squares are round. You can create any number of sides, but the most traditional is the four-sided granny square.

An Intro or Review of the Traditional Granny Square
For those well acquainted with the granny square, please feel free to skip this section and go straight to the granny square projects.
A Granny Square, like any crocheting in rounds projects, begins with a magic circle or from from a specified number of chain stitches that are joined into a ring by a slip stitch.
A typical granny square is worked from this ring outward using crochet stitches, such as the double crochet stitch. Just to be clear, the double crochet stitch in the US is also known as the treble crochet in the UK.
You can make as many rounds as you like depending on how big you'd like your square to be.
You can make it all one color, alternate colors, or make each round a different color.
You can even turn it into a hexagon, triangle or a number of other shapes.
There are some videos that follow that include step by step granny square instructions. Depending on the pattern you use to crochet Granny's, you might end up with different combination of single crochet (or dc) and chains.
Abbreviations Used on this Page
ch: chain
sts: stitches
dc: double crochet (US English)
RS: right side
WS: wrong side
rnd: round
ch sp: chain space
Step-by-Step Granny Squares
There are more than one way to make granny squares and endless different patterns are possible. It seems that there are as many ways to make one as there are crocheters out there. The ones on this page are just one example of a basic square.
Step by Step Granny Squares: Step One
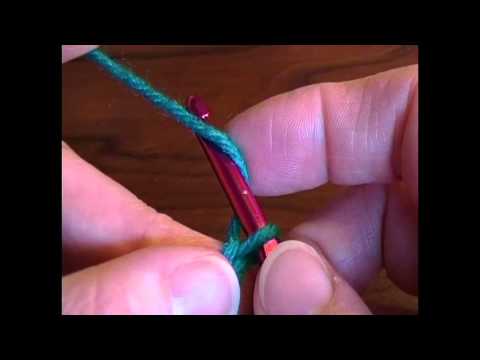
One: Start with a magic circle or chain 4. Connet the chains with a slip stitch to create a ring.
Step by Step Granny Squares Step Two
Two: Make three chain stitches.
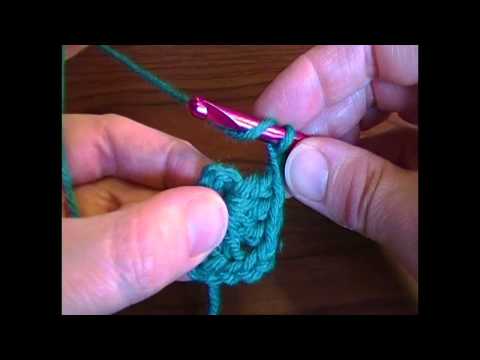
Step by Step Granny Squares Step Three
This video covers round two of the granny square. This round will include making four corners.
First, chain three. Make 2 more double crochet stitches in the chain-2 space. Chain 2. Make 3 more double crochet stitches in the same chain 2 stitch. These six double crochet stitches create a corner.
Next chain one. Make three double crochet in the next chain space. Chain 2. Make three more double crochet stitches in the same chain space. Chain 1.
Repeat this same pattern in the next two corners. Once you have the small square block, chain one. Make a slip stitch into the top of the chain three that you made at the beginning of the round.
Here is what a pattern might look like
Round 2 (RS). Ch 3 (counts as first dc). Make 2 dc in ch sp from previous rnd. Ch. 2 Make 3 dc in same ch sp. Ch. 1.
[Make 3 dc in next ch space. Ch 2. Make 3 dc. in same chain space. Ch 1.] Rep 2 more times to end of round. Ch 1. Connect with a sl st.
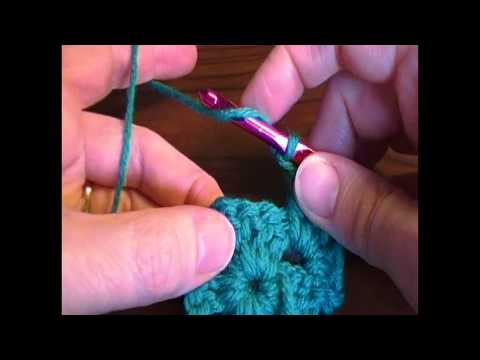
Step by Step Granny Squares Step Four

This video covers the third round of a granny square. You will still create the corners by making two sets of three double crochet stitches, but you will also add a set of three double crochet stitches on each side between the corners.
First make 3 chains. Make two double crochet stitches in the same chain space. Chain 2. Make three more double crochet stitches in the same space. Ch 1. Work three double crochet stitches in the next chain space. Ch. 1. Work three double crochet stitches in corner space. Chain two. Make three double crochet stitches and Ch 1. You have now made one side which includes two corners. Work in a similar way around the square until you get to the end of the round. In the video, she ends the square with a slip stitch and fasten off.
You can make a 3 round granny square, or you can make as many rounds as you like depending on the project you are making.
Step by Step Granny Squares Step Five

This video talks about weaving in ends. Always weave in your ends so that there is no chance that your work will ravel out at some point.
A Slightly Different Version of the Traditional Granny Square
As I mentioned above, you will find many variations of the traditional granny square. I used this method when I made my granny square headband.
Rnd 1: Ch 5 (counts as dc and ch 2), [3 dc in ring, ch2] 3 times, 2 dc in ring, join to ch-5 sp with sl st. (12 dc)
Rnd 2: Ch 5, 3 dc in same ch-5 sp, [ch 1, (3 dc, ch 2, 3 dc) in next ch-2 sp] 3 times, ch 1, 2 dc in first ch-5 sp, join to this round’s ch-5 sp with sl st. (24 dc)
Rnd 3: Ch 5, 3 dc in same ch-5 sp, ch 1, 3 dc in next ch-1 sp, [ch 1, (3 dc, ch 2, 3dc) in next ch-2 sp, ch 1, 3 dc in next ch-1 sp] 3 times, ch 1, 2 dc in first ch-5 sp, join to this round’s ch-5 sp. (36 dc)
Rnd 4 and beyond: Continue in this manner making the corners the same as round 3 but adding 3 additional double crochets groups at each side
Note: That the video presenter turns her work after each round. You may do this or keep the same side facing throughout.

Conclusion
There are so many different designs that can be created with granny squares. The one above is only one but probably the most basic that beginners enjoy making. You may prefer to make each round in your granny square a different color.
To make a colorful granny square, you would make each round in the same way as above but fasten off the yarn at the end of the round. Attach a new color at any corner and begin with the three chains. After that the directions are all the same.
Disclosure:
This post contains affiliate links. If you buy through them, I may earn a small commission at no extra cost to you.

Janice Jones is a Certified Knitting and Crochet Instructor who creates beginner-friendly patterns and tutorials, backed by a 389-page library of practical knitting and crochet content.
Most Popular Pages
All Types of Crochet Stitches

36 Reversible Knit Stitch Glossary

How to Crochet the Second Row

Dog Sweater Patterns

Working with Alpaca Yarn

Free eBooks, Just for You
Get my beginner eBook guides to Knitting and Crocheting, just for signing up for my monthly newsletter.
Choose one or both when you sign up.


About the Author: Please allow me to Introduce myself

Janice Jones is a Certified Knitting Instructor and Certified Crochet Instructor through the Craft Yarn Council who focuses on beginner-friendly patterns, stitch guides, and technique tutorials. She has built a library of 389 pages on her website, sharing practical instructions and patterns, and has completed projects ranging from crochet blankets to knit sweaters. You can explore her work on her website. She makes items for Warm Up America and often knits and crochets sweaters for her small dogs.
Thank you for visiting Smart-Knit-Crocheting. I hope this and all of my tutorials will give you the inspiration to continue your knit or crochet journey. For a complete list of all the pages on my site, please visit my table of contents.
I participant in the Amazon Services LLC Associates Program, an affiliate advertising program designed to provide a means for sites to earn advertising fees by advertising and linking to Amazon.com. “As an Amazon Associate I earn from qualifying purchases.” These earnings go towards supporting my website.

Home | Contact | About | Privacy Policy | Disclaimer
I DO NOT SELL ANY PERSONAL INFORMATION FROM THIS WEBSITE. PLEASE SEE MY PRIVACY POLICY FOR MORE DETAILS.
Copyright © 2006-2026 Smart Knit Crocheting. All Rights Reserved
Please Share
Remember, Sharing is Caring