How to Make a Sweater
Make a Sweater That Fits You
To make a sweater doesn't mean that you have to buy yarn, choose a nice stitch pattern, take your hooks or needles... Sure, you will have to do it. But if you really want to crochet or knit a sweater which doesn't look like it was made for somebody else but you, a good sweater pattern has to be done first.
It is not a bad idea to make a full scale pattern - you can reuse this again and again.
But in most cases a small sketch with your dimensions on it is quite enough.
To make a sweater pattern, you will have to sketch a pattern base grid using your own measurements.
Step-by-step instruction how to do it can be found on the Make a Garment page. Ok, a base grid is ready. Let's make a sweater pattern.
Important Notes:
1. Pattern is designed for crochet and
knit sweaters. Doesn't work for sewing projects.
2.Instruction can be used to make a sweater for women, men, and
kids.
3.To follow the numbers and abbreviations for measurements used in
this example see Make a Garment page mentioned above.
4. Use for a lady sweater with bust circumference (BS/2) no
more than 50 cm (20 in). Information about making a pattern for a
plus size sweater can be found at the Plus
Size Sweater page.
Make a Sweater Pattern
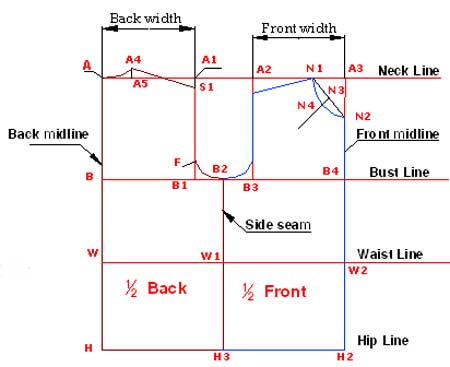
1/2 Back Part
Neck line
Horizontal line AA5 = (NS / 2) / 3 = 18 cm / 3 = 6 cm
AA5 = (NS / 2 ) / 3 = 7 in / 3 = 2.3 in
Vertical line A5A4 = (NS/2) / 9 = 18/9 = 2 cm
A5A4 = (NS/2) / 9 = 7 in / 9 = 0.8 in
Connect points A and A4 with a fluent curve.
Shoulder line
Vertical line A1S1 = constant = 2 cm
A1S1 = constant = 0.8 in
Connect points A4S1 with a straight line.
Distance A4S1 has to be equal to your measurement NSL = 13
cm (5 in)

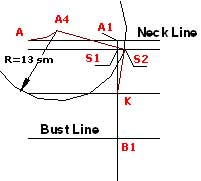
If it is not equal: draw a
horizontal line through point S1 and using point A4 as a center,
draw a circumference till it intersects a horizontal line (point
S2). Find middle point K between points A1 and B1, draw the line
S2K (see a small picture for reference).
Sometimes point S2 can be located not on the right side of the line
A1B1 like on the picture, but on the left side. What should you do
if it happens? Act exactly the same way as described for point S2
located on the right side of the line A1B1.
Armhole line
Measure the distance B1B2. For our example B1B2 = 6 cm. Find point
F: B1F = 2/3 (B1B2) = 2/3 x 6 cm = 4 cm. Connect points F1 and B2
with a fluent curve.

1/2 Front Part
Neck line
Horizontal line A3N1= (NC/2)/3 + 0.5 cm = 18 cm/3 + 0.5 cm =6.5
cm
A3N1 = (NC/2)/3 + 0.2in = 7 in / 3 + 0.2 in = 2.5 in
Vertical line A3N2 = (NC/2) / 3 + 2 cm = 18 cm / 3 + 2 cm =8
cm
A3N1 = (NC/2) / 3 + 0.8 in = 7 in / 3 + 0.8 in = 2.9 in
Draw the line N1N2 and find its midpoint N3 (N1N3 = N3N2). Draw a
perpendicular line N3N4. Distance N3N4 = constant =2 cm
N3N4 = constant = 0.8 in.
Connect points N1, N4, and N2 with a fluent curve.
Armhole line
Mirror the line FB2B3 about a vertical line "Side seam".
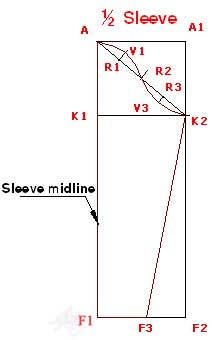
1/2 Sleeve

Distance AA1 = (AC/2) + 3 cm = 15 cm + 3 cm = 18 cm.
AA1 = (AC/2) + 1.2 in = 6 in +1.2 in = 7.2 in.
Draw a line A1F2 parallel to AF1.
Draw a line K1K2 parallel to AA1.
Distance AK1 = (BC/2) / 4 + 3 cm = 48/4 + 3 cm = 15 cm.
AK1 = (BC/2) / 4 + 1.2 in = 19/4 +1.2 in = 6 in.
Distance AF1= (AL) = 56 cm.
AF1= (AL) = 22 in.
Distance F1F3 = (CC/2) = 8 cm + 2 cm = 10 cm.
Distance F1F3 = (CC/2) = 3.2 in + 0.8 in = 4 in.
To finish the top part of the sleeve: Draw an auxiliary line AK2. Divide it into four equal segments: AR1, R1R2, R2R3, and R3K2. There are three points between the points A and K2: R1, R2, R3. Draw perpendicular lines to the segment AK2 at points R1 and R3.
Distance R1V1 = 2 cm (0.8 in), R3V3 = 1.5 cm (0.6 in)
Connect points A, V1, R2, V3, and K2 with a fluent curve.
You've made a sweater pattern. What should you do after that? No matter whether you are going to crochet a sweater or to knit it, you will need to make a gauge swatch. Check a Beginner Crochet page.
Now the last step before you can begin to make a sweater of you dream. It is necessary to calculate number of stitches and rows for your project.
Detailed instructions can be found at Crocheting Basics page.
Please don't be scared with all this calculations.
They are very simple and have good pictures to understand. It is only matter of a proper planning.
You need to make a sweater pattern only once to understand the idea. Next time it will be easy.


