- Home
- Make a Knit or Crochet Garment
Beginner’s Guide to Making Knitted and Crocheted Garments
Last updated November 24, 2025
Making your first knitted or crocheted garment is an exciting milestone—one that many beginners dream about but often feel nervous to attempt. The good news? Garments aren’t as intimidating as they seem when you break the process into small, manageable steps.
Whether you want to create a cozy sweater, a simple vest, a breezy crochet top, or an adorable baby sweater, you can absolutely do this. I’ll walk you through each step in a calm, beginner-friendly way so you feel supported from cast-on to bind-off.
Think of this page as your Garment-Making Hub. From here, you can explore detailed step-by-step patterns, learn essential garment techniques, and gain the confidence to choose your first wearable project.
Let’s get started—one gentle step at a time.
Choosing Your First Garment
Your success truly begins with the right project. You want something that teaches foundational skills while minimizing frustration.
Beginner-Friendly First Garments
✔ Baby Sweaters
Quick to knit or crochet, less yarn, forgiving sizing. A perfect practice run before making an adult garment. If you take any knitting or crochet certification classes, your first project will likely be a baby sweater.
✔ Simple Vests
No sleeves means far less shaping. Look for straight edges, simple armholes, and minimal neckline shaping.
✔ Cardigans With Drop Shoulders
Drop-shoulder construction avoids complicated armhole shaping and gives you lots of room to learn.
✔ Crochet Tops Made from Squares or Rectangles
Minimal shaping and plenty of flexibility in style and fit.
✔ Raglan or Top-Down Seamless Sweaters
Easy to try on as you go (great for beginners who worry about fit).
Materials & Tools You’ll Need
Before you get started, gather everything in one place so your project flows smoothly from beginning to end.
Yarn
Choose a yarn weight your pattern recommends (or select a substitute using YarnSub). Yarn Sub is a good resource to bookmark, as it offers many options for the yarn specified in the pattern. For beginners, worsted or DK weight yarns are the easiest to work with for garments.
Buy one extra skein to allow for swatching and any unplanned adjustments.
Knitting Needles or Crochet Hooks
Depending on your craft, you may need:
For Knitting:
- Straight or circular needles (Check the pattern)
- Circulars for all flat pieces (they hold stitches comfortably)
- DPNs or small-circumference circulars for sleeves
For Crochet:
- One main hook size
- A second hook size for edging or adjusting tension
Notions
- Stitch markers
- Tapestry needle
- Scissors
- Measuring tape
- Row counter (optional)
- Blocking tools
- Pen or pencil for jotting notes
- Additional supplies required by your pattern, ie, buttons
Taking Accurate Body Measurements
Before you can shape a perfectly fitting garment, you’ll need accurate body measurements. This step may feel a little intimidating at first, but don’t worry — with a soft tape measure and a few minutes of patience, you can gather everything you need. These measurements become the foundation for customizing your garment so it fits comfortably and looks polished.
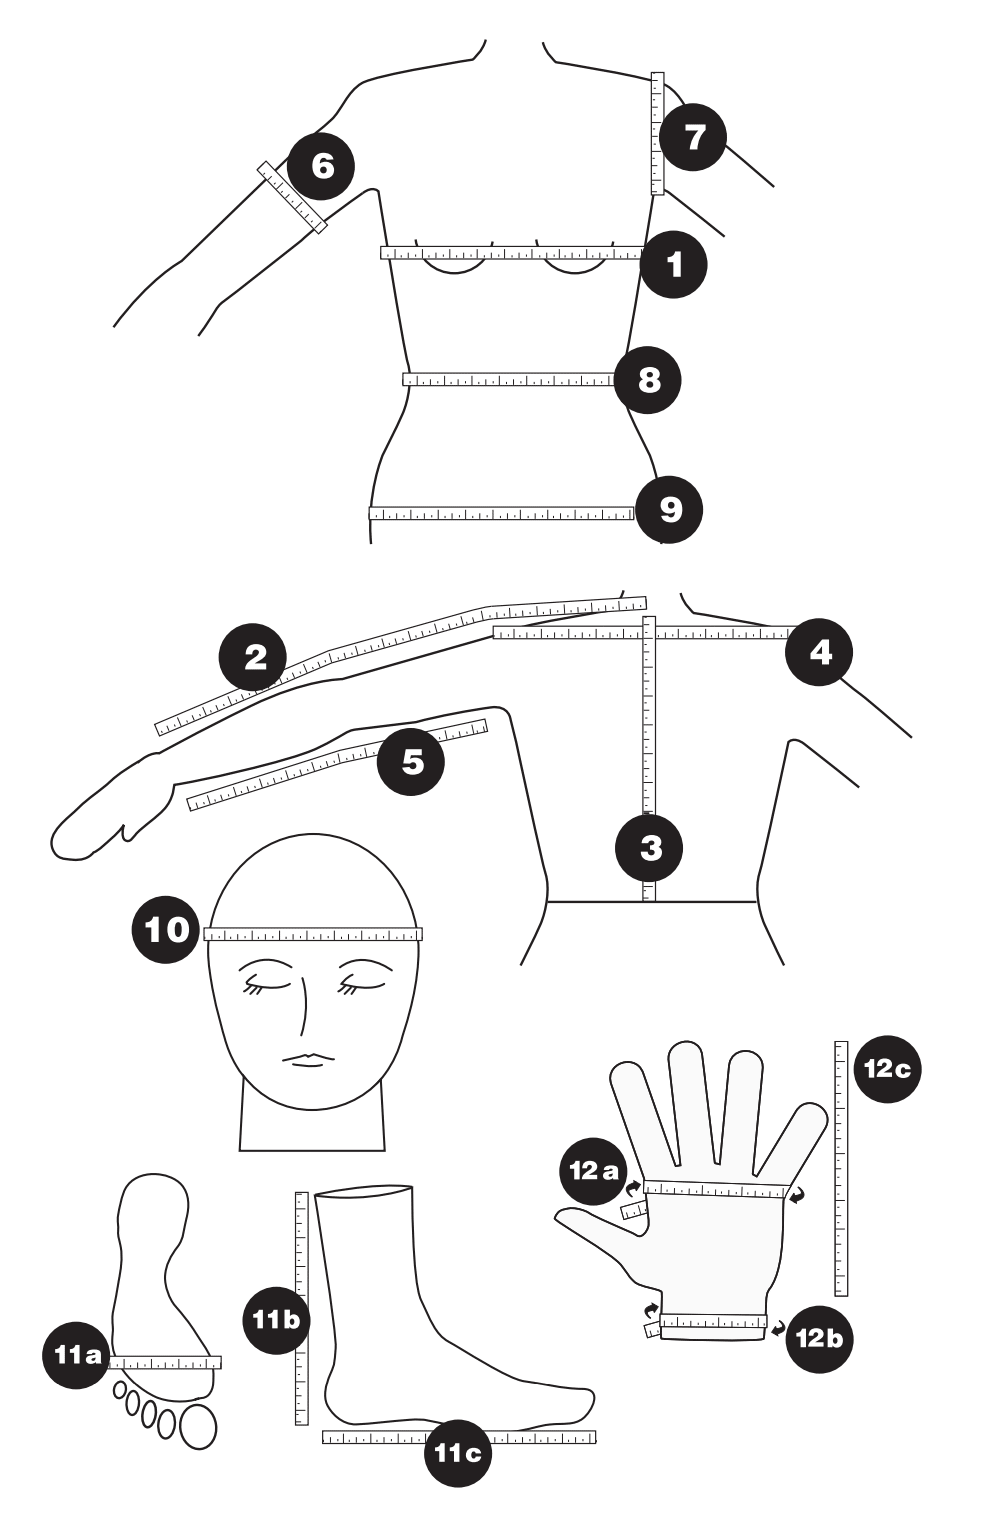
Below are the key measurements every knitter should take before beginning a sweater, top, or fitted knit project.

- Chest/Bust
- Center Back Neck–to-Wrist
- Back Waist Length
- Cross Back
- Arm Length
- Upper Arm
- Armhole Depth
- Waist
- Hip
- Head Circumference
- Sock Measurements
11a. Foot Circumference
11b. Sock Height
11c. Total Foot Length
12a. Hand Circumference
12b. Wrist Circumference
12c. Hand Length
1. Bust or Chest Circumference
Measure around the fullest part of the chest, keeping the tape straight across the back and level with the floor. This is one of the most critical measurements in garment construction and will influence your size selection and shaping.
2. Upper Bust (Optional but Helpful)
Measure just under the armpits and above the full bust. If you have a fuller bust, this number helps achieve a more tailored fit.
3. Waist
Wrap the tape measure around your natural waistline — the smallest part of your torso. Don’t suck in your stomach. Relax and breathe normally so you get an accurate measurement.
4. Hips
Measure around the fullest part of your hips and backside. This is especially important for sweaters, tunics, or garments that extend below the waist.
5. Shoulder Width
Measure from the edge of one shoulder bone straight across to the other. This helps determine yoke fit and the ideal placement of sleeves.
6. Back Length
Start at the base of the neck (where that small bump is) and measure straight down to the desired garment length — waist, hip, or wherever your pattern ends.
7. Armhole Depth
With your arm relaxed at your side, measure from the top of the shoulder down to the crease of the underarm. This helps ensure sleeves are comfortable and not too tight.
8. Sleeve Length
Bend your arm slightly — the way you naturally hold it — and measure from the top of the shoulder down to the wrist. This prevents sleeves from ending up too short or too long after knitting.
9. Wrist Circumference
Measure around the wrist bone. This is mainly used for shaping fitted sleeves or cuffs.
10. Neck Circumference
For garments with a crew neck, turtleneck, or collar, measure around the base of the neck where the neckline will sit.
Helpful Tips For Taking Measurements
- Write everything down immediately and label your measurements clearly. You’ll refer to them over and over.
- Round to the nearest ¼ inch unless the pattern specifies otherwise.
- If you’re between sizes, choose the size closest to your bust and adjust other measurements in the shaping.
- Remember: knitted fabric stretches, so your measurements should be accurate but not overly tight.
- Compare your measurements to those on the pattern. These measurements help you choose a size, modify a pattern, and understand your own fit preferences.
For more information on taking and understanding body measurements, visit the Craft Yarn Council Website.
Understanding Ease (Fit Room)
Before you begin knitting or crocheting any garment pattern, it’s essential to understand a concept called ease. Ease refers to the extra room built into a garment, allowing you to move, breathe, and feel comfortable while wearing it. Without ease, a sweater would fit like a second skin, a skirt might feel restrictive, and a top could pull across the shoulders or bust. Ease is the difference between your body measurement and the measurement of your finished garment. It affects comfort, movement, silhouette, and style. Purl Solo offers an excellent explanation for this concept.
When we knit or crochet, fabric behaves differently than store-bought woven fabric, so the amount of ease you choose can make a big difference in how your finished piece feels and drapes on the body.
Two Types of Easy:
Wearing Ease
This is the ease that allows you to move naturally. Bending your arms, reaching forward, sitting down, and breathing comfortably.
Most everyday garments, such as sweaters, cardigans, simple tops, and skirts, include positive ease—usually 1 to 4 inches, depending on the style and yarn weight.
Wearing Ease:
- For everyday sweater comfort.
- Typical: 1–4 inches of positive ease
Two Types of Ease:
Design Ease
This type of ease is added intentionally to create a particular look: Oversized sweaters, Boxy tops, Tunic-style garments, Slouchy or relaxed silhouettes
Design ease can range widely—sometimes 6–10 inches or more—depending on the effect you want to achieve.
2. Design Ease:
- Added to create specific looks: boxy, oversized, cropped, and more.
- Typical: 6–10+ inches
How to Choose the Right Ease for You
Here are a few general guidelines:
- Fitted garments: 0–2 inches of ease
- Standard everyday fit: 2–4 inches of ease
- Relaxed fit: 4–6 inches of ease
- Oversized or boxy: 6 inches or more
Keep in mind that highly elastic stitch patterns (like ribbing or some lace) behave differently from dense stitches like single crochet or stockinette knit. Stretchy fabrics often require less ease, while firm or stiff fabrics may need more to feel comfortable.
Ease and Yarn Choice
Yarn weight and drape also influence ease.
- Heavy yarns (bulky weight) produce thicker fabrics and may require additional ease to prevent the garment from feeling tight.
- Lightweight yarns (sport or fingering) produce more fluid fabrics and can be worked with less ease for a flattering silhouette.
Why Ease Matters
Understanding ease helps you customize a garment so it actually fits your body and not someone else’s. It allows you to adjust any pattern, even a commercial one, or to begin designing from scratch when you are ready.
Once you know your measurements and the type of fit you prefer, you can easily adapt your knitting or crocheting to create clothing that feels good and matches your personal style.
Swatching for Garments
Swatching is a non-negotiable step, especially for sweaters or anything meant to fit.
Your swatch should:
- Be at least 4" × 4"
- Be blocked the same way you’ll block your finished garment
- Use the exact yarn and needles you plan to use
- Use the exact stitch pattern you will use on your garment. Remember, the gauge varies depending on the stitch type.
Write down:
- Stitch gauge
- Row gauge
- Needle size used
Matching gauge = matching the intended size of the pattern.
Learn more about how to calculate gauge for knitting.
Learn more about how to calculate gauge for crocheting.
Construction Methods: Choose the Right Style for You
Garments are built in several different ways. Understanding these methods helps you select patterns you’ll enjoy making.
Top-Down Sweaters (Seamless)
- Great for beginners
- Easy to try on as you go
- Perfect for customizing length
- Explore: Seamless Sweater Tutorial
Bottom-Up Sweaters
- Traditional method
- Pieces joined together at the end
- Offers structure and stability
- Explore: Make a Sweater
Drop Shoulder Construction
- Minimal sleeve shaping
- Very forgiving
- Beginner-friendly
- Explore: Cardigan Sweater (drop shoulder)
Motif-Based Crochet Tops
- Worked from squares or rectangles
- Excellent for crocheters of all skill levels
- Easy to customize
- Explore: Crochet Top
Plus-Size Considerations
- Understanding ease, drape, and shaping becomes even more critical.
- Explore: Plus Size Sweater Guide
First Garment Tips for Success
- Choose smooth, light-colored yarn for your first project (avoid black or dark brown)
- Take your time with measurements and gauge
- Read through the entire pattern before beginning. If there is anything you don't understand, research the technique and practice it before starting your garment.
- Keep a notebook for notes and corrections
- Try on the garment at key milestones whenever possible
- Block your finished sweater—it makes a world of difference
- And most importantly: be patient with yourself. Learning to make garments is a joyful step in your crafting journey.
Related Pages
Make a Sweater: How to make a set-in sleeves sweater pattern.
Crochet Top: How to crochet a sleeveless top of motifs.
Cardigan Sweater: A drop-shoulder cardigan for women.
A Baby Sweater: Make your pattern. Step-by-step instruction.
Crochet Slipper Pattern: Granny square project.
Frequently Asked Questions
Do I need to be an advanced knitter or crocheter to make a garment?
Do I need to be an advanced knitter or crocheter to make a garment?
Absolutely not. With the correct beginner-friendly pattern, you can make a garment after learning just a few basic stitches.
What yarn weight is best for a first garment?
What yarn weight is best for a first garment?
Worsted or DK weight yarns are easiest to work with and produce garments that grow quickly without being bulky.
How do I choose my size?
How do I choose my size?
Use your bust or chest measurement as your primary guide, then check ease recommendations to match the fit you prefer.
Do I need to block my garment?
Do I need to block my garment?
Yes, blocking smooths out stitches, improves drape, and helps your finished piece fit beautifully.
What if my gauge doesn’t match the pattern?
What if my gauge doesn’t match the pattern?
Change your needle or hook size.
- Too many stitches? Go up a size.
- Too few stitches? Go down a size.
Make a Garment: Pin for Future Reference
Conclusion
Learning how to make a garment opens up a whole new world of knitting and crochet possibilities. With the proper foundation, measurements, ease, yarn choice, and a beginner-friendly pattern, you’re well on your way to creating beautiful, comfortable clothing you’ll be proud to wear.
Start with a simple project, such as a basic vest or a simple stockinette stitch baby sweater. Take your time and enjoy the process. I’ll be here cheering you on every step of the way.


