- Home
- Types of Knit Stitches
- Slip Stitch Patterns
Slip Stitch Knitting Patterns: Discover How to Create Stunning Designs
Slip Stitch Knitting Patterns by Janice Jones, Last updated 05-04-2026
As a knitter, you may already be familiar with basic stitches like garter stitch or even more intricate lace designs. But if you are ready to try something new that adds texture and visual interest without being difficult to learn, slip stitch knitting is a great next step.
Slip stitch patterns are created by moving stitches from one needle to the other without knitting or purling them. This simple technique can produce beautiful textures, colorwork effects, and unique designs that look far more complex than they actually are.
In this guide, you will learn how slip stitches work, the different ways to use them, and several beginner-friendly patterns you can try right away.
What Is Slip Stitch Knitting?
Slip stitch knitting is a technique where you move one or more stitches from the left needle to the right needle without knitting or purling them. The stitch is simply slipped across the needle and worked later, or left unworked to create texture, color patterns, or decorative floats.
For beginners, the good news is that the actual movement is simple. Most slip stitch patterns only ask you to slip a stitch purlwise or knitwise and hold the yarn either in front or in back of your work.
Introduction to Slip Stitch Knitting Patterns: Advantages
Not all knitting patterns make use of slipping stitches, but those that do all have a few things in common:
- They add texture and visual interest.
- Slip-stitch patterns can add a decorative element to plain knitting designs.
- Some slip-stitch knitting patterns are reversible, meaning that the right side of the fabric looks identical to the wrong side of the knit fabric.
- They can be used in many different projects, such as scarves, blankets, washcloths, and more advanced wearables.
The good news is that making a slip stitch is super easy. Slip stitch knitting patterns use a technique in which stitches on the left needle are moved to the right needle without knitting or purling them.
Stitches can be slipped knitwise or purlwise, meaning that stitches are slipped between needles as if to knit (knitwise) or as if to purl (purlwise).
You will also encounter slip-stitch directions that ask you to hold the yarn in the front or the back of the work to create different results.
Some slip stitch knitting patterns involve working with two or more colors and manipulating stitches to create various effects. The beauty of slip-stitch patterns lies in their simplicity.
Common Techniques for Making Slip Stitch Knitting Patterns
There are just a couple of ways to create slip stitches, each done slightly differently.
1. How to Make the Slip Stitch Purlwise
This is likely the most common slip stitch technique (as if to purl).
- With the yarn in back, insert your right needle into the next stitch on the left needle as if to purl.
- Slip it to the right needle without purling it.
- Pattern abbreviation: Sl1 or Sl1P WYIB (read Slip one stitch or Slip 1 purlwise with yarn in back)
- If the pattern does not specify how to make the slip stitch, assume that you will slip the stitch purlwise.
2. How to Make Slip Stitch Knitting Patterns Knitwise
To make a slip stitch knitwise (as if to knit), follow these steps. This technique is less common.
- Insert your right needle into the next stitch on your left needle as if to knit.
- Slip the stitch directly to the right needle without knitting it.
- This technique is seen when making knitting decreases (SSK or SKP)
3. With Yarn In Front or Held in Back
The other thing to know about slip stitches, besides purlwise or knitwise, is where to hold the yarn. It can be held in the back or the front.
You will know where to hold the yarn because the pattern will use these abbreviations: WYIB or WYIF
- WYIB: With yarn in back (also yb - yarn back or wyb with yarn in back)
- WYIF: With yarn in front (also yf - yarn forward or wyf with yarn in front)
These abbreviations tell you where to hold the yarn, not whether you are working on the right or wrong side of the fabric. In this case, when the yarn is in front, it is facing and closest to you, even if you are working on the wrong side of the fabric.
Slip Stitch Knitting: WYIB vs WYIF Explained

Using a Knitting Chart
Slipped stitch patterns are generally easy to follow using written instructions. However, some people prefer charts. Here are a couple of examples for you.
Stamen Stitch Pattern
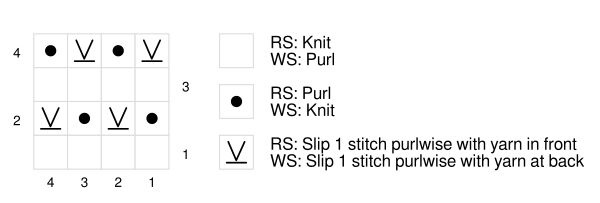
Another Example of a Slip Stitch Pattern

Different Types of Slip Stitch Patterns
These patterns create a variety of beautiful, textured fabrics.
- One color, textured patterns: A variety of beautiful textured fabrics
- Another popular type is the slip-stitch mosaic pattern, which involves slipping stitches from the previous row and working them in a contrasting color. This technique creates a beautiful mosaic effect and is perfect for adding pops of color to your knitting.
- Still another type is the slip-stitch cable pattern, which combines slip stitches and twisted stitches to create the appearance of cables without a cable needle. This technique is excellent for creating intricate cable designs with a twist.
- Additionally, slip-stitch colorwork patterns, such as slip-stitch stripes or slip-stitch fair isle, allow you to incorporate multiple colors effortlessly.
Common Slip Stitch Patterns at a Glance
| Pattern | Texture | Difficulty | Best For |
|---|---|---|---|
| Linen Stitch | Woven, dense | Beginner | Coasters, placemats |
| Half-Linen Stitch | Woven, softer | Beginner | Scarves, garments |
| Slip Stitch Rib | Stretchy, textured | Beginner | Cuffs, hats |
| Cartridge-Belt Rib | Firm, structured | Beginner | Edges without purling |
| Stamen Stitch | Textured, slightly raised | Beginner | Dishcloths |
| Double Woven Stitch | Thick, layered | Intermediate | Warm fabrics |
How to Choose the Right Slip Stitch Pattern
If you are just starting out, choose a simple pattern, such as the linen stitch or slip-stitch rib. These patterns are easy to follow and help you get comfortable with slipping stitches.
If you want a more textured or decorative look, try patterns such as the double-woven stitch or the cartridge-belt rib. These create thicker fabrics with more structure.
For colorwork, slip-stitch mosaic patterns are a great choice because they let you work with multiple colors without handling more than one yarn at a time.
Start simple, build confidence, and then explore more complex designs as your skills improve.
Beginner-Friendly Slip Knitting Patterns to Try Right Now
Here is a way to practice a slip-stitch pattern and make a cute coaster at the same time using the linen stitch pattern. The linen stitch is not reversible, but does look nice on either side. If this feels confusing at first, that’s completely normal—slip stitches take a few rows to click.
1. Linen Knit Stitch Pattern
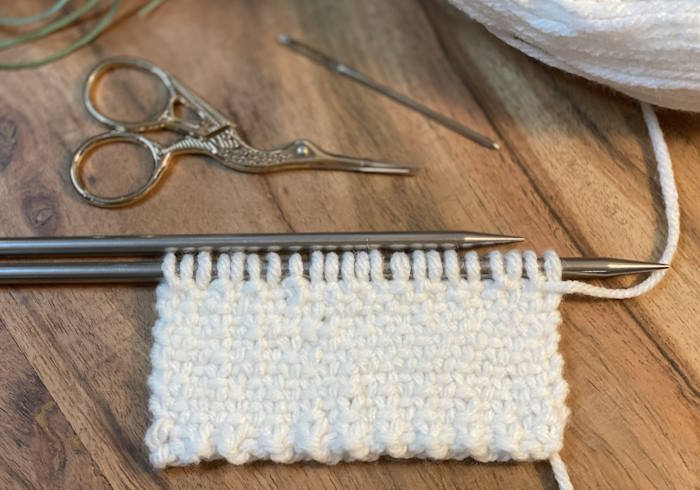
How to Make the Knit Linen Stitch Pattern
2. Mock Ribbing Slip Stitch Design
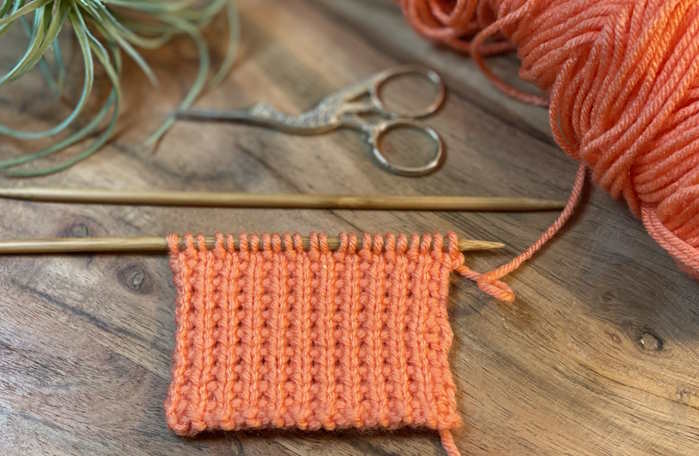 Mock Ribbing Slip Stitch Right Side
This knit pattern includes knit and purl stitches and rib stitches. I’ve included it here as an example of a slip stitch pattern because it is easy to master, even for beginners.
The Mock Ribbing Slip Stitch Knit Pattern
3. Vertical Stripe Slip Stitch Pattern
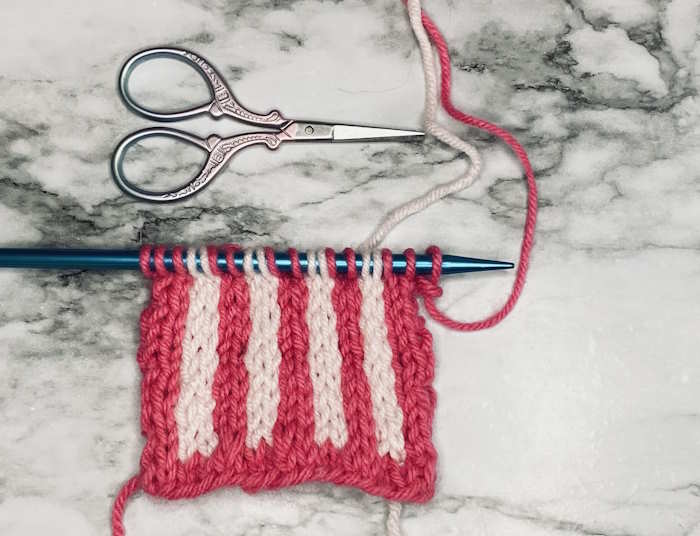
To make this sampler, you will need to cast on a multiple of 4 stitches. I used worsted-weight yarn number 4 and 10 (5 mm) needles.
Cast on with Color B and purl one row. Working a purl row first adds a nice, smooth bottom border.
CO. 20
CA = Light Pink yarn (Or colors of your choice)
CB = Dark Pink yarn
Next, continue to the pattern repeat below.
Row 1 (RS): With A, k1, * sl 2 wyib, k2; rep from *, end sl 2, k1.
Row 2: With A, k1, * sl 2 wyif, p2; rep from *, end sl 2, k1.
Row 3: With B, k1, * k2, sl 2 wyib; rep from *, end k3.
Row 4: With B, k1, * p2, sl 2 wyif; rep from *, end p2, k1.
Repeat rows 1-4 until the desired length has been reached.
Finish with one more purl row and then bind off and weave in ends.
4. Knit Stamen Stitch Pattern & Free Pattern
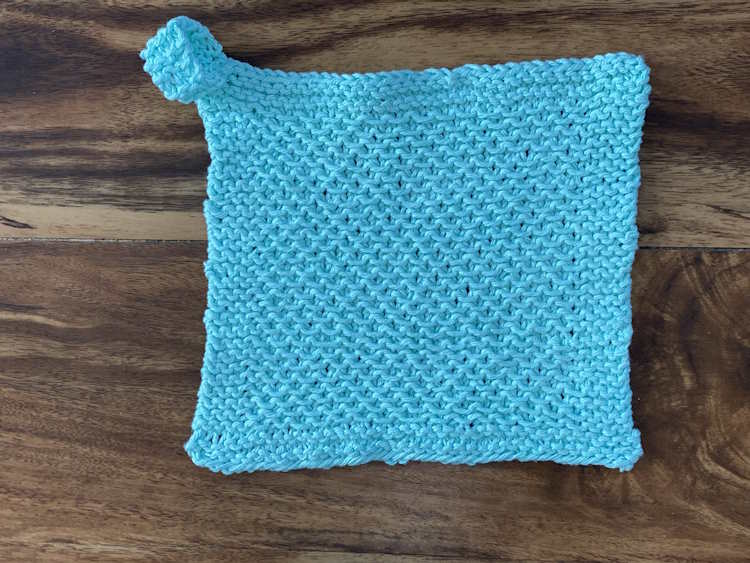 Knit Stamen Stitch Dishcloth
This is a very easy pattern if you are just getting started with slip stitches. It requires alternating slipping stitches purlwise and then knitting a stitch. Every other row is entirely made of knit stitches. Since each slipped stitch is followed by a knit stitch, the floats you create are easy to manage and thus you shouldn't have too much trouble with tension.
Learn how to make the Knit Stamen Stitch and Dishcloth
5. Double Woven Stitch Pattern
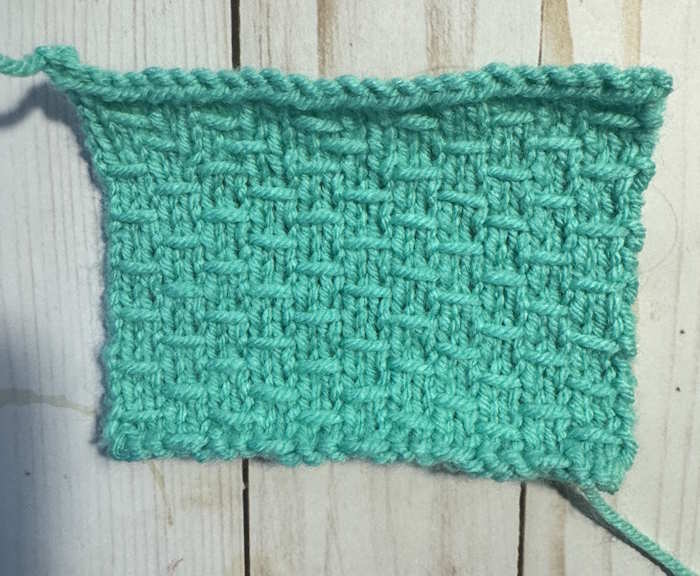
This lovely knit stitch pattern is an easy example of slip stitch knitting. Slip stitches are made by slipping stitches from the left needle to the right needle without knitting or purling the stitch.
This results in a fabric where the slipped stitch looks like a bar that floats on the side of the fabric where the slipped stitches were made.
Double Woven Knit Stitch Tutorial
6. Half-Linen Knit Stitch Pattern
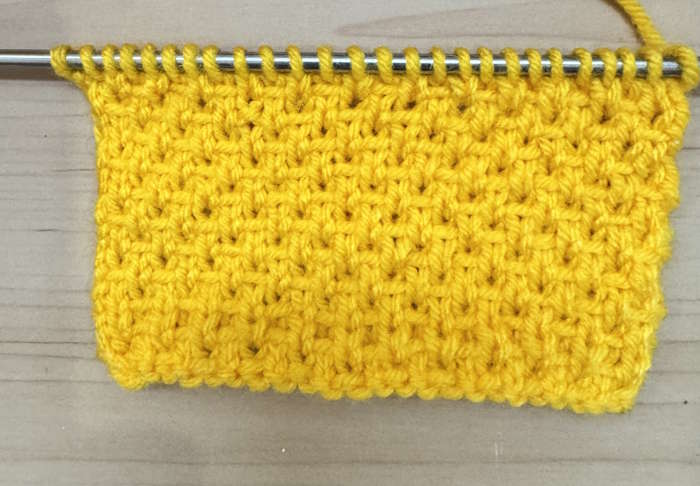
The half-linen knit stitch pattern is a woven stitch created with slip stitches to produce a tight, dense fabric, but not quite as tight as the Linen Stitch.
So, it is a great compromise for projects that need a woven look but don’t need the tight fabric of the linen stitch.
Half-Linen Knit Stitch Pattern
7. Cartridge-Belt Rib
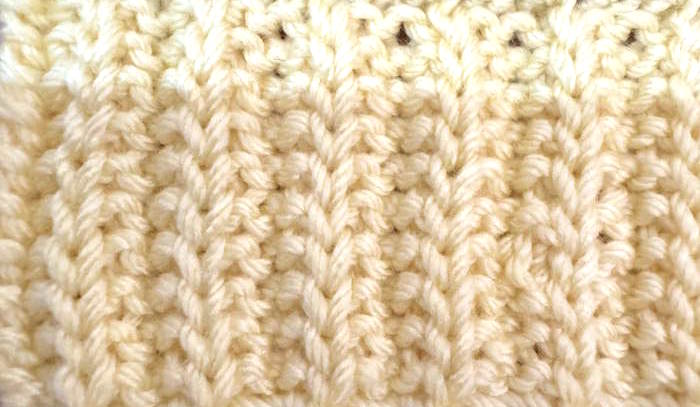 Cartridge-Belt Rib Stitch
If you hate to purl but need to make a rib stitch, the cartridge belt rib stitch is perfect for you. You must know how to make the knit stitch, but the slip stitches replace all purl stitches.
cartridge-belt-knit-stitch.jpg
8. Slip Stitch Rib
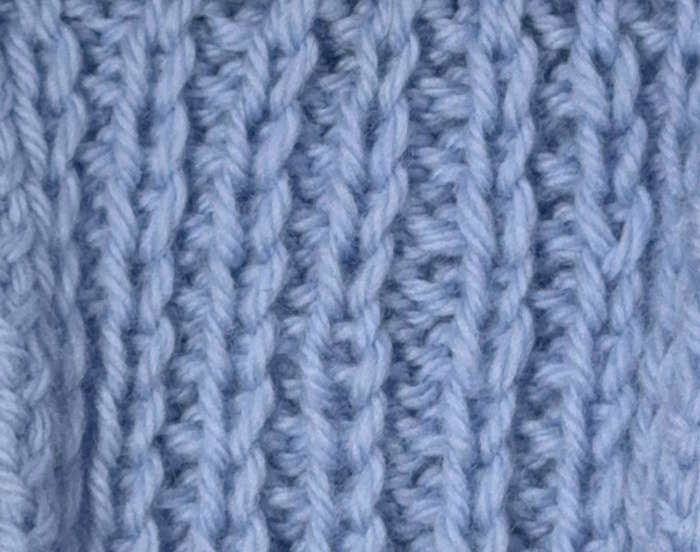 Slip Stitch Rib
This is one of the easiest slip stitch patterns you will find. With only a two row repeat, and knits and purls, it's the perfect introduction to slip stitches for the beginner.
Whelk Stitch
 Knit Whelk Stitch
This stitch pattern uses a series of slip stitches to create a fabric that resembles the sea whelk. It is worked on a four-row repeat and a stitch repeat of multiples of 4 plus 3.
Tips for Creating Stunning Designs with Slip Stitch Patterns
To create stunning designs with slip stitch patterns, consider the following tips:
- Choose the Right Yarn: Opt for a yarn that showcases the texture and color changes of slip stitch patterns. Variegated or gradient yarns can add depth and dimension to your designs. However, if you are aiming for a highly textured fabric where stitch definition is important, a solid color may be your best bet. I prefer a thicker yarn, such as a number 5 or 6, bulky or super bulky. I always select knitting needles that are a size or two larger, as many slip stitch patterns tend to create thick fabric.
- Practice Tension: Slip stitch patterns often require a looser tension to allow the slipped stitches to stand out. Experiment with your tension until you achieve the desired effect. This was my biggest challenge.
- Experiment with Colors: Slip stitch patterns are an excellent opportunity to play with colors. Try different color combinations to create unique and eye-catching designs. If making something for your home, pick two colors that complement each other and would work well with your current decor.
- Combine with Other Stitch Patterns: Don't be afraid to mix slip stitch patterns with other stitch patterns, such as garter stitch or ribbing, to create interesting textures.
- Block Your Work: Blocking is essential to enhance the stitch definition and even out the fabric. Take the time to block your slip-stitch projects for a polished, professional finish. Most slip stitch patterns are thick and compact; most do not curl, so you may be tempted to avoid the blocking step. Blocking always makes your work look more professional.
Knitting Techniques for Working with Slip Stitch Patterns
Working with slip stitch patterns requires a few specific techniques to achieve the desired results. Here are some key techniques to keep in mind.
- Carrying Yarn: In slip-stitch colorwork patterns, it's essential to carry the yarn not in use loosely across the back of the work. This prevents the fabric from puckering and allows for smooth color transitions. When changing colors, twist the two strands of yarn before beginning the new row.
- Twisting Stitches: Some slip-stitch patterns may require twisting the slipped stitch in subsequent rows. This creates a more defined and elongated stitch, adding to the overall design. If the pattern does not call for twisted stitches, be sure all of your stitches are knit/purl or slipped properly.
Remember how stitches rest on the needle. There are always two legs of each stitch, the leg closest to you and the one on the other side of the needle. In proper formation, the leg closest to you should also be the leg closest to the working stitches.
Popular Slip Stitch Patterns for Beginners
If you're new to slip stitch patterns, there are several beginner-friendly options to get you started. Here are a few popular patterns:
- Slip Stitch Dishcloth: This simple pattern combines slipped stitches with garter stitch to create a textured and absorbent dishcloth. It's an excellent project for practicing slip stitch techniques. Likewise, if you want to tackle something a little more challenging, a place mat or small doilie lends themselves to slip stitch designs.
- Slip Stitch Hat: Knitting a hat with slip stitch patterns allows you to experiment with color changes and create a unique design. Choose a pattern that incorporates simple slipped stitch motifs for a manageable project.
- Slip Stitch Scarf: A slip stitch scarf is a versatile accessory that can showcase a variety of slip stitch patterns. Start with a basic slip stitch stripe pattern and gradually explore more complex designs.
Advanced Slip Stitch Patterns for Experienced Knitters
For experienced knitters looking for a challenge, advanced slip stitch patterns offer endless possibilities. Here are a few examples:
- Slip Stitch Lace Shawl: Combine slip stitches with lace motifs to create an intricate and delicate shawl. This pattern requires careful attention to detail but results in a breathtaking finished piece. Plan to use needles several sizes larger than you normally would.
- Slip Stitch Colorwork Sweater: Knitting a sweater with slip stitch colorwork allows you to showcase complex color patterns without the need for stranded knitting. Choose a pattern that incorporates multiple slip stitch motifs for a visually stunning garment.
- Slip Stitch Cable Blanket: This pattern combines slip stitches with cable techniques to create a cozy and visually appealing blanket. The combination of textures and colors makes for a truly remarkable project.
Conclusion:
Slip stitch patterns may look impressive, but they are surprisingly simple once you understand how they work. Even if you are still getting comfortable with your knit and purl stitches, you can successfully learn this technique.
If your stitches feel a little awkward at first, that is completely normal. Take your time, practice a few rows, and you will start to see the pattern come together.
Start with one of the beginner-friendly patterns above, and remember—every row you knit builds your skill and confidence. You are making real progress, one stitch at a time.
Disclosure:
This post contains affiliate links. If you buy through them, I may earn a small commission at no extra cost to you.

Janice Jones is a Certified Knitting and Crochet Instructor who creates beginner-friendly patterns and tutorials, backed by a 389-page library of practical knitting and crochet content.
Most Popular Pages
Comprehensive Guide to Yarn

All Types of Crochet Stitches
36 Reversible Knit Stitch Glossary
How to Crochet the Second Row
Dog Sweater Patterns
Working with Alpaca Yarn
Free eBooks, Just for You
Get my beginner eBook guides to Knitting and Crocheting, just for signing up for my monthly newsletter.
Choose one or both when you sign up.
About the Author: Please allow me to introduce myself
Janice Jones is a Certified Knitting Instructor and Certified Crochet Instructor through the Craft Yarn Council who focuses on beginner-friendly patterns, stitch guides, and technique tutorials. She has built a library of 389 pages on her website, sharing practical instructions and patterns, and has completed projects ranging from crochet blankets to knit sweaters. You can explore her work on her website. She makes items for Warm Up America and often knits and crochets sweaters for her small dogs.
Thank you for visiting Smart-Knit-Crocheting. I hope this and all of my tutorials will give you the inspiration to continue your knit or crochet journey. For a complete list of all the pages on my site, please visit my table of contents.
I participate in the Amazon Services LLC Associates Program, an affiliate advertising program designed to provide a means for sites to earn advertising fees by advertising and linking to Amazon.com. “As an Amazon Associate I earn from qualifying purchases.” These earnings go towards supporting my website.
Home | Contact | About | Privacy Policy | Disclaimer
I DO NOT SELL ANY PERSONAL INFORMATION FROM THIS WEBSITE. PLEASE SEE MY PRIVACY POLICY FOR MORE DETAILS.
Copyright © 2006-2026 Smart Knit Crocheting. All Rights Reserved
Please Share
Remember, Sharing is Caring