- Home
- Knit and Purl Stitches
- Linen Knit Stitch
Linen Knit Stitch Pattern: A Beginner-Friendly Tutorial
Linen Knit Stitch Pattern, by Janice Jones
Need something that looks like an intricate woven look fabric that is dense, thick, and highly textured? The Linen Knit Stitch might work for you.
The Linen Stitch knitting pattern is a slipped stitch knitting pattern that creates a dense, firm fabric. With its tight texture and beautiful drape, it resembles woven linen.
In this comprehensive guide, we will explore the Linen Stitch Pattern, its characteristics, and how to knit it. In addition, at the end of the tutorial, you'll find a free pattern for an easy dishcloth.
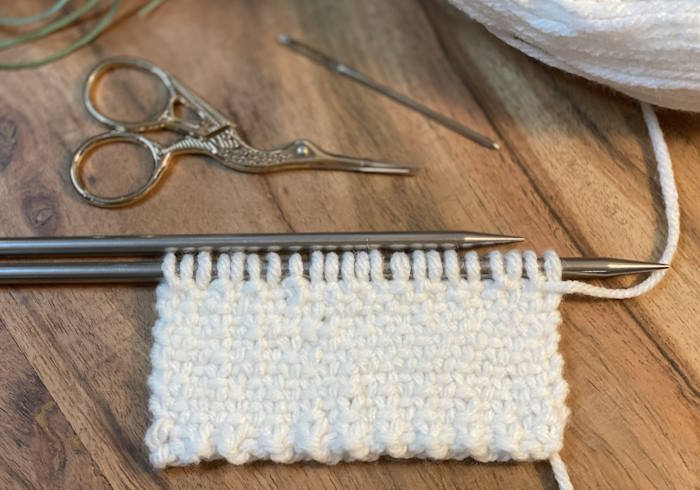
What is a Linen Knit Stitch Pattern?
This stitch is perfect for creating placemats, pot holders, table runners, washcloths, blankets, and even market bags or knit baskets.
You can create an even denser fabric if you use a needle size that is smaller than would be appropriate for the type of yarn you are using. If you want a fabric with a nice drape, try working it with a larger needle.
The alternating slipped stitches and knits or purls give the fabric a unique look that is both elegant and sturdy. It is also a great choice if you want to add some color to your work without having to learn Fair Isle or Intarsia.
It can be worked on both straight needles as well as circular needles.
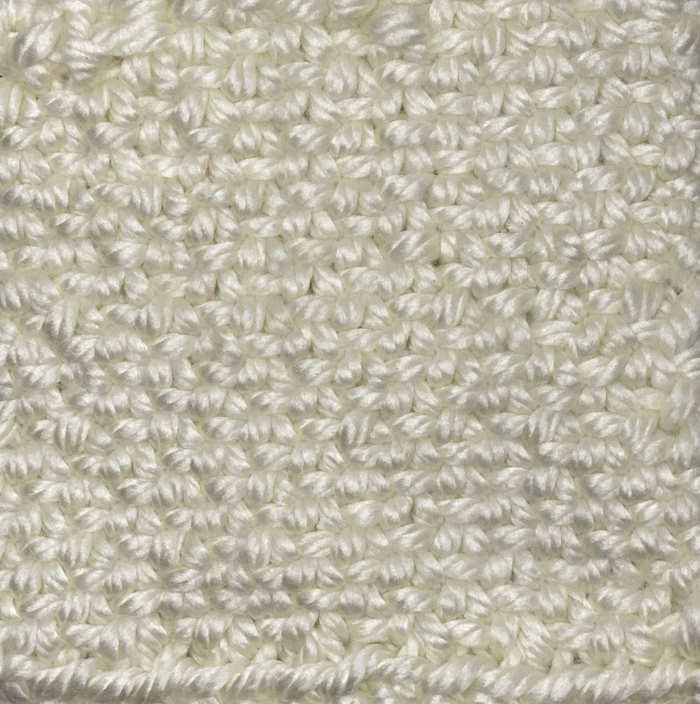 Linen Knit Stitch Pattern (Front of the work)
Skill Level

Easy: It requires slip stitches.
Abbreviations Used
K – knit
P – purl
Wyif – with yarn in front
Wyib – with yarn in back
Sl (sl st) slip (slip stitch)
Sl 1P – Slip one purlwise
RS – right side
WS – wrong side
CO – cast on
* * - Repeat instructions between asterisks for the number of times indicated.
How to Make the Slip one Purlwise with yarn in front (Sl 1p wyif)
With the yarn in front as if to make a purl stitch, insert the right needle into the next stitch as if you are going to purl it, but just slip it off the left needle and onto the right needle.
How to Make the Slip one Purlwise with yarn in the back (Sl 1p wyib)
With the yarn in the back, as if you were going to make a knit stitch, insert the right needle into the next stitch as if you are going to purl it, but just slip it off the left needle and onto the right needle.
The woven-like texture is created by performing these two maneuvers.
Skills Needed
How to make a slip stitch, purlwise
How to block (optional)
Notes About the Linen Knit Stitch Pattern
The Linen Stitch has several characteristics that make it a favorite among knitters:
- Dense and Sturdy: The Linen Stitch creates a tight and durable fabric, making it ideal for projects requiring structure and longevity.
- The slipped stitches make this fabric thicker than other knit fabrics.
- Subtle Texture: The texture of the Linen Stitch is relatively understated, giving the fabric a sophisticated and refined appearance.
- Can be worked on either an odd or even number of stitches.
- Non-Reversible: Unlike some other stitch patterns, the Linen Stitch is not reversible. However, both sides of the fabric are visually appealing, with the wrong side resembling the popular Seed Stitch.
- Flat and Non-Curling: The Linen Stitch lays flat without curling along the edges or ends, making it an excellent choice for scarves and other accessories.
- Colorwork Possibilities: Linen Stitch can be combined with colorwork techniques to create stunning patterns and designs.
- All instructions are in U.S. terms
- Some think the linen stitch resembles the seed stitch or even the moss stitch, but the linen stitch resembles woven fabric where as the seed or moss stitches are more textured.
Is This Pattern Reversible?
No, both sides look different, but both sides are very dense.
 Linen Stitch Right Side of the work
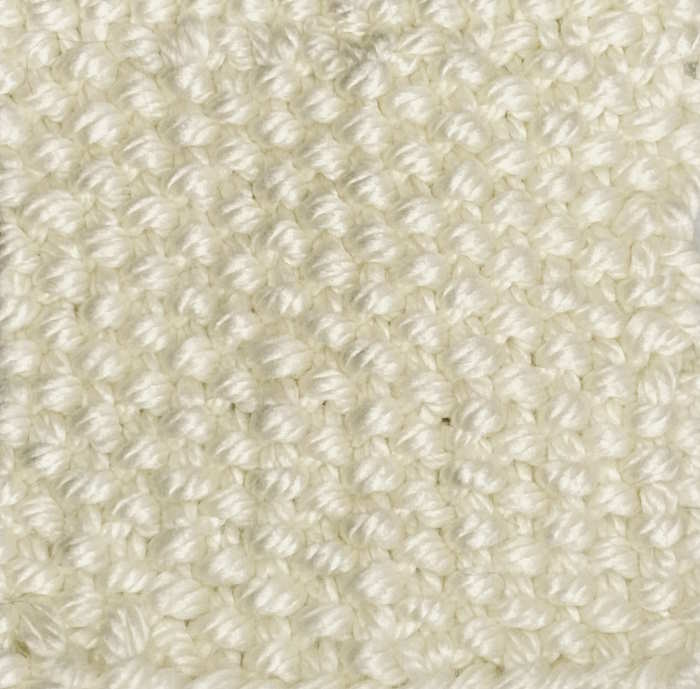 Linen Stitch Wrong Side of the Work
Supplies Needed For This Tutorial
- Yarn: For the swatch, I used Yarn Bee Soft and Sleek Chunky #5 Yarn
- Knitting Needles (I worked this on US 9 (5.5 mm)
- Scissors
- Yarn Needle
- Stitch Marker (optional)
Written Directions
Knitting the Linen Stitch Flat
 The wrong side of the Linen Knit Stitch pattern resembles the seed stitch.
Creating the Linen Stitch Flat
Method One: Working Flat on an Even Number of Stitches
To knit the linen stitch flat, start by casting on an even number of stitches. For the purposes of this tutorial, I cast on 22 stitches.
Row 1 (Right Side): *K1, slip 1 purlwise with yarn in front; repeat from * until 2 stitches remain, k2. To make it easier to identify the right side from the wrong side, attach a stitch marker somewhere along this first row.)
Row 2 (Wrong Side): *P1, slip 1 purlwise with yarn in back; repeat from * until 2 stitches remain, p2.
Work these two rows until you reach your desired length. Bind off and weave in ends.
Method Two: Working Flat on an Odd Number of Stitches
An alternative way of working the Linen Stitch Pattern is by working on an odd number of stitches.
Cast on an odd number of stitches. For the purposes of this tutorial, I cast on 23 stitches.
Row 1 (RS): * K1, slip 1 purlwise with yarn in front; repeat from * to last stitch, K1.
Row 2 (WS): Slip 1 purlwise with yarn in back, *P1, slip 1P with yarn in back.*
Repeat Rows 1 and 2: Continue repeating rows 1 and 2 until your work has reached the desired length. Bind off and Weave in ends.
It's important to note that when slipping stitches, you should always slip them purlwise. This ensures that the stitches are slipped correctly and creates the desired texture.
Knitting the Linen Stitch in the Round
If you prefer to knit the Linen Stitch in the round, follow these instructions:
Cast on an even number of stitches.
Round 1: *K1, slip 1 (purlwise) with yarn in front; Repeat from * around.
Round 2: *Slip 1 (purlwise) with yarn in front, K1; Repeat from * around.
Learn How to Read Knitting Stitch
This is a relatively easy pattern to understand using written instructions, however if English is not your language or you would like to know more about reading knitting charts, I have provided a chart for you to study.
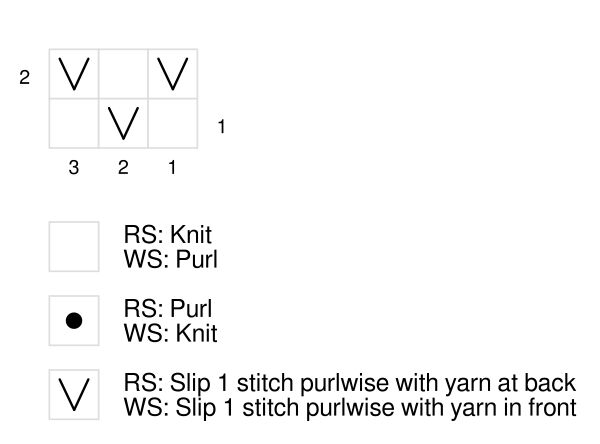 Linen Knit Stitch Knitting Chart
Tips for Making This Stitch
Tips and Tricks for Knitting the Linen Stitch
As with any knitting pattern, there are a few tips and tricks that can help you achieve the best results when knitting the Linen Stitch:
- Maintain Even Tension: Pay attention to your tension while knitting the Linen Stitch, as it can affect the overall appearance of the fabric. Aim for consistent tension throughout your project.
- Experiment with Yarn Colors: The Linen Stitch lends itself well to colorwork. Consider using multiple yarn colors and alternate each row to create unique and eye-catching patterns.
- To keep track of which side you are on, place a stitch marker somewhere on the first row of your work (right side) and leave there until you complete your project.
Free Linen Stitch Dishcloth
Cast on 40 stitches.
Row 1 (Right Side): *K1, slip 1 purlwise with yarn in front; repeat from * until 2 stitches remain, k2. To make it easier to identify the right side from the wrong side, attach a stitch marker somewhere along this first row.)
Row 2 (Wrong Side): *P1, slip 1 purlwise with yarn in back; repeat from * until 2 stitches remain, p2.
Work these two rows until you reach your desired length. Bind off and weave in ends.
Last Words
The Linen Stitch is a versatile and visually appealing pattern that adds depth and texture to your knitting projects. Whether you knit it flat or in the round, the Linen Stitch creates a beautiful, durable, and elegant fabric.
So grab your needles and yarn, and start knitting the Linen Stitch today. Discover the joy of creating intricate, textured fabric that impresses everyone who sees your handiwork. Happy knitting, Smart Knitters!
Janice
