- Home
- How to Knit
- Bind off Knitting
Bind Off Knitting (Casting Off Beginner Friendly)
Bind Off Knitting (Casting Off) by Janice Jones |Updated March 23, 2026
Do you remember your first project as a beginning knitter? A scarf or washcloth, perhaps? You got to the end of the pattern, triumphant in your accomplishments, and the pattern simply said, bind off in pattern.
What?
All you really wanted to know was how to end your knitting so you could use your prized project. Ending a knitting project is also called binding off or casting off. Both terms mean the same thing, but if you live in the US, you will say "bind off". If you live in the UK, you'll use the term cast off.
There are various ways to bind off, but the most common one is also the easiest to learn and perfect for beginners. You may see it abbreviated as BO.

Bind Off Knitting or BO
The method I will describe is a simple or basic bind off technique. If done correctly, it produces a loose, stretchy edge that is good for most projects. Sometimes the pattern will tell you which type of method to use. If the pattern just says something such as bind off in pattern, this method works fine.
What Does Bind Off In Pattern Mean?
Binding off in pattern just means that you will be using the same stitch pattern that you used in your project. So for example, if you are working a stockinette stitch and you are binding off on the right side, you would bind off by knitting. If you were on the wrong side of the stockinette stitch, you would purl the stitches you bind off.
If you are working a pattern of both knit and purl stitches, you will continue in that same pattern. So for example if you were working a project in the seed stitch, your bind off row would continue to be purl one, knit one, and so forth.
You may also see the terms in a pattern, bind off knitwise or bind off purlwise, to describe this procedure. This just means that the designer wants you to bind off during your knit row (knitwise) or on your purl row (purlwise).
The following directions would be for a piece worked in knit stitches. Please change if you are working in any other combination of stitches. The bind-off row should be knit with a loose stitch as you will be passing one stitch over another, and it just makes it easier if your stitches are loose. It also creates a stretchy edge.

Directions for Bind Off Knitting
Step One
Knit two stitches. You will have both of these two knit stitches on your right-hand needle.
Step Two
Using the tip of your left-hand needle, lift the first knitted stitch up and pass it over the last stitch you just knitted and allow the stitch to fall off your needle. You now have one worked stitch left on the right-hand needle. The abbreviation for this technique is called pass slipped stitch over. (PSSO)
Step Three
Knit one more stitch and then pass the original knit stitch up and over the stitch you just knitted. Let it fall off the needle.
Step Four
Continue doing this until you reach the end of the row.
Step Five
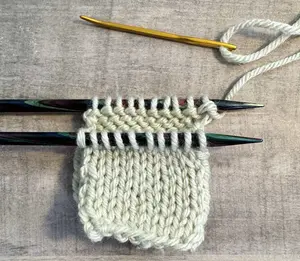
When you reach the last stitch on your right-hand needle, cut the yarn, leaving a five or six-inch tail. Draw the tail through the last stitch and tug on the yarn end to secure it in place.
If it is easier, use a crochet hook to draw the tail through the last stitch. Another way is to use a yarn needle. If you do use a yarn needle, continue to step six without unthreading your needle.
Step Six
Weave the yarn in and out of the piece to secure it in place.

Problems that Might Arise When You Bind Off Knitting Projects
Tension is always a concern when you cast on (place stitches on your needle at the beginning of a project) and when you bind off.
If your bind off stitches are too loose, you will end up with a sloppy edge. If you bind off too tightly, then the bound off edge will take on the appearance of a smile.
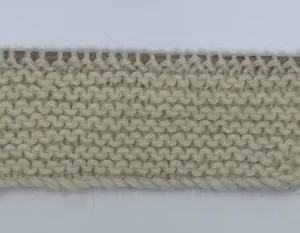
The bind off edge should be straight, slightly stretchy and the same size as the cast on edge. How does your bind off edge look? Is it too tight?
Bind off Edges that are Too Tight
This common tension problem occurs when we have a tendency to knit to tightly. If this is the case for you, try first to practice knitting looser. If this doesn't work, you may be able to achieve a good look by using a knitting needle that is one size larger than the ones you used to knit the project.
Last Stitch that Looks Sloppy
I have always struggled with this problem. The knitting looks good but the last stitch is stretched out and looks, well, ugly.
There are a couple of ways you can try and fix this problem.
- If this is an issue for you, anticipate it the row before the bind off row. Knit the first few stitches a bit tighter than normal.
- Make sure you are knitting on the tips of your needles so you aren't stretching the yarn or manipulating it any more than is needed. Do this on the row before your bind off row.
- Knit into the leg of the stitch in the previous row.
Knit into the leg of the stitch in the previous row
Bind off as normal until you reach the last stitch on the left hand needle. You will have two stitches, one on the left needle and one on the right.
Using the right needle tip, slip that last stitch onto the right needle.
Use your left needle tip to pick up one of the legs of the last stitch from the previous row and place it on the right needle.
Now, you need to slip both of those stitches back to the left needle and knit both together. You have two stitches left on your right needle. Slip the first stitch over the last stitch and off of the needle.
Cut your yarn leaving a six inch tail, and pull the yarn through the last stitch. This procedure usually solves the ugly stitch problem.
Weaving in the Ends
It’s essential to leave a yarn length after you finish the project to weave in the ends. This is to hide and secure them so the ends don’t unravel.
Weaving means just that, snake the end through about five or six stitches, going diagonally or horizontally, then turn and go in the opposite direction. If you simply slip your needle through five stitches, the ends are likely to unravel.
Do not pull the yarn so tightly as to cause puckering on the right side. Also, be careful to weave the yarn on the back of the fabric so any tiny stitches you might make won’t show on the right side.
There are other ways to bind of, but this is the easiest beginner-friendly way to do so.
Learn more about weaving in ends.
The next step after weaving in ends is to block your project. Learn how to block.
Pin for Future Reference: Bind Off Knitting

Binding off finishes your project — for a full walkthrough of the entire knitting process, see our guide on how to knit.
You might like these
Kitchener Stitch Tutorial: A Seamless Finish for Your Knitting
The Kitchener Stitch is a way to join two sets of live stitches creating an invisible, stretchy bind-off perfect for socks, shoulder seams, and mittens
Joining Yarn in Knitting: Pictures and Step-by-Step Instructions
Joining yarn in knitting is as simple as adding a new ball of yarn, but there are more than one way of doing it. I'll show you a couple for you to try out
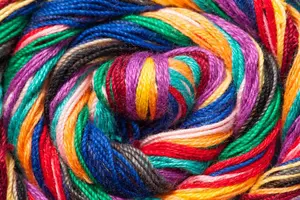
Colorwork Knitting: 8 Colorful Techniques to Try
Ready to try colorwork knitting? Learn the many ways to incorporate color into your designs and what methods to use. 7 different colorwork techniques to try.
Circular Knitting Basics and Beyond for All Levels
Learn circular knitting with circular needles, DPNs, Magic Loop, and short circulars. A beginner-friendly guide to knitting in the round.
How to Do the Cable Cast-On in Knitting: Step-by-Step Tutorial
Learn how to make the cable cast-on in knitting with this easy, beginner-friendly guide. Includes step-by-step instructions, tips, images, and project ideas.

Disclosure:
This post contains affiliate links. If you buy through them, I may earn a small commission at no extra cost to you.

Janice Jones is a Certified Knitting and Crochet Instructor who creates beginner-friendly patterns and tutorials, backed by a 389-page library of practical knitting and crochet content.
Most Popular Pages
All Types of Crochet Stitches

36 Reversible Knit Stitch Glossary

How to Crochet the Second Row

Dog Sweater Patterns

Working with Alpaca Yarn

Free eBooks, Just for You
Get my beginner eBook guides to Knitting and Crocheting, just for signing up for my monthly newsletter.
Choose one or both when you sign up.


About the Author: Please allow me to Introduce myself

Janice Jones is a Certified Knitting Instructor and Certified Crochet Instructor through the Craft Yarn Council who focuses on beginner-friendly patterns, stitch guides, and technique tutorials. She has built a library of 389 pages on her website, sharing practical instructions and patterns, and has completed projects ranging from crochet blankets to knit sweaters. You can explore her work on her website. She makes items for Warm Up America and often knits and crochets sweaters for her small dogs.
Thank you for visiting Smart-Knit-Crocheting. I hope this and all of my tutorials will give you the inspiration to continue your knit or crochet journey. For a complete list of all the pages on my site, please visit my table of contents.
I participant in the Amazon Services LLC Associates Program, an affiliate advertising program designed to provide a means for sites to earn advertising fees by advertising and linking to Amazon.com. “As an Amazon Associate I earn from qualifying purchases.” These earnings go towards supporting my website.

Home | Contact | About | Privacy Policy | Disclaimer
I DO NOT SELL ANY PERSONAL INFORMATION FROM THIS WEBSITE. PLEASE SEE MY PRIVACY POLICY FOR MORE DETAILS.
Copyright © 2006-2026 Smart Knit Crocheting. All Rights Reserved
Please Share
Remember, Sharing is Caring