- Home
- How to Knit: Basics
- Fix Knitting Mistakes
How to Fix Knitting Mistakes
How to Fix Knitting Mistakes by Janice Jones Updated January 13, 2026
If you are new to knitting, you might compare your knitting to someone more advanced than you and wonder how their knitted pieces look so perfect. Is there a secret to never making a mistake?
I want to assure you that you're not alone. When I first started knitting as a child, I often looked at my work and compared it to a sweater my grandmother was knitting. I'd wondered if there would ever be a time when all my stitches looked the same. That was a long time ago, and we didn't have internet or videos to watch. The truth is that every knitter makes mistakes.
My grandmother always assured me that "practice makes perfect," but I think there's more to it than that. Yes, practice is essential, but I now know some tricks I can share with you to speed up your progress.

Common Knitting Mistakes
You want your knitted piece that you worked so hard to create to look good. Right? But it seems that mistakes creep up every time you pick up your needles. What are some common knitting mistakes:
- Even Stitches, Tension Problems
- Dropped Stitches
- Twisted Stitches
- Holes in the fabric you just knitted
- Knitting in the Wrong Direction
Before we get into the nitty gritty of fixing problems, let's make sure we are doing other things correctly.
Holding the Knitting Needles Correctly
Everyone knits a bit differently. But if you are clenching those needles in tight hands, not only are your hands going to tire quickly, but you may notice that your entire body feels tense. Pick up a ball of yarn and cast on a few stitches.
Notice how your body feels, how your hands feel. Is your body relaxed? Great! That's the way it should be. But many new knitters tend to hold the needles and yarn in their hands in such an intense way that their stitches are incredibly tight.
If you have stitches on your needle that you are having difficulty moving to the other needle, then you might be guilty of this one.
Is Your Body Relaxed?
Knitting should be relaxing. We know that there are many health benefits to knitting and crocheting, but none of it means anything if we are sitting inn a tense position.
Find a comfortable place to sit where you're not to hot or not too cold. Beginners will also benefit from finding a place where they won't have too many distractions. Play music or not depending on your personal taste. Try to relax your entire body. Breathe deeply and feel your body relax even further. Now, while still relaxed, concentrate on your knitting, each stitch of the way.
How to Fix Knitting Mistakes
In this article we will look at six common mistakes that beginners and even advanced knitters make, many of which the knitter may not even be aware. Some are very typical of beginners such as knitting in the wrong direction or splitting their yarn, whereas some advanced knitters still have issues with tension.
Tension Issues
This is a common mistakes among knitters and for some of us, it takes a great deal of practice to get it right. One of the first tasks that new knitters must master is that of tension or gauge.
Practicing new stitches by making small projects such as washcloths can help you figure out how your tension is improving. Being aware is the first step.
There are several ways tension problems can occur in our work:
- Uneven stitches
- Uneven rows
- Gaps between stitches in a row
- Uneven selvage or edge stitches
Stick with One Method Throughout the Project
One mistake I found myself making was trying to practice knitting using both the continental method the English method, all within one piece.
My tension was different depending on the method I used. From the voice of experience, pick a method and at least use that one method until you finish your work. Then switch, if you like.
Different Size Stitches
")
Do you see size differences in your stitches? Check where on your needle you are working the yarn and stitches. Are you working the stitches at the very thin tip of your needles?
Or, Are you taking advantage of the total diameter of the needle (the fattest area)? If you are working some of your stitches on the needle tips and some on the fatter area, you aren't taking advantage of the needle's size.
Tips of needles are thinner, sometimes much thinner, and the result means that stitches will look uneven.
Loose edges
 There is a tension problem when the edge stitches are not uniform in size.
All of your stitches in the interior of your project look relatively uniform. Still, the stitches at the beginning and end of the rows are loose or bigger than the others. Loose end stitches are relatively common, and a slight tug may be all you need to make them tight.
When you get to the end of the row, give the yarn a little tug. Do the same with the first stitch of the row. These stitches tend to be loose, so a gentle pull on the yarn will even out your stitches.
Gaps Within Rows

Gaps are a common problem when doing a stockinette stitch. You see the gaps within rows on the reverse side of the fabric. Gaps with rows happen when your tension is not identical when you knit and purl.
You might be making tighter knit stitches and looser purl stitches or vice versa. This happens when we are working the stockinette stitch on two needles and not in the round. Remember that the stockinette stitch is worked in the round by just making knit stitches.
Please see my article about tension problems and how to correct them
Dropped Stitches

Everyone drops a stitch now and again. It's going to happen. Beginning knitters might do well to use plastic, wood, or bamboo needles as stitches may not fall off those needles as quickly as they would steel needles.
You might find you lose stitches if you set your knitting down at the end of the row, and the stitches slip off, especially if you have a lot of stitches on the needle. Using needle protectors might help here.
What is important is knowing how to pick up that dropped stitch and get it back on the hand without twisting it. It's also a good idea to fix a lost stitch as soon as you lose it. It's just easier to fix.
You can either use your knitting needle to pull the stitch back or a crochet hook if you have one. A crochet hook makes the job so much easier.
Fix for Dropped Stitches
 Fix Knitting Mistakes: Dropped Stitches
How to Repair Dropped Knit Stitches
- Work your way along the row until you get to the dropped stitch. Place it on a stitch holder if you like.
- Knit down the row until you get to the dropped stitch.
- Work on the front side of the fabric. Place your crochet hook into the dropped stitch. You will see bars of yarn between the slipped stitch and the needle. Each bar represents one row, so if you see three bars, you will need to work the stitch three times, one time for each bar. The bars will be in the back, and your dropped stitch out in front.
- With the dropped stitch on your hook, grab the first bar on your hook and pull it through.
- Continue grabbing each bar onto your hook and pull through until you reach the top of your work.
- Place the stitch on the left-hand needle and then knit.
Steps to Repairing Dropped Purl Stitches
- Work along the row until you reach the dropped stitch.
- Fix the stitch on the wrong side of the fabric. Place your crochet hook into the dropped stitch. Notice how many yarn bars. (You may need to turn your work over to the wrong side for this method)
- Grab the bar onto the hook and pull through just as you did for fixing a knit stitch. Continue working until you used up all the bars and your stitch can be placed on the needle. Turn onto the right side and continue knitting.
Read more about how to fix Dropped Stitches
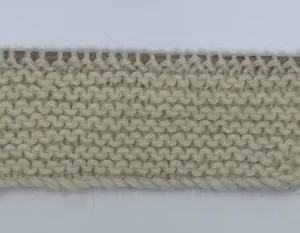
Twisted Stitches
 Notice that the stockinette stitches at the top of the photo look very different from the ones at the bottom.
If you see most stitches that look similar, but a few stand out as obviously different, and it's not because you lost a stitch. It could be where you are placing your needle.
When we knit, our right-hand needle picks up the stitch's front loop on the left-hand needle. If you are picking the front loop of the stitch some of the time and the back loop at other times, you are twisting your stitches.
Some patterns call for picking up the back look, but most projects will either specify front or back, not both.
Fix for Twisted Stitch Mistakes
Sometimes it takes a bit of mindfulness to get into the habit of knitting correctly and this only comes with practice. For beginners, it may be difficult to watch tv, text, or carry on a conversation. Concentration is needed for beginning knitters.
Knit stitches: Always place your right hand needle through the front loop of the stitch and wrap your yarn clockwise around the needle.
Purl stitches: Place your right needle from right to left through the front loop of the stitch on the left needle. Wrap the yarn around the right needle in a clockwise manner.
 This is the correct way to place your knitting needles and wrap the yarn.
Fix Knitting Mistakes Involving Holes in Your Work
Holes typically mean you've created a yarn over unintentionally. This often occurs when your working yarn is in the front when making knit stitches.
You may not notice that the yarn loop has been placed on the right-hand needle until you get to the next row.
Another way that holes show up is if you are knitting a row and then set your knitting down. When you pick it up to knit again, you start knitting in the opposite direction. (see below). Always check where your working yarn is and assure it is attached to the needle in your right hand.
Holes will happen with dropped stitches, but you usually will also see the little yarn lines or bars showing you that you've lost a stitch. If you see those bars, use the instructions above to pick up your stitches.
Fix for Holes in Your Work
If the holes are do to a mistaken yarn over, you will need to The only way rip out those stitches you made after your accidental yarn over and re-knit them. You don't need to rip the entire row, just those surrounding the hole. The new stitches may be a little stretched but the hole will be gone. To even out the stretched stitches, try manipulating them slightly with a yarn needle.
Fix Knitting Mistakes Involving Working in the Wrong Direction
This is a common problem for beginners. You stop working in the middle of a row and put your needles down. When you begin again later, you start knitting in the wrong direction. This creates an uneven row where there are more stitches worked on one end and less on the other end.
Fix for Knitting in the Wrong Direction
This one is easy to fix. Always remember that your working yarn is attached to the work on your right needle. If you make it a practice to look at both needles when you begin your work again, the stitches you will knit are on the left needle and the ones you've already finished are on the right needle. The working yarn is attached to those you've already finished.
Fix Knitting Mistakes Involving Split Yarn

Some yarns are wonderful to work with because the plies are tightly spun and rarely come apart. Others are notoriously loose and it is easy to split yarn. What do I mean by split yarn?
Split yarn is simply yarn that has come unraveled and when you knit a stitch, instead of picking up the entire diameter of the yarn, you catch only one or two strands. The strands not knitted into the stich stick out and ruin the appearance of the fabric.
Some times it is the yarn itself that causes this. Other times, knitting needles with very sharp points can break apart the plies. Sometimes, it's us. We simply start knitting, not really concentrating and then pick up part of the yarn instead of the entire piece.
Fix for Split Yarn
It happens to all of us, so what should we do. Beginners don't always have a lot of experience choosing yarn. They pick a yarn that has a great feel, is the perfect color, or is unique in some other way such as novelty yarns.
For best results, if you are just starting out, choose a yarn that is a 100% wool or wool blend. Some wools will split apart, but you are likely to have a better chance of not encountering this problem with a wool yarn.
Secondly, stick to wood or bamboo needles, at least initially. Most of these needles have fine points, but they may not be as sharp or long pointed as some steel needles.
Finally, as I mentioned above, practice a little mindfulness. If the yarn starts to split while knitting a stitch, stop and place the entire strand of yarn on the needle. You'll be glad you did.
Fix Knitting Mistakes: Pin for Future Reference

Final Words
These are some of the most common scenarios that beginners report. Beginners may become so frustrated with any one of these that they decide to quit. I hope that doesn't happen to you.
Practice does make perfect, but it sure helps to know how to fix things when they occur. I hope these tips have been helpful.
Did You Find, How to Knit Even Stitches Helpful?
You might like these articles too.
Circular Knitting Basics and Beyond for All Levels
Ready to try circular knitting? This supportive guide shows how to knit in the round using circular or double-pointed needles, with tips that help beginners and hobby knitters grow.
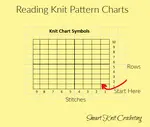
How to Read Knitting Charts for Patterns and Projects
Knitting charts and written instructions are both useful for gaining mastery and pleasure from knitting. Lets learn how to read knitting symbols and charts.
How to Do the Cable Cast-On in Knitting: Step-by-Step Tutorial
Learn how to make the cable cast-on in knitting with this easy, beginner-friendly guide. Includes step-by-step instructions, tips, images, and project ideas.
Understanding Knitting Instructions: How to Read Patterns
How to Understand knitting Instructions including the anatomy of a knit pattern and how to understand each part so you can confidently create a lovely project.
How to Knit for Beginners (Step-by-Step Guide)
Learn how to knit with this complete beginner guide! Discover the best tools, stitches, and easy patterns for first-time knitters; photos and tips.
How to Make a Slip Knot for Knitting (Step-by-Step for Beginners)
Learn how to make a slip knot for knitting with clear photos and simple steps. Includes two easy methods and beginner tips for perfect cast-ons.

Disclosure: This post contains affiliate links, which means if you make a purchase from one of these links I will get a small commission.

Hi, there, I'm Janice, the voice behind this website and avid knitter and crochet enthusiast. I want to share my passion with you and help you learn how to knit or crochet, smarter.
Most Popular Pages
All Types of Crochet Stitches

36 Reversible Knit Stitch Glossary

How to Crochet the Second Row

Dog Sweater Patterns

Working with Alpaca Yarn

Free eBooks, Just for You
Get my beginner eBook guides to Knitting and Crocheting, just for signing up for my monthly newsletter.
Choose one or both when you sign up.


About the Author: Please allow me to Introduce myself

I'm Janice, the voice and writer behind Smart-Knit-Crocheting. I'm passionate about crocheting and knitting, and I love sharing my passion with my readers. I've been knitting and crocheting daily for about five years, but I first learned from my grandmother as a child, many years ago.
I'm a certified knitting and crochet instructor from the Craft Yarn Council, and my goal is to present instructions and patterns in a way that's easy to understand for the absolute beginner. Always feel free to contact me if you have any questions or want to say hello.
Thank you for visiting Smart-Knit-Crocheting. I hope this and all of my tutorials will give you the inspiration to continue your knit or crochet journey. For a complete list of all the pages on my site, please visit my table of contents.
I participant in the Amazon Services LLC Associates Program, an affiliate advertising program designed to provide a means for sites to earn advertising fees by advertising and linking to Amazon.com. “As an Amazon Associate I earn from qualifying purchases.” These earnings go towards supporting my website.

Home | Contact | About | Privacy Policy | Disclaimer
I DO NOT SELL ANY PERSONAL INFORMATION FROM THIS WEBSITE. PLEASE SEE MY PRIVACY POLICY FOR MORE DETAILS.
Copyright © 2006-2026 Smart Knit Crocheting. All Rights Reserved
Please Share
Remember, Sharing is Caring