- Home
- Crochet Pattern Reading
How to Read Crochet Patterns: A Beginner's Guide
by Janice Jones, Certified Crochet Instruction (Craft Yarn Council) Published September 9, 2026
Learning how to read crochet patterns is one of the biggest steps between “I know a few crochet stitches” and “I can actually make the project I want.”
At first, a crochet pattern can look confusing. You may see abbreviations, asterisks, brackets, parentheses, row numbers, stitch counts, special notes, and instructions that seem much shorter than ordinary step-by-step directions. That does not mean the pattern is too hard for you. It usually means you are learning a new kind of written language.
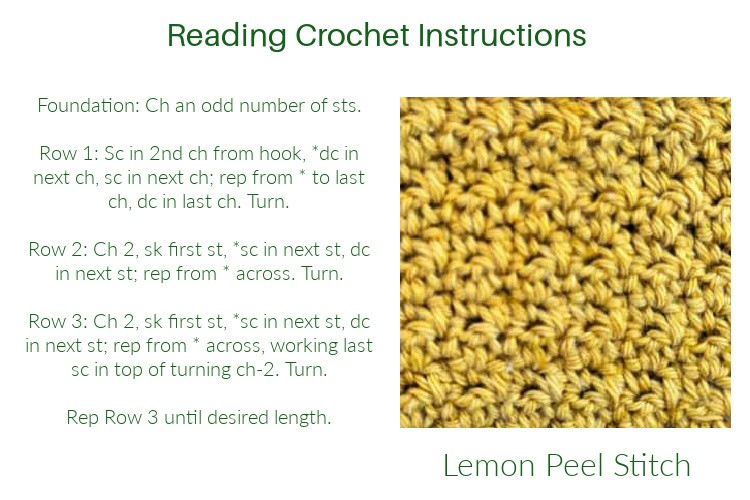
Crochet patterns are written in a shortened format so the instructions do not become too long. Once you understand how that format works, the pattern becomes much easier to follow. You do not have to memorize everything at once. You only need to learn how to read one part at a time.
This guide will help you understand the main parts of a crochet pattern, what to look for before you begin, how to follow written instructions, how to use crochet abbreviations, and when to check a chart or stitch count. It also links to more detailed guides that explain each part more slowly.
If you are brand new to crochet patterns, start here. Then use the linked pages whenever you need help with a specific part of a pattern.
What is a Crochet Pattern
A crochet pattern gives you the instructions you need to make a finished crochet project. It usually includes the yarn, hook size, stitches used, gauge, finished measurements, and row-by-row or round-by-round instructions. It may also include information about assembling and finishing the project.
Crochet patterns are generally presented in two ways:
- Written instructions that use abbreviations and punctuation marks
- Charts or diagrams in which symbols represent crochet stitches
Why Crochet Patterns Look Confusing At First
Crochet patterns can look like a foreign language at first because they use abbreviations, symbols, punctuation, and shortened instructions to save space. Patterns also assume that you already know some basic crochet terms and stitches. Needing to stop and decode an instruction is a normal part of learning to read patterns.
The Main Parts of a Crochet Pattern
There is no one-size-fits-all when it comes to crochet patterns. Each publisher has its own template, which may be confusing at first. Once you have worked through a few patterns, their organization and wording will begin to feel more familiar. Most patterns should have the following parts.
Quick Guide to the Parts of a Crochet Pattern
| Pattern Section | What to Look For |
|---|---|
| Project name and photo | What the finished project should look like |
| Skill level | Whether the techniques match your experience |
| Finished size | Expected dimensions or garment size |
| Materials | Yarn, hook size, notions, and other supplies |
| Gauge | Number of stitches and rows within a measured area |
| Abbreviations | Shorthand terms used in the pattern |
| Special stitches | Instructions for stitches unique to the project |
| Pattern notes | Construction, turning, joining, US or UK terms, and other important details |
| Written instructions | The row-by-row or round-by-round directions |
| Charts or diagrams | A visual representation of stitches, construction, or measurements |
Project Name and Photo
Designers will create their own pattern name and provide a finished photo to help you see the shape, texture, and construction.
Skill Level
Designers often use their own terms for the skill level, but the Craft Yarn Council has designated four project levels as a way to explain the differences. Still, there are some differences in how the patterns are graded.
- Basic
- Easy
- Intermediate
- Advanced
Some patterns will list the names, while others will provide the Craft Yarn Council Symbol.
Finished Size
You will want to know how big the finished project will be, especially if you are making something to wear. We need to know that we can actually wear what we make.
Materials List
In this section, you will see what you need to complete the project. Here are a few examples of what might be listed in this section.
- Yarn
- Hook size
- Stitch markers
- Tapestry needle
- Scissors
- Buttons or extras
Gauge
For some projects, such as a dishcloth, gauge is not a big factor. Most people don't care if their dishcloth ended up being 7 1/2 inches square instead of 8 inches square. However, if you are making something where the size matters, the gauge is very important to get right before beginning the project. If you don't know how to calculate gauge, I recommend reading my article on gauge.
Abbreviations
Abbreviations are used to save space so the pattern does not run into numerous pages. Easy examples are sc (single crochet) or ch (chain).
- ch = chain
- sc = single crochet
- hdc = half double crochet
- dc = double crochet
- sl st = slip stitch
- st/sts = stitch/stitches
- rep = repeat
See my full guide to crochet terms and abbreviations if you need help with common crochet shorthand.
Special Stitches
Many crochet stitches beyond the basics, such as single crochet, fall into the category of special stitches. You will find these in a separate section before the written instructions begin. The designer will write out instructions for creating the stitch. For example V-st = (dc, ch 1, dc) in indicated sp.
Pattern Notes
Pattern notes vary by project. Many times the pattern will indicate that the project is worked flat, in the round, joined, turned, seamed, or made in pieces. You will also see a note indicating that the pattern uses US or UK terms. That is important because there are many differences between US and UK terminology. Many Commonwealth countries use UK terms.
For example, if you see the instructions, “miss 2 sts”, you are probably in a
UK pattern, as “miss” means “skip” in US terms.
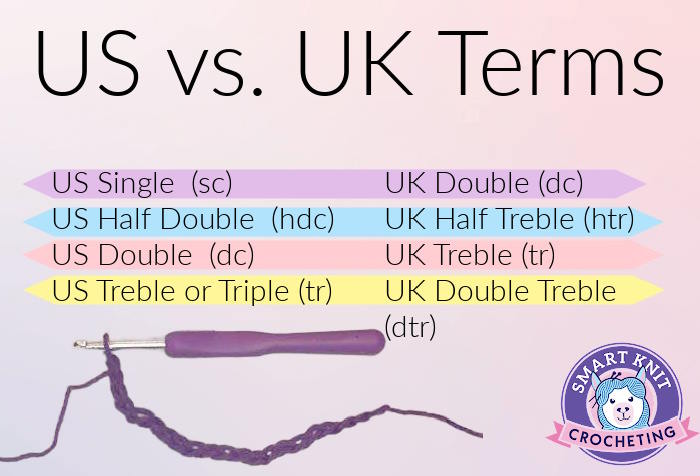 Always check which terminology the designer uses before you begin, because the same abbreviation can describe different stitches.
Written Instructions
This is where the pattern's actual instructions begin. You will follow it row by row to complete your project. I have a more detailed page on reading written instructions that you may want to browse.
Charts or Diagrams
Many crocheters find charts helpful because they can see what a stitch pattern will look like. Beginners, on the other hand, are often intimidated by all those symbols. Learning to read a simple crochet chart can also be useful when you begin working with more complex patterns.
Schematics are another area of the pattern that may be available, especially if you are creating something to wear. It is a diagram of the various pieces and their measurements.
How to Read a Crochet Pattern Before You Start
Before you make the first chain, take a few minutes to look over the whole pattern. This helps you notice anything unusual before you are halfway through the project.
- Look at the finished photo.
- Read the pattern notes.
- Check the skill level.
- Gather the materials.
- Review the abbreviations.
- Look for special stitches.
- Check the gauge if size matters.
- Read through the first few rows before starting.
- Crochet a gauge swatch.
By doing this, you will save yourself time and frustration. If the skill level is beyond your comfort zone, consider another pattern unless you are up for the challenge. Be sure to understand how to make any special stitches needed for a pattern.
How to Read Repeats and Punctuation in Crochet Patterns
I have found that repeats in crochet to be confusing at first. Here is a quick explanation of each.
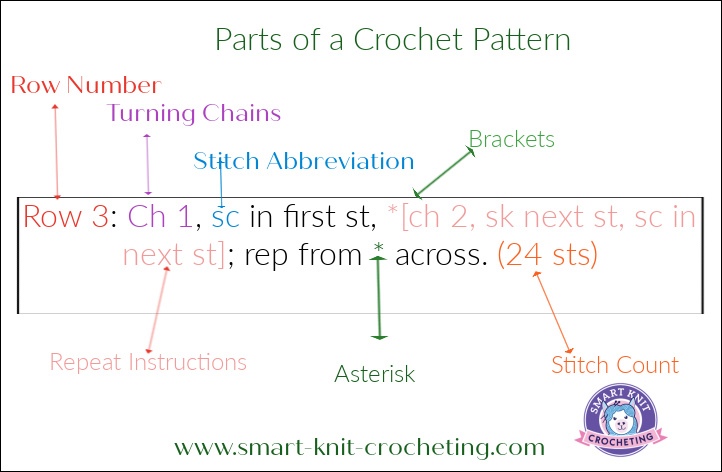
Asterisk * *
The first asterisk is used to show the point where a series of stitches will be repeated for the number of times indicated.
Other symbols that are sometimes used include a diamond ◊, a dagger †, or a double dagger ‡. Here is an example of how asterisks are used in a pattern.
Row 2: Ch 1, sc in first st, *ch 1, sk next st, sc in next st; rep from * across.
Explanation: Work the instructions once until you reach “rep from *.” Then go back to the asterisk and repeat only the instructions that follow it.
Brackets [ ]
Brackets are used in two different situations.
- Show Sizes: xs [s, m, l, xl] Example: Row 2: Ch 3, dc in next 4 sts, sc in next 3 [4, 5, 5, 6] sts. The numbers within the brackets represent how many stitches to make based on your size. So, if you are creating a project in size xl, you would make single crochet stitches in the next 6 stitches.
- Show a Series of Steps: Example: [dc in next st, ch 3, 2 dc in next st, sk 3 sts] 4 times.
Parentheses ( )
Parentheses are often used to group stitches that are worked together or into the same stitch or space. They may also contain a stitch count at the end of a row or round, such as (24 sts), which tells you how many stitches you should have after completing that row or round.
Parts of a Crochet Pattern
Stitch Counts
Stitch counts can be a little confusing at first because it may not be immediately clear how the designer arrived at the count in the instructions. For example,
Ch 10.
Row 1: Sc in 2nd ch from hook, sc in each ch across, turn. (9 sc). Beginners may wonder how only 9 stitches are produced when they began with ten chain stitches. In this case, you insert your hook into the second chain from the hook and then works single crochets across the row, ending with 9 single crochets. Had the instructions said to Sc in the 1st ch from the hook, then the stitch count would be 10.
Common Mistakes Beginners Make When Reading Crochet Patterns
| Common Mistake | What to Do Instead |
|---|---|
| Skipping the pattern notes | Read the notes before you begin so you understand construction, turning, joining, and any special instructions. |
| Not checking whether the pattern uses US or UK terms | Check the terminology before starting because the same stitch names can mean different things in US and UK crochet. |
| Ignoring gauge when size matters | Make a gauge swatch when the finished size is important, especially for garments and fitted projects. |
| Misunderstanding repeats | Look carefully for asterisks, brackets, and parentheses that show which stitches should be repeated. |
| Missing the stitch count at the end of a row or round | Count your stitches regularly and compare your total with the number given in the pattern. |
| Forgetting to turn or join | Check the end of each row or round for instructions telling you whether to turn, join, or continue. |
| Using the wrong hook size or yarn weight | Compare your hook and yarn with the materials list before you begin. |
| Assuming all crochet patterns are written the same way | Read each pattern's notes and abbreviations because publishers may organize and word instructions differently. |
Crochet Pattern Reading FAQ
Why are crochet patterns so hard to read?
Why are crochet patterns so hard to read?
Because they are written in a shortened format using abbreviations, repeats, punctuation, and stitch counts. Once you learn what each part means, they become easier to follow.
Do I need to memorize all crochet abbreviations?
Do I need to memorize all crochet abbreviations?
No. It helps to learn the most common ones, but you can keep a crochet abbreviation chart nearby while you work.
What does the number at the end of a crochet row mean?
What does the number at the end of a crochet row mean?
It is usually the stitch count. It tells you how many stitches you should have at the end of that row or round.
What does repeat from the asterisk mean in crochet?
What does repeat from the asterisk mean in crochet?
It means you go back to the instruction marked by the asterisk and repeat that section as directed.
Are crochet charts harder than written patterns?
Are crochet charts harder than written patterns?
Not always. Some people find charts easier because they show where stitches go. Others prefer written instructions. Many crocheters use both.
Should beginners use written patterns or charts first?
Should beginners use written patterns or charts first?
Most beginners start with written patterns, but simple charts can be helpful once you understand basic stitch symbols.
Conclusion
Start With One Crochet Pattern
Learning to read crochet patterns takes practice. You do not need to memorize every abbreviation, symbol, or rule before you begin. Read the pattern notes first, keep an abbreviation guide nearby, and check your stitch count as you finish each row or round.
Choose a beginner-friendly pattern and work through it one instruction at a time. When something doesn't make sense, stop and decode that part before continuing. Each pattern you complete will give you more experience with the shorthand and organization used in crochet instructions.
Disclosure:
This post contains affiliate links. If you buy through them, I may earn a small commission at no extra cost to you.
Janice Jones is a Certified Knitting and Crochet Instructor who creates beginner-friendly patterns and tutorials, backed by a 389-page library of practical knitting and crochet content.
Most Popular Pages
Comprehensive Guide to Yarn

All Types of Crochet Stitches
36 Reversible Knit Stitch Glossary
How to Crochet the Second Row
Dog Sweater Patterns
Working with Alpaca Yarn
Free eBooks, Just for You
Get my beginner eBook guides to Knitting and Crocheting, just for signing up for my monthly newsletter.
Choose one or both when you sign up.
About the Author: Please allow me to introduce myself
Janice Jones is a Certified Knitting Instructor and Certified Crochet Instructor through the Craft Yarn Council who focuses on beginner-friendly patterns, stitch guides, and technique tutorials. She has built a library of 389 pages on her website, sharing practical instructions and patterns, and has completed projects ranging from crochet blankets to knit sweaters. You can explore her work on her website. She makes items for Warm Up America and often knits and crochets sweaters for her small dogs.
Thank you for visiting Smart-Knit-Crocheting. I hope this and all of my tutorials will give you the inspiration to continue your knit or crochet journey. For a complete list of all the pages on my site, please visit my table of contents.
I participant in the Amazon Services LLC Associates Program, an affiliate advertising program designed to provide a means for sites to earn advertising fees by advertising and linking to Amazon.com. “As an Amazon Associate I earn from qualifying purchases.” These earnings go towards supporting my website.
Home | Contact | About | Privacy Policy | Disclaimer
I DO NOT SELL ANY PERSONAL INFORMATION FROM THIS WEBSITE. PLEASE SEE MY PRIVACY POLICY FOR MORE DETAILS.
Copyright © 2006-2026 Smart Knit Crocheting. All Rights Reserved
Please Share
Remember, Sharing is Caring