- Home
- Knit and Purl Stitches
- Wide Chevron Zig Zag Stitch
Wide Chevron Zig-Zag Knit Stitch (Tutorial for Beginners)
by Janice Jones, Certified Knit Instructor (CYC) Published March 24, 2026
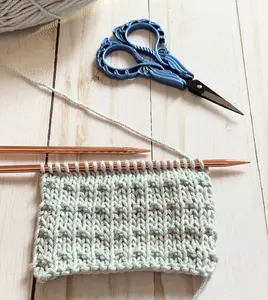
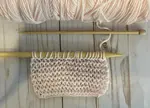
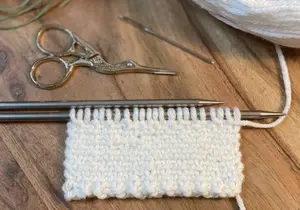
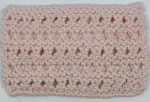
The wide chevron zig-zag knit stitch is a bold, eye-catching pattern that looks far more complex than it actually is.
If you’re comfortable with knit and purl stitches and ready to try something a little more interesting, this stitch is a perfect next step.
The flowing zig-zag pattern creates beautiful texture without requiring any increases or decreases, making it a great way to build confidence while creating something that looks impressive on both sides.
Wide Chevron Zig Zag Knit Stitch: At a Glance
Skill Level: Easy: This stitch is ideal for knitters who are comfortable with knit and purl stitches and want to try a longer repeat pattern without learning new techniques like increases or cables.
Stitch Multiple: 10 Stitches
Row Repeat: 18 row repeat
Reversible: Yes
Worked Flat: Yes
Worked in the Round: Yes
Fabric Behavior: Lies Flat
Techniques Used: Knit and Purl Stitches Only
Why You'll Love This Stitch
This is one of those stitches that makes people say, “You made that?”
The wide chevron zig-zag knit stitch looks bold and intricate, but it’s really just knit and purl stitches working together in a clever way. Once you get into the rhythm, it becomes surprisingly relaxing to knit.
Even better, it’s fully reversible—so it looks just as good on both sides. If you want something a little more interesting than basic stitches without getting overwhelmed, this one is a fun next step.
Abbreviations
k = Knit
P = Purl
RS = right side
WS = wrong side
rep = repeat
rnd = round
* * Work the instructions within the asterisks for the number of times indicated.
Skills Needed
Supplies Needed for Knitting a Practice Swatch
- Yarn: I recommend a worsted-weight yarn in a light color
- Needles: Size that is appropriate for the yarn you are using. If using a worsted-weight yarn, choose size 7 (4.5 mm) or 8 (5.0 mm) needles
- Scissors
- Tapestry Needle
- Stitch marker (optional)
Before You Begin
This stitch pattern is worked over an 18-row repeat, which means it takes a little longer to memorize than simpler patterns. For some of us, we won't be memorizing it at all.
To make things easier, consider using a row counter or marking off rows as you go. Once you complete a full repeat, the pattern becomes much easier to recognize and follow.
Written Instructions for Working Flat on Straight Needles
Cast On: Multiples of 10 Stitches
Row 1 (RS): * P5, k1, p4, rep from * to end.
Row 2 (WS): * K4, p1, k5, rep from * to end.
Row 3: * K1, p9, rep from * to end.
Row 4: * K9, p1, rep from * to end.
Row 5: * K2, p7, k1, rep from * to end.
Row 6: * P1, k7, p2, rep from * to end.
Row 7: * K3, p5, k2, rep from * to end.
Row 8: * P2, k5, p3, rep from * to end.
Row 9: * K4, p3, k3, rep from * to end.
Row 10: * P3, k3, p4, rep from * to end.
Row 11: * P1, k4 rep from * to end.
Row 12: * P4, k1, rep from * to end.
Row 13: * P2, k7, p1, rep from * to end.
Row 14: * K1, p7, k2, rep from * to end.
Row 15: * P3, k5, p2, rep from * to end.
Row 16: * K2, p5, k3, rep from * to end.
Row 17: * P4, k3, p3, rep from * to end.
Row 18: * K3, p3, k4, rep from * to end.
Repeat rows 1 – 18 for the pattern. Finish by weaving in ends and blocking.
Blocking helps relax the fabric and define the zig-zag columns more clearly.
For best results, gently wet block your finished piece, smoothing the fabric into shape without stretching it lengthwise. Allow it to dry completely before removing pins. If you are making a small project like a dishcloth or coaster, light steam blocking can also work well. For more information on blocking, jump to my blocking tutorial.
Instructions for Working Flat in Chart Form
Swatch Gauge
My Stitch Gauge
I have received numerous questions about gauge, so I am now including gauge information in my stitch tutorials.
- Work a swatch by casting on 30 stitches.
- Block your swatch and allow it to dry thoroughly.
- Mark off the selvage and edge stitches using stitch markers or scrap yarn before making any measurements.
- Measure the width between your marks. Jot it down.
- Count the stitches. Jot it down.
- Divide the stitches by the width, but don't round off (stitches per inch)
- Multiply the stitches per inch by 4. Round this number up or down. This is your stitch gauge
Adjust needle size if necessary to match the gauge for your project.
My stitch gauge is: 20 stitches/ 4 inches
My Row Gauge
- Measure the length between your markers, but do not round off.
- Count the number of rows.
- Divide the number of rows by the length. (number of rows per inch) Do not round off.
- Multiply the number above by 4. Round up or down
- This is your row gauge per 4 inches.
Written Instructions (For Working in the Round)
Cast on a multiple of 10 stitches. Connect to work in the round. Add a stitch marker to mark the start of your round.
Rnd 1: * P5, k1, p4, rep from * around.
Rnd 2: * P5, k1, p4, rep from * around.
Rnd 3: * K1, p9, rep from * around.
Rnd 4: * K1, p9 rep from * around.
Rnd 5: * K2, p7, k1 rep from * around.
Rnd 6: * K2, p7, k1, rep from * around.
Rnd 7: * K3, p5, k2, rep from * around.
Rnd 8: * K3, p5, k2, rep from * around.
Rnd 9: * K4, p3, k3, rep from * around.
Rnd 10: * K4, p3, k3, rep from * around.
Rnd 11: * P1, k4, rep from * around.
Rnd 12: * P1, k4 , rep from * around.
Rnd 13: * P2, k7, p1, rep from * around.
Rnd 14: * P2, k7, p1, rep from * around.
Rnd 15: * P3, k5, p2, rep from * around.
Rnd 16: * P3, k5, p2, rep from * around.
Rnd 17: * P4, k3, p3, rep from * around.
Rnd 18: * P4, k3, p3, rep from * around.
What Can You Make with the Wide Chevron Zig Zag Knit Stitch Pattern
Since this stitch pattern is reversible, it lends itself well to projects where you want both sides to show. For example,
- Scarves and Cowls
- Blankets (especially baby blankets)
- Dish and Washcloths
- Placemats
- Coasters
- Panels in garments such as sweaters
Troubleshooting and Beginner Challenges
Keeping track of your location: When a stitch pattern requires 18 rows to complete, it can be challenging for beginners compared to a 4-row or 2-row repeat pattern. Use a stitch marker to mark off the stitch pattern and a row counter to keep track of what row you are knitting. If you must set it down, notate where you left off so you can pick up without problems.
Tension Problems: Because it is worked only with knit and purl stitches, beginners often struggle with tension when switching between them. Try tugging just a little when making a purl stitch that follows a knit stitch. Learn more about making even stitches.
Frequently Asked Questions
Is the wide chevron zig-zag knit stitch good for beginners?
Is the wide chevron zig-zag knit stitch good for beginners?
Yes. While the stitch has a longer repeat, it uses only knit and purl stitches and does not require increases, decreases, or cables. To keep your place, use stitch markers and a row counter.
Does this stitch curl at the edges?
Does this stitch curl at the edges?
No. Because it balances knit and purl stitches, the fabric lies relatively flat compared to stockinette.
Does this stitch use more yarn?
Does this stitch use more yarn?
It uses slightly more yarn than plain stockinette due to the texture, but less than heavily cabled or bobble-stitch patterns.
Last Words
The wide chevron zig-zag knit stitch is a rewarding pattern that turns simple stitches into a striking design. While the 18-row repeat may seem long at first, it quickly becomes intuitive with practice. Whether you’re making a scarf, blanket, or textured panel, this stitch is a great way to expand your skills and create something truly eye-catching.
Pin for Future Reference
You might like these
How to Knit the Fleck Stitch Pattern: Beginner-Friendly Tutorial
Learn how to knit the fleck stitch pattern and the double fleck stitch in this beginner-friendly tutorial that includes a free pattern.
Knit Hurdle Stitch: Beginner-friendly, Tutorial and Free Pattern
The knit hurdle stitch is an easy beginner-friendly knit pattern that resembles a rib stitch and is created with knit and purl stitches
Knit Condo Stitch Pattern (Beginner Tutorial + Needle Tips)
Learn how to knit the condo stitch using two needle sizes. Beginner-friendly tutorial with photos, yarn tips, common mistakes, and project ideas.
Slip Stitch Knitting Patterns: How To
Discover the possibilities with slip stitch knitting patterns. Tips, techniques and tutorials for adding knit slip stitch patterns to your skills
Eyelet Rib Stitch Step-by-Step for Beginners
Start lace knitting with the Eyelet Rib Stitch! Ideal for beginners, this guide includes instructions, skills needed, pattern notes, and project ideas.
How to Knit the Open Honeycomb Stitch: Easy Lace Pattern Tutorial
Learn how to knit the Open Honeycomb Stitch with our step-by-step guide, tips, and FAQs. Perfect for scarves, shawls, and lightweight lace projects.
Purl Stitch. Two Methods of Purling for the Absolute Beginner
The purl stitch is one of the two major stitches in knitting. Quality of the finished knitting fabric depend on the way you purl the stitch.

Disclosure:
This post contains affiliate links. If you buy through them, I may earn a small commission at no extra cost to you.

Janice Jones is a Certified Knitting and Crochet Instructor who creates beginner-friendly patterns and tutorials, backed by a 389-page library of practical knitting and crochet content.
Most Popular Pages
All Types of Crochet Stitches

36 Reversible Knit Stitch Glossary

How to Crochet the Second Row

Dog Sweater Patterns

Working with Alpaca Yarn

Free eBooks, Just for You
Get my beginner eBook guides to Knitting and Crocheting, just for signing up for my monthly newsletter.
Choose one or both when you sign up.


About the Author: Please allow me to Introduce myself

Janice Jones is a Certified Knitting Instructor and Certified Crochet Instructor through the Craft Yarn Council who focuses on beginner-friendly patterns, stitch guides, and technique tutorials. She has built a library of 389 pages on her website, sharing practical instructions and patterns, and has completed projects ranging from crochet blankets to knit sweaters. You can explore her work on her website. She makes items for Warm Up America and often knits and crochets sweaters for her small dogs.
Thank you for visiting Smart-Knit-Crocheting. I hope this and all of my tutorials will give you the inspiration to continue your knit or crochet journey. For a complete list of all the pages on my site, please visit my table of contents.
I participant in the Amazon Services LLC Associates Program, an affiliate advertising program designed to provide a means for sites to earn advertising fees by advertising and linking to Amazon.com. “As an Amazon Associate I earn from qualifying purchases.” These earnings go towards supporting my website.

Home | Contact | About | Privacy Policy | Disclaimer
I DO NOT SELL ANY PERSONAL INFORMATION FROM THIS WEBSITE. PLEASE SEE MY PRIVACY POLICY FOR MORE DETAILS.
Copyright © 2006-2026 Smart Knit Crocheting. All Rights Reserved
Please Share
Remember, Sharing is Caring