- Home
- How to Crochet
- Crochet in Rounds Using Charts
Crochet in Rounds Using Charts: Beginner Tutorial
Crochet in Rounds Using Charts Re-Written by Janice Jones
Updated 08-25-2023
Crocheting in the round can be as easy as making a circle of crochet stitches such as when you want to make a set of coasters, or as intricate, as making a crocheted doily.
When you get to the point where you want to crochet a doily or motif that has a lot of different stitches, you may benefit from learning how to read a crochet chart.
This is part two of a two-part series on Crocheting in the Round. Part One is the Introduction to Crocheting in the Round.
Crochet in Rounds Using Charts: What is a Chart?
A crochet chart is made up of symbols each of which stand for a specific stitch. Though them may look confusing at first, there is a logic that helps crocheters master intricate designs quicker.
- Charts help you to visualize a pattern and understand its logic.
- They are made up of symbols most of which are universally understood
- It does not mean you are creating circles, but it can
- You work from the center outward, rather than in rows.
How to Read Charts When You Crochet in Rounds
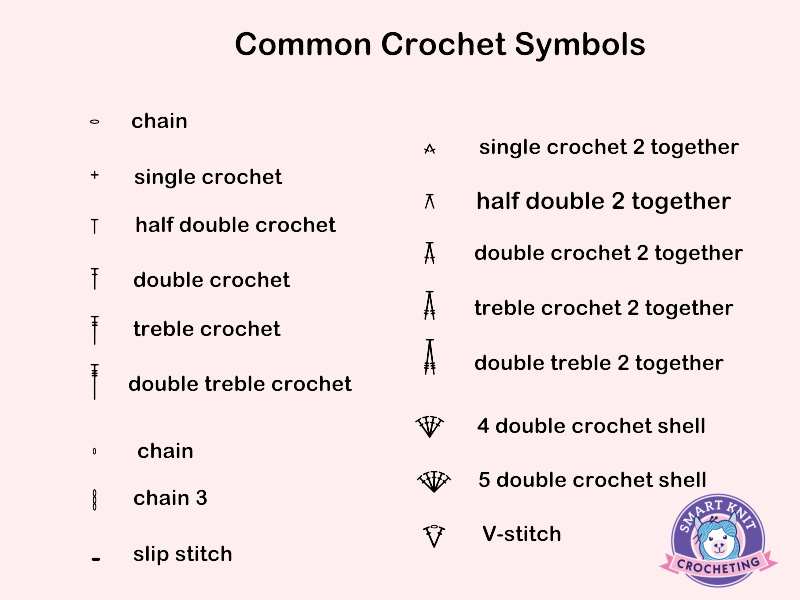
Before you can truly understand crochet charts, you need to learn the symbols. Each crochet stitch can be described with an abbreviation or a symbol. The best place to learn the many different symbols is through the Craft Yarn Council. But for the purposes of this tutorial, here are a few you can learn immediately.
 Standard Crochet Symbols Found in Charts
Crochet in Rounds Using Charts
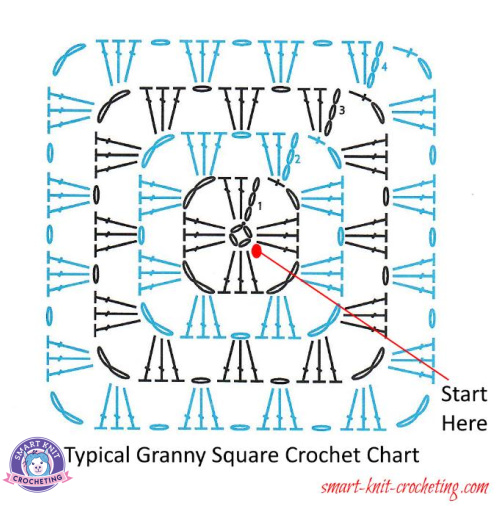
Here is an example of a crochet in rounds pattern. Yes, it doesn't look round, it's almost square.
But you would use the same technique of crocheting whether you need to make a circle, square, rectangular or any other shape. To crochet any of those shapes, we would apply the crocheting in round technique. Let's follow it step by step.
A large picture gives a general idea about pattern.

- The pattern begins in the center of the diagram and shows a chain ring that consists of 4 chain stitches. A slip stitch connects first and last chain into the ring.
- The chart shows a total of 4 rounds, but that doesn't mean that you must stop at the end of the fourth round unless you are following a pattern. If the pattern calls for more rounds, you will likely see written directions such as "repeat round 4 until square is desired size."
- If you look closely at the little symbols in the chart and compare them to the table above in pink, you will see that the entire square is worked in chain stitches, single crochet, double crochet stitches and and slip stitches.
- What it doesn't say is whether to work each round in a different color. Sometimes charts are created where each round of symbols are printed in a different color. If changing colors is indicated, you will likely see it shown in the written directions.
So far so good?
Breaking Down the Crochet in Rounds Chart
So, what exactly is the chart telling us?
Let's look at the written directions for this chart.
Chain 4, join with a slip stitch to form a ring.
Rnd 1: Ch 3 (counts as dc throughout), 2 dc in ring, ch 2, *3 dc in ring, ch 2; rep from * once more; 3 dc in ring, ch 1, join with sc in top of ch-3.
Rnd 2: Ch 3, 2 dc in space formed by joining st and chain, ch 1, *(3 dc, ch 2, 3 dc, ch 1) in next 3 spaces, join with sc in top of ch-3.
Rnd 3: Ch 3, 2 dc in space formed by joining st , *ch 1, 3 dc in next space, ch 1**, (3 dc, ch 3, 3 dc) in corner space; rep from * around, ending last rep at **, 3 dc in same space as beginning ch, ch 1, join with sc in top of ch-3.
Rnd 4: Ch 3, 2 dc in space formed by joining st , ch 1, *[3 dc in next space, ch 1] in each ch-l space to corner space**, (3 dc, ch 2, 3 dc, ch 1) in corner space; rep from around, ending last rep at **, 3 dc in same space as beginning ch, ch 1, join with sc in top of ch-3.
Rep Rnd 4 until square is desired size.
Whew. That's a lot of directions and repeats to keep in mind.
Which is Easier for You to Read
As a beginner, you might feel more comfortable reading written directions especially if you feel confident in your ability to recognize crochet abbreviations. But as you begin to tackle more complex patterns, you might change your mind. You might decide that a chart is actually easier to follow.
What Does the Crochet in Rounds Chart/Written Directions Produce?
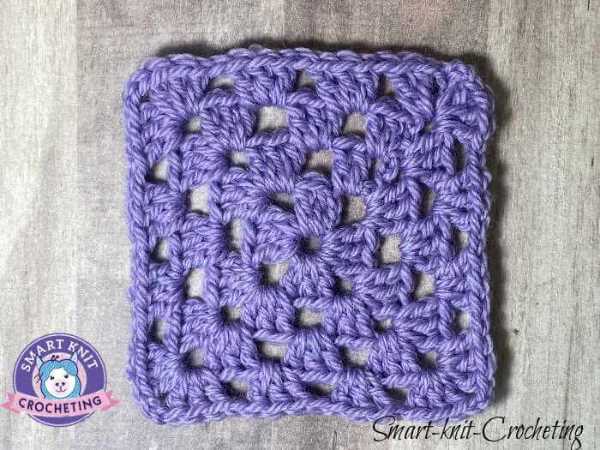
What do you think the pattern looks like when crocheted? If you guessed a granny square, you are correct.

Pin for Future Reference
Go Back to Part One: Introduction to Crocheting in the Round.


