- Home
- Irish Crochet
- Using Irish Motifs to Make a Skirt
Using Irish Motifs to Make a Skirt
Updated 08-15-2022
When you use Irish motifs to make a skirt, you can be pretty sure no one else will have exactly the same one. The reason is simple: even if you crochet two skirts from the same motifs, they’ll look different. Making a skirt from motifs is a creative process.
By its nature, this kind of garment isn’t suited to mass production. The opportunity to feel like an artist may be one of the most attractive features of working with crochet motifs.
Our skirt will feature Irish motifs assembled with a crochet net. In other words, we’re going to use the Irish crocheting technique to make a skirt. Wait, wait! It’s too early to leave this page. :) Irish crocheting is not as difficult as it seems.
A little patience and a strong desire to finish, that’s all we need. To begin, please go through the Motif Pattern page to get an idea of what we’re going to do. Ready? Let’s continue.
A Few General Ideas About Joining Irish Motifs
The information below isn’t a strict rule. You can accept it or skip it if you already have your own approach to making a crochet skirt from Irish motifs. The purpose is to make your first experience with Irish crocheting as positive as possible.
Connecting Irish motifs with the help of a crochet net is not the simplest technique, BUT IT IS DOABLE. Most importantly, the result is certainly WORTH the time you invest. Here are a few practical tips to help you avoid trouble while joining Irish motifs with a net.
For beginners, cotton yarn is usually easier to work with. In general, any yarn with a length of about 450–600 m per 100 g will work. Don’t waste your time on pure acrylic or blends with more than 40–50% acrylic. It won’t hold its shape, and your Irish crocheting may stop looking neat fairly quickly.
A steel hook size between 0.7 and 2 mm usually works well. Choose one that lets you crochet tightly, but doesn’t require significant effort. Crochet tightly, but make sure it still feels comfortable.
As a rule, the yarn for the net should be thinner than the yarn for the motifs, so you’ll use a smaller hook. But again, there are no rules that can’t be broken.
When you crochet the net, don’t rely on chains alone—use double crochet, treble crochet, and other stitches too. It will help you create a better-quality net.
Holding the Crochet Hook
There’s no single “correct” method. Either the Pencil/Underhand method or the Knife/Overhand method will work for crocheting motifs, BUT the Knife/Overhand method is much more productive for crocheting a net.
How to Crochet a Skirt Using Irish Motifs: Instruction
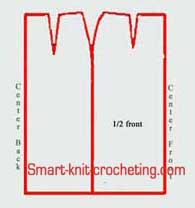
Step 1. Make a skirt pattern
Read these steps from beginning to end first, so you understand the overall process. If crocheting a skirt feels too complicated, it may be a good idea to choose a smaller project: a girl’s top, or just a coquette for a dress. Either way, follow the instructions.
For this project, you will need a full-scale skirt pattern made according to your body measurements.
How to make it, you will find out at the Skirt Pattern page.
A skirt pattern is the base we’re going to use to lay out the motifs. You can use a skirt pattern as shown in the picture, draw the back and front separately, or draw them together as one piece.
Draw the skirt pattern on paper first and use it as a template for other crochet or knit projects. For this project, you will need a pattern made on cotton fabric.
This isn’t just a pattern; it’s a “tool” that helps you maintain proper yarn tension and makes the net-crocheting process easier. Here is how to do it.
Step 2. Make a fabric base to assemble a skirt
Take several layers of cotton fabric (old bedding can also be used) and cover an area slightly larger than the skirt pattern. It’s better if the top layer is a different colour from your motifs. Iron the base to make it smooth. Place the paper pattern on top and trace it with a pencil or chalk. The base is ready.
Step 3. Lay out motifs on a
fabric base
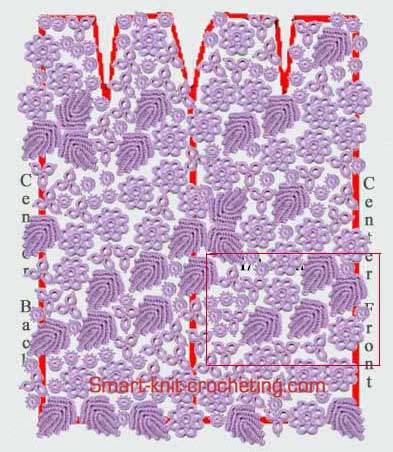
Lay out the Irish motifs on the fabric base, upside down (wrong side up).
Use your imagination to create an attractive composition.
Don’t be in a hurry.
Move motifs until they look their best. Pin them to the base if necessary.
If you’re making a warm skirt, keep motifs closer together and leave less space between them. If it’s a summer variant, leave larger distances between them to be filled with a crochet net.
As you lay out motifs, remember you’ll still need a seam to form a skirt “tube.” Follow the skirt pattern line so the crochet fabric looks uniform and the future seam is less visible.
Don’t overlap the dart lines. It’s easier to add additional motifs later than to remove joined motifs after you realise they didn’t need to be there.
Important note
If you used cotton yarn, steam each motif (or blocks of a few motifs sewn together) before laying them out. Cotton tends to shrink when washed, and this helps you avoid an unpleasant surprise after the skirt is finished.
Tightly sew all your motifs to the base with a needle and thread (cotton is best). Later, when you have more experience, you might choose not to sew every motif to the base and instead hold them with pins only. Remember, this is temporary: the thread must be pulled out after the skirt is finished. Your composition is now ready for crocheting a net.
Step 4. Crocheting a net
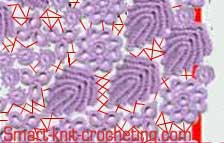
Choose an opening you’d like to start with (see the red grid on the picture), take a thread, and start to form a net.
Crochet tightly, but don’t pull too hard—keep your work flat (that’s why you need the thick fabric base).
This isn’t very easy for beginners, but there are a few important moments to keep in mind at all times.
To form the net, use different elements: chains, double crochet, treble crochet—whatever makes it look neat.
In a chosen opening, crochet the net along its shortest direction.
Small groups of Irish motifs can be sewn together before placing them on the fabric base.
There is no need to break the yarn while moving from one opening to another. In most cases, you can make a few additional stitches over a motif to start the net in the next area.
Step 5. Finishing a skirt
Neatly weave the yarn ends into the completed skirt. Depending on the yarn you used, lightly steam the skirt, or place a wet fabric on it and let it dry.
Conclusion
This may not have been easy work. Check out this picture tutorial for specific ways of joining your motifs.
But I’m sure that after taking this challenge, you realised there is no limit to perfection. Most importantly, it can be done—and you can do it!
Disclosure:
This post contains affiliate links. If you buy through them, I may earn a small commission at no extra cost to you.

Janice Jones is a Certified Knitting and Crochet Instructor who creates beginner-friendly patterns and tutorials, backed by a 389-page library of practical knitting and crochet content.
Most Popular Pages
All Types of Crochet Stitches

36 Reversible Knit Stitch Glossary

How to Crochet the Second Row

Dog Sweater Patterns

Working with Alpaca Yarn

Free eBooks, Just for You
Get my beginner eBook guides to Knitting and Crocheting, just for signing up for my monthly newsletter.
Choose one or both when you sign up.


About the Author: Please allow me to Introduce myself

Janice Jones is a Certified Knitting Instructor and Certified Crochet Instructor through the Craft Yarn Council who focuses on beginner-friendly patterns, stitch guides, and technique tutorials. She has built a library of 389 pages on her website, sharing practical instructions and patterns, and has completed projects ranging from crochet blankets to knit sweaters. You can explore her work on her website. She makes items for Warm Up America and often knits and crochets sweaters for her small dogs.
Thank you for visiting Smart-Knit-Crocheting. I hope this and all of my tutorials will give you the inspiration to continue your knit or crochet journey. For a complete list of all the pages on my site, please visit my table of contents.
I participant in the Amazon Services LLC Associates Program, an affiliate advertising program designed to provide a means for sites to earn advertising fees by advertising and linking to Amazon.com. “As an Amazon Associate I earn from qualifying purchases.” These earnings go towards supporting my website.

Home | Contact | About | Privacy Policy | Disclaimer
I DO NOT SELL ANY PERSONAL INFORMATION FROM THIS WEBSITE. PLEASE SEE MY PRIVACY POLICY FOR MORE DETAILS.
Copyright © 2006-2026 Smart Knit Crocheting. All Rights Reserved
Please Share
Remember, Sharing is Caring