- Home
- How to Knit: Basics
- Mattress Stitch in Knitting
Mattress Stitch in Knitting: A Beginner's Guide
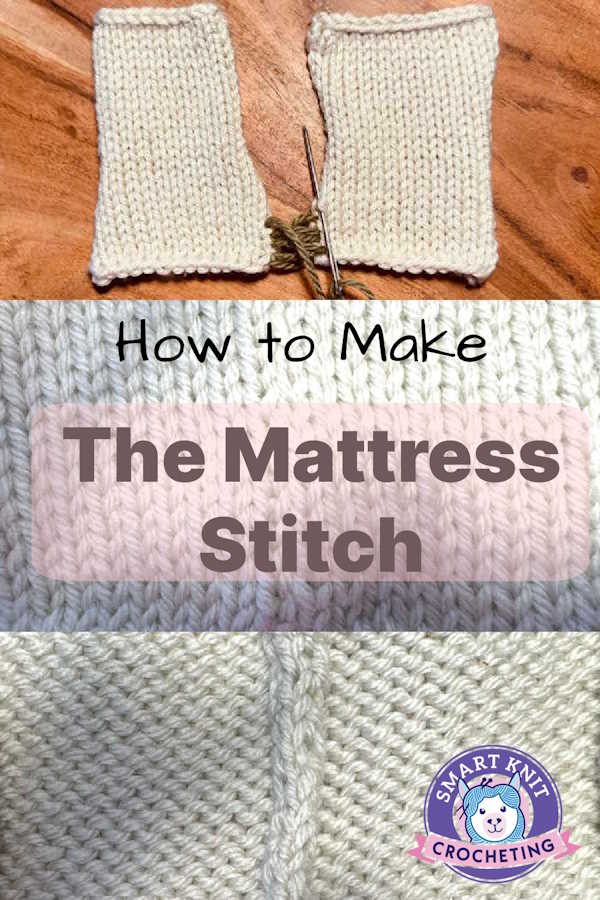
The mattress stitch is the secret to creating invisible seams in your knitting. It’s the finishing technique that transforms two separate pieces into one smooth fabric: no ridges, no bumps, no awkward joins.
If you’ve ever wondered how professional knitters make their sweaters look flawless, this is it. The mattress stitch pulls the edges together like magic, leaving your work looking neat and seamless from the right side.
In this tutorial, you’ll learn:
- What the mattress stitch is and when to use it
- Step-by-step instructions for stockinette stitch
- How to adapt it for ribbing, garter stitch, and colorwork
- Common mistakes to avoid
- Finishing tips for perfect results
What Is Mattress Stitch in Knitting?
What Is the Mattress Stitch?
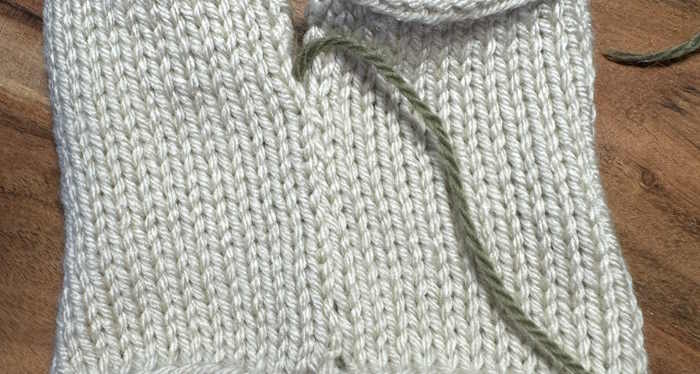
The mattress stitch is a sewing technique used to join two knitted pieces side by side. It’s worked vertically — from bottom to top — and designed to hide the seam on the right side of your fabric.
You’ll often use it when sewing:
- Sweater side seams
- Sleeves
- Front and back panels of cardigans
- Pillow covers and blankets made from knitted squares
When done correctly, the seam is strong yet flexible, and completely invisible from the right side.
Tools You’ll Need for Mattress Stitch
- Tapestry or yarn needle
- Matching yarn (the same yarn used in your project, or contrasting yarn if you want to practice.
- Flat knitted swatches with clean, even edges
- A blocking board or flat surface
- Pins or clips (optional)
Tip: Use a length of yarn about three times the height of the seam you’re sewing. Always block your pieces before sewing to make the process easier.
Step-by-Step Tutorial: How to Do Mattress Stitch
Step One: Prepare Two Swatches to be Seamed
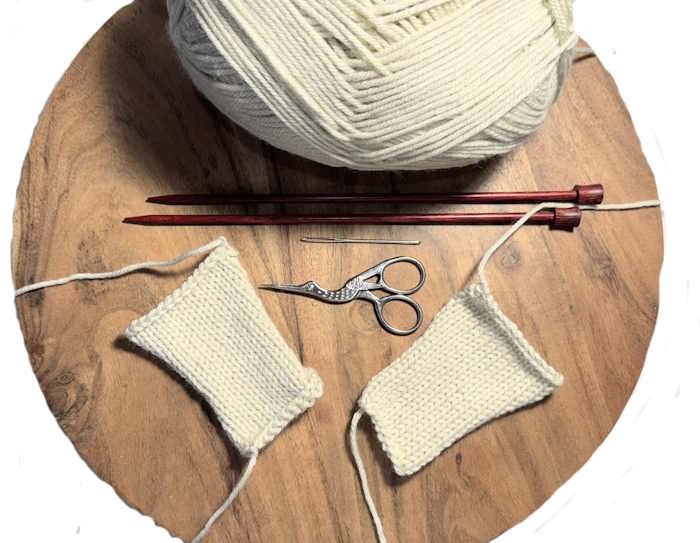
For this tutorial, you will need to create two small swatches of stockinette stitch. I knit two swatches in a light colored acrylic yarn, but you can use whatever scrap yarn you have. Both swatches need to have the same number of rows.
My swatches are 2.5 x 4 inches each worked on US 8 (5.0 mm) needles and #4 Worsted Weight Yarn. I used Lion Brand, Schitt's Creek, Color 4100 (Rose Apothecary).
For each swatch, I cast on 15 stitches and worked 34 rows. Your two swatches do not need to be exactly the same as mine. Bind off but do not weave in ends. Leave a long tail on at least one swatch about 3 times the length of your swatch.
Step Two: Block Your Swatches
I find it easier to make the mattress stitch if the swatches are blocked. Acrylic yarn is not as easy to block, but blocking will still help as the stockinette stitch tends to curl making it difficult to work with when sewing swatches together.
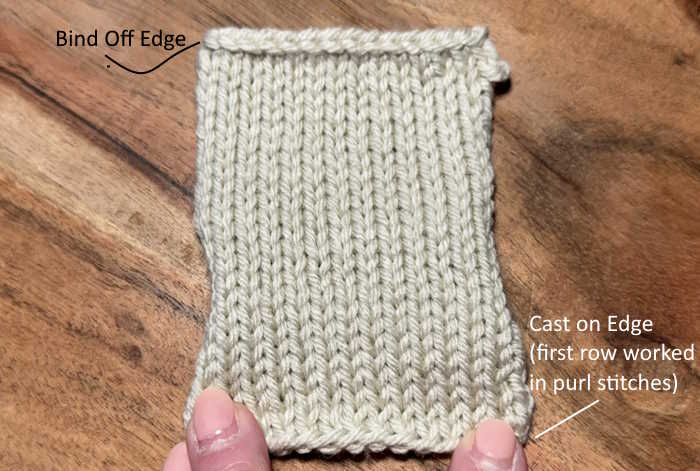
Step Three: Identify the Cast on and Bind off Edges and Match Up
Lay the pieces you want to join side by side with the right sides facing up. Make sure the edges you wish to seam are even and aligned, and that the cast-on edges match up.
You will work from the cast-on edge towards the bind-off end.
Step Four: Identify Where You Will Stitch
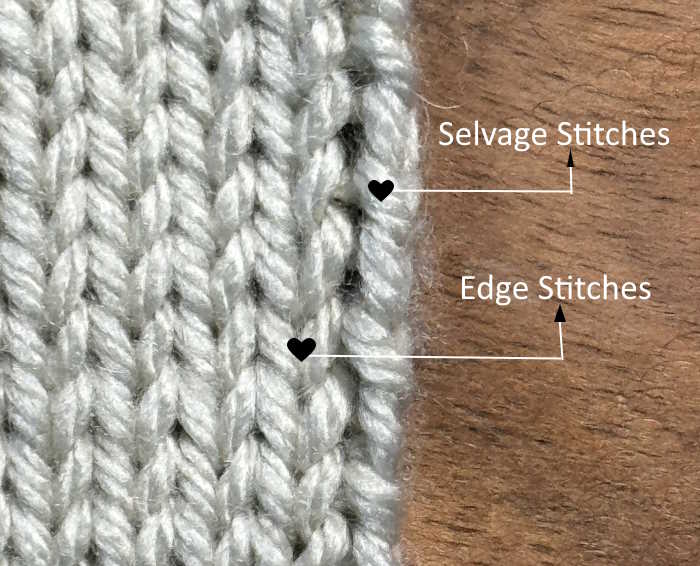
The mattress stitch seam is made between two columns of stitches, the selvage stitches and the edge stitches.
Step 5: Grab Your Tapestry Needle and Get Started
Thread your tapestry needle with either the long tail still attached. For demonstration purposes, I am using a contrasting color so it is easier to see.
You can start seaming on either side, though I find it easier to start on the right because I am right handed.
Study the side edges of either swatch. There should be a little bar between the stitches or "Vs." Think of them as a little ladder. You will be working with the bars or rungs of the ladder only.
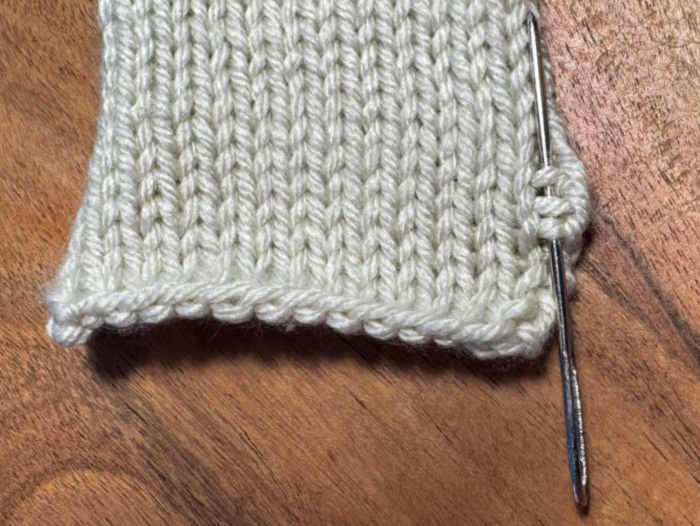 You will work the mattress stitch by picking up these little bars, one at a time.
Step Six: Begin with a Figure 8 to Connect Both Swatches
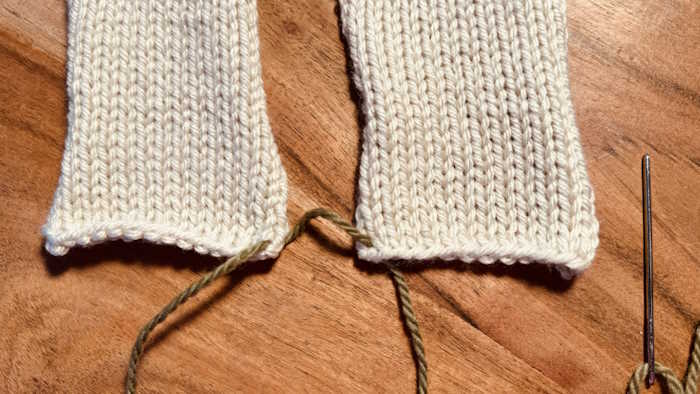
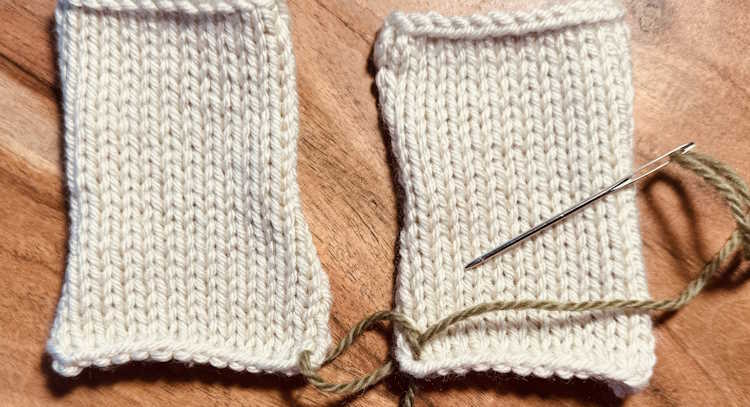
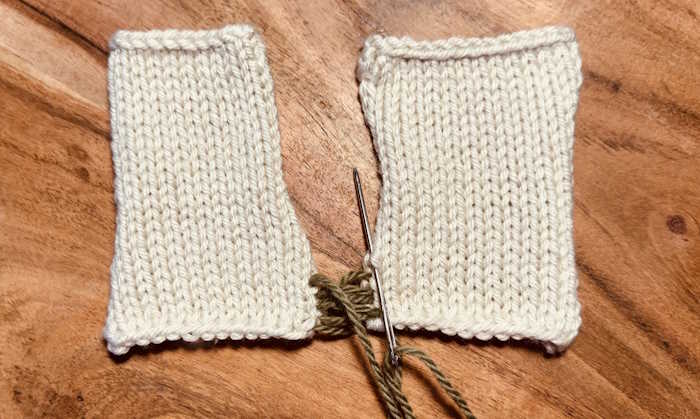
But first, you will create a figure 8 at the base of the cast-on edge. To create the figure 8 join, lay the two swatches side by side, aligning them so that both cast-on edges are at the bottom and both bind-off (cast-off) edges are at the top. Always work on the right side of the fabric.
You will make the figure 8 join in the cast-on edge and then work the seam up towards the bind-off edge.
Insert the needle between the first stitch of the right swatch from back to front.
Then insert the needle from back to front between the first stitch on the left swatch.
Bring the tapestry needle back to the left swatch and go through the exact same stitch that you did initially. You've created a figure 8.
Step Seven: Sew the Mattress Seam
Move from the stitch on the right piece to the corresponding bar on the left piece, being careful not to miss any bars.
Pick up that bar and then move to the corresponding bar on the right piece of fabric.
Continue to pick up the bars, one by one but do not tighten the seam.
Step Eight: Pull the Seam Closed
After you've worked about an inch, tug on the yarn to close the seam, but don't pull too tightly! Your seam will buckle and not lay flatly if you pull too tightly. If this happens gently stretch it out before creating another stitch.
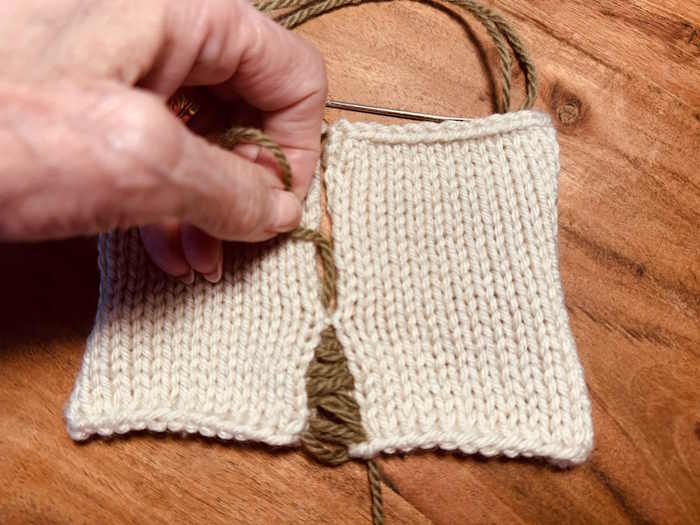

Continue to the top of the seam.
Step Nine: Secure the Seam
When you reach the top, weave the tail under the last few stitches on the wrong side to secure it.
The Appearance of the Mattress Stitch Seam
When finished, the join you created with the mattress stitch should be mostly invisible on the right side. On the wrong side, it will look like a column of stockinette stitch.
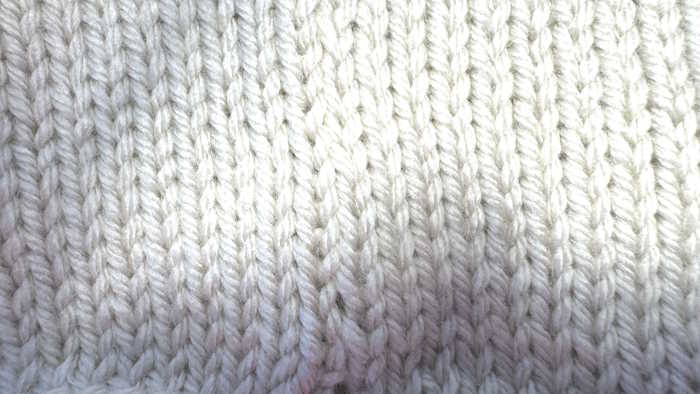 Mattress Stitch Seam: Right Side
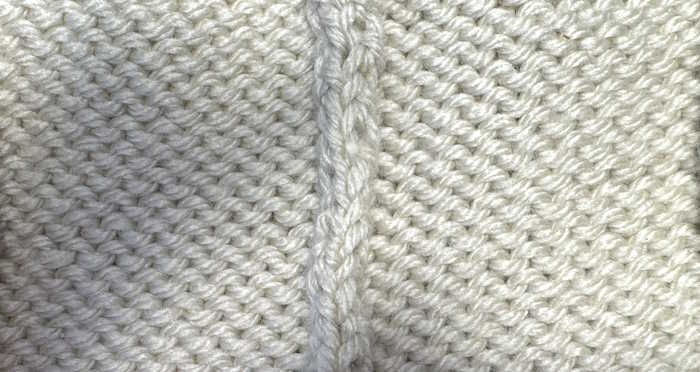 Mattress Stitch Seam: Wrong Side
Variants and Special Cases
The mattress stitch can be used on other types of knitting.
1. Mattress Stitch on Ribbing
Match knit columns to knit columns and purl columns to purl columns. Insert the needle under the bars between identical columns so the rib pattern continues seamlessly.
2. Mattress Stitch on Garter Stitch
Instead of bars, work between the “bumps” of the garter ridges. Pick up one horizontal bar from each ridge for an even, invisible join.
Why Choose Mattress Stitch Over Other Seaming Methods?
Mattress Stitch vs. Other Seaming Techniques
| Technique | Appearance | Strength | Best For |
|---|---|---|---|
| Mattress Stitch | Invisible from the right side; creates a seamless join | Strong and flexible | Sweater side seams, cardigans, blankets, garments |
| Backstitch | Visible ridge on the right side | Very strong and stable | Shoulder seams, heavy garments, reinforced joins |
| Whipstitch | Slight raised edge; decorative if worked evenly | Moderate | Quick seams, decorative finishing, joining squares |
| Three-Needle Bind-Off | Flat seam with a visible ridge | Strong and tidy | Shoulder seams, edges on live stitches |
| Kitchener Stitch | Completely invisible, grafted look | Moderate | Toe grafting, joining live stitches, seamless finishes |
More Tutorials You Might Find Helpful:
Working the Mattress Stitch in Knitting: Tips
Here are some tips and tricks to help you perfect the mattress stitch technique:
1. Tension is key: Pay attention to the tension of your stitches as you work the mattress stitch. Aim for a tension that matches the surrounding stitches to create an invisible seam.
2. Block your pieces: Before seaming, it is recommended to block your knitted pieces. Blocking helps even out any discrepancies in size and shape, making the seaming process easier and ensuring a more polished finish.
3. Use removable stitch markers: To keep track of your stitches and ensure accurate seaming, place removable stitch markers at regular intervals along the edges of your knitted pieces.
4. Pull the seams apart: Pull the edge seams from the selvage stitches to show the little bars.
5. Practice on scrap yarn: If you are new to mattress stitching, practice it before attempting it on your project. This will help you get a feel for the technique and build confidence.
Common Mistakes to Avoid When Using the Mattress Stitch in Knitting
While the mattress stitch is a relatively straightforward
technique, some common mistakes can affect the quality of your seams. Here are
a few to watch out for:
- Skipping
stitches: Stitch through each corresponding stitch on both pieces.
Skipping stitches can result in a visible gap or uneven seam.
- Pulling
too tight: Avoid pulling the yarn too tight when working the mattress
stitch. This can distort the fabric and create puckering along the seam.
Aim for a tension that matches the surrounding stitches.
- Misaligning edges: Ensure that the edges of your knitted pieces are correctly aligned before seaming. Misaligned edges can lead to wonky seams and an uneven finished product.
Projects that Benefit From the Mattress Stitch
The mattress stitch is a versatile technique used in various knitting projects. Here are some examples of projects that benefit from the mattress stitch:
- Sweaters, vests, and cardigans: Seaming the sleeves to the body of a sweater or cardigan using the mattress stitch creates a seamless and polished finish.
- Scarves and shawls: Joining the ends of a knitted scarf or shawl using the mattress stitch ensures an invisible and uninterrupted pattern.
- Hats and caps worked flat: When making a hat that is worked flat and then seamed, a mattress stitch creates an invisible join.
- Afghans and blankets: When knitting Afghans or blankets in separate squares, panels, or pieces, the mattress stitch allows you to assemble the pieces seamlessly into a cohesive whole.
Frequently Asked Questions: Mattress Stitch in Knitting
Is mattress stitch invisible?
Is mattress stitch invisible?
Yes. Mattress stitch creates an almost invisible seam, which is why it’s the preferred finishing method for sweaters and other knit projects. The stitches “zip” the edges together neatly.
Why is mattress stitch better than whipstitch or backstitch?
Why is mattress stitch better than whipstitch or backstitch?
Unlike whipstitch or backstitch, mattress stitch doesn’t leave visible seams or bulky edges. It creates a flat, professional join that looks polished on the right side of the fabric.
Can you use mattress stitch on garter stitch?
Can you use mattress stitch on garter stitch?
Absolutely. The mattress stitch works on both garter stitch and stockinette. The technique is slightly different because of the bumpy edge, but it still produces a neat and sturdy seam.
Can you use mattress stitch on ribbing?
Can you use mattress stitch on ribbing?
Yes — but you’ll need to be more careful. When seaming ribbing, line up the knit and purl columns correctly so the rib pattern flows seamlessly across the join. This takes more attention but gives a professional-looking finish.
Conclusion
The mattress stitch is a knitting technique every knitter should have in their repertoire. It allows you to achieve seamless seams that elevate the overall look of your knitted projects.
By following the step-by-step guide, practicing the tips and tricks, and avoiding common mistakes, you can master the art of mattress stitching and create beautifully finished garments and accessories.
Happy Knitting, Smart Knitter!
Janice
