- Home
- How to Knit: Basics
- Knitting Stitches Per Inch Chart
Knitting Stitches Per Inch Chart: Beginner's Guide
As a beginner knitter, understanding the concept of knitting stitches per inch (also known as gauge) is crucial for ensuring your projects turn out the right size and shape.
What is a Knitting Stitch Per Inch Chart?
A knitting stitches per inch chart is an essential tool that helps you achieve the correct gauge for your project. You can download one here or keep reading for a thorough understanding of how to use it in the most efficient way.
A knitting stitches per inch chart is a guide that shows how many stitches and rows you should have per inch of knitting using a specific yarn weight and needle size.
This chart helps you figure out the correct needle size to use with your chosen yarn to achieve the desired gauge for your project. In other words, choose the yarn the matches the needle size and vice versa.
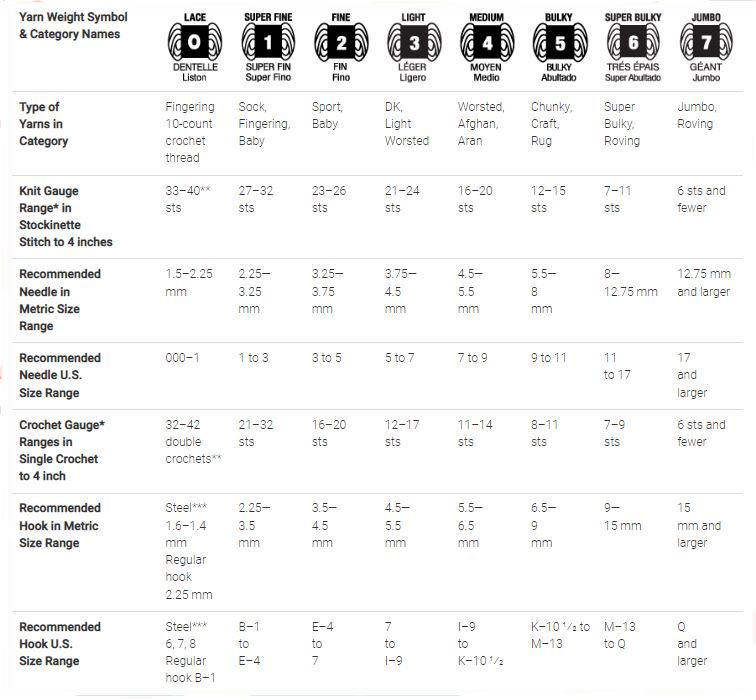
The chart below is from the Craft Yarn Council showing the yarn weights at the top followed by recommended needle sizes and the approximate number of stitches per 4 inches if worked in stockinette. This is just a starting point as there is more to it than this.
How do Different Knit Stitch Patterns Affect the Number of Knit Stitches Per Inch?
Different knit stitch patterns can significantly affect the number of knit stitches per inch, even when using the same yarn weight and needle size. This is because various stitch patterns create different textures and densities in the fabric, which can affect the overall gauge.
Here are some ways in which knit stitch patterns can affect knit stitches per inch:
Knitting Stitches Per Inch Chart: Differences Based on Stitch Pattern: Before Blocking
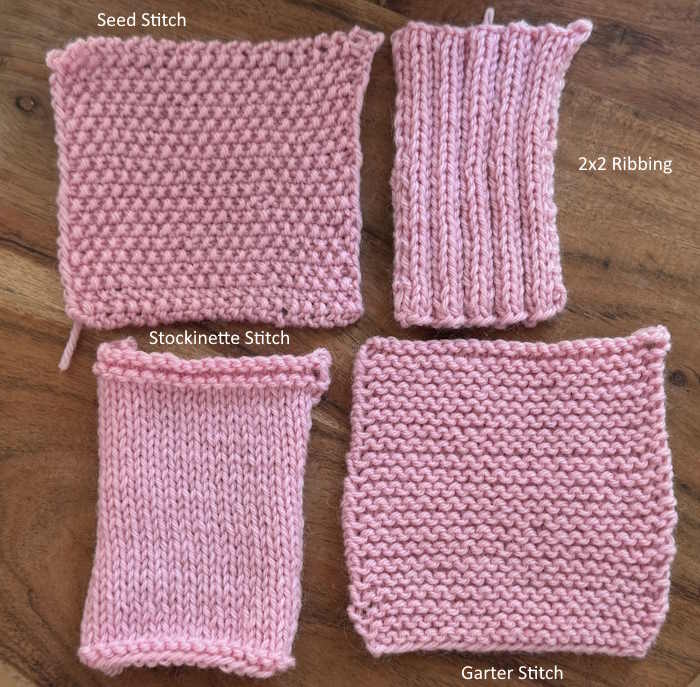 Each of these swatches has been worked on 22 stitches and has been worked for four and one-half inches. They are all about the same length but are clearly not the same width.
Knitting Stitches Per Inch Chart: Differences Based on Stitch Pattern: After Blocking
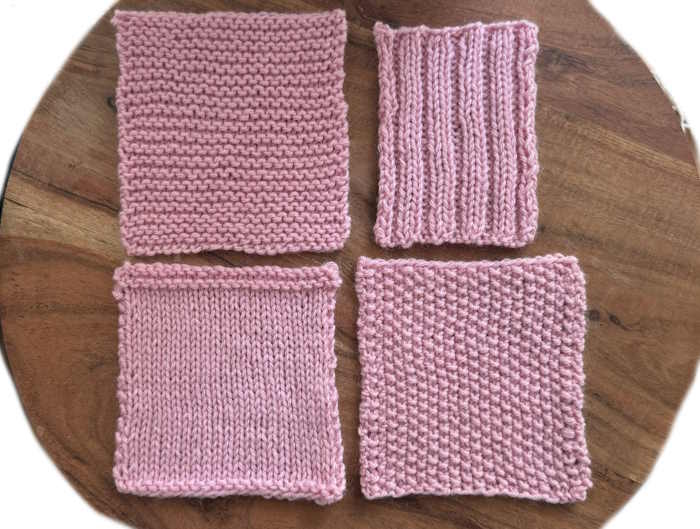
Each pink swatch was worked on the same number of stitches and same rows, though they do not look alike. This little experiment suggest that different stitch patterns change the knitting stitches per inch. Let's see how they are different
Basic Knit Stich Patterns
1. Stockinette stitch:
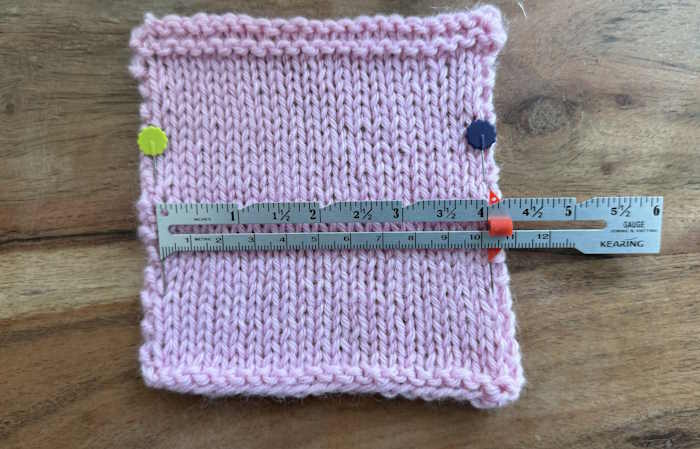
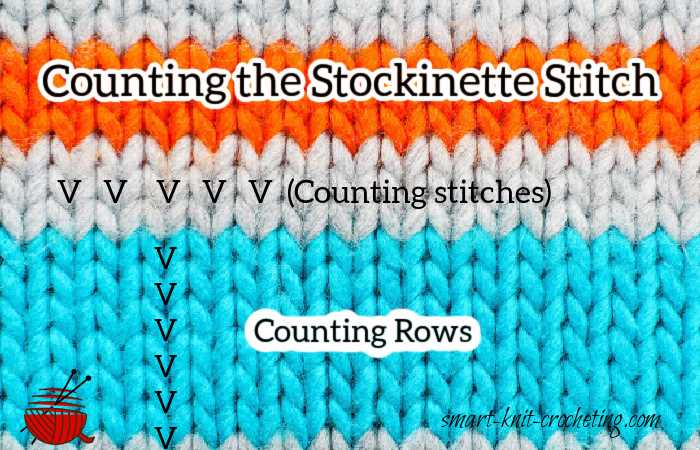
This is the most basic knit stitch pattern, consisting of alternating knit and purl rows. Stockinette stitch creates a smooth, even fabric and is often used as the baseline for measuring gauges on yarn balls.
The stockinette stitch tends to curl inward on the edges which means that blocking is esential for an accurate stitch per inch measurement.
After blocking, I placed a pin after each selvage stitch leaving 20 stitches between the pins. It looks like there is 4 inches (10cm) between the pins. By doing the math, 20 sts divided by 4 works out to 5 knit stitches per inch.
2. Garter stitch:
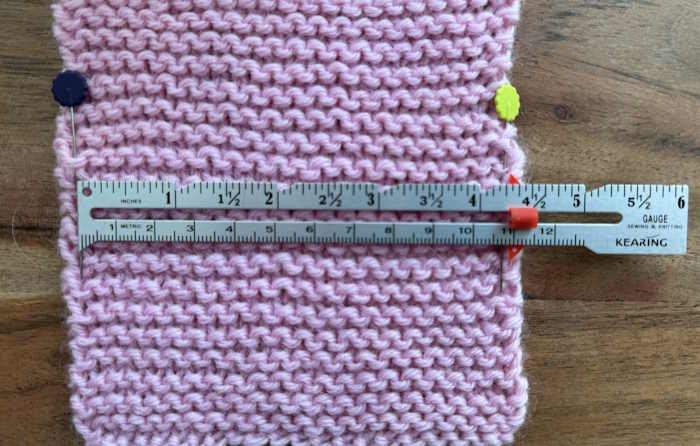
Garter stitch is created by knitting every row. This stitch pattern tends to produce a denser, more compressed fabric compared to stockinette stitch, resulting in more rows per inch and potentially fewer stitches per inch.
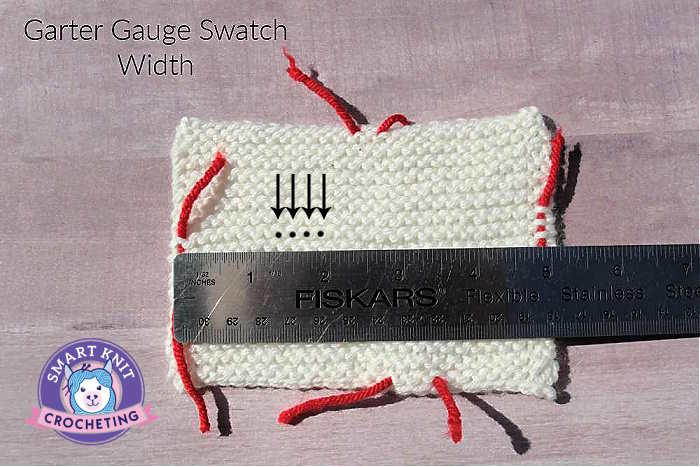
After blocking, I placed a pin after each selvage stitch leaving 20 stitches between the pins. It looks like there is 4 inches (10cm) between the pins. By doing the math, 20 sts divided by 4 works out to 5 knit stitches per inch.
3. Ribbing:
Rib stitches, such as 1x1 or 2x2 ribbing, alternate knit and purl stitches within a row. Ribbing creates a stretchy, elastic fabric that can pull in and affect the number of stitches per inch. Ribbing often requires more stitches to achieve the same width as the stockinette stitch.
When blocking ribbing, you do not want to stretch the ribs horizontal because that is not the way they should lay.
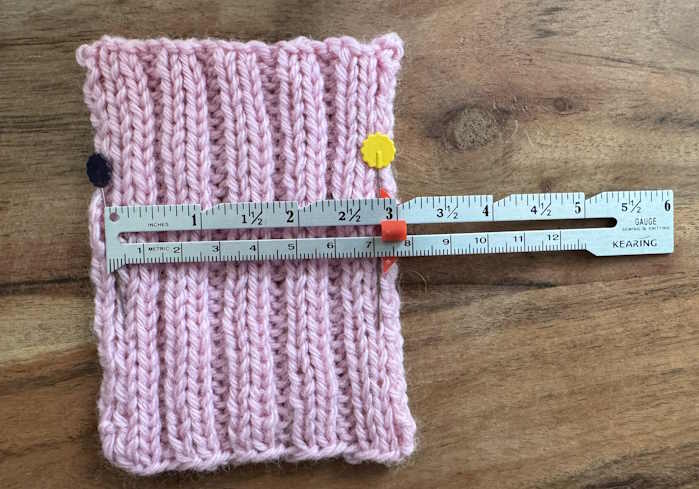
After blocking, I placed a pin after each selvage stitch leaving 18 stitches between the pins. It looks like there is just less than 3 inches (7cm) between the pins. By doing the math, 18 sts divided by 3 works out to 6 knit stitches per inch.
4. Seed stitch:
The seed stitch is a textured pattern that alternates knit and purl stitches in a checkerboard-like arrangement. This stitch pattern creates a dense, bumpy texture that can affect the gauge in the following ways:
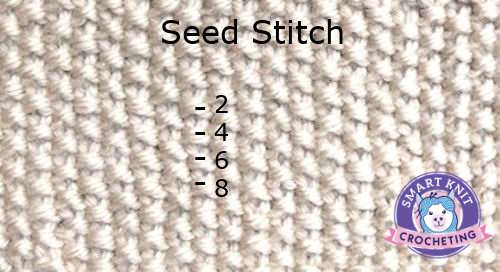
a. More stitches per inch: Due to the alternating knit and purl stitches, the seed stitch tends to pull the fabric inward, resulting in more stitches per inch compared to the stockinette stitch.
b. Fewer rows per inch: The seed stitch also tends to create shorter rows, which means you may have fewer rows per inch compared to the stockinette stitch.
To account for the effect of textured knit stitch patterns on gauge, consider a gauge swatch using the same stitch pattern as your project calls for as each textured knit stitch pattern will be different.
By understanding how textured knit stitch patterns like the seed stitch affect knitting stitches per inch, you can make informed decisions when choosing stitch patterns, adjusting needle sizes, and planning your projects to ensure the perfect fit and size.
Let's measure gauge for the seed stitch.
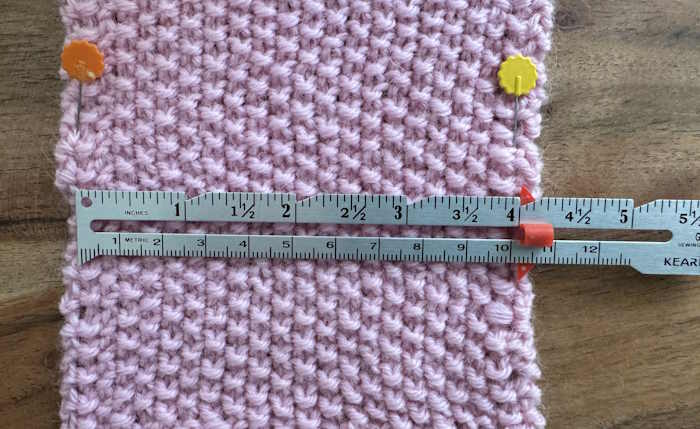
After blocking, I placed a pin after each selvage stitch leaving 20 stitches between the pins. It looks like there is 4 inches (10cm) between the pins. By doing the math, 20 sts divided by 4 works out to 5 knit stitches per inch, similar to the stockinette stitch pattern.
What Else affects the number of knitting stitches per inch?
- Yarn Weight
- Needle Size
The type of yarn and needle size you use can greatly affect the number of knitting stitches per inch in your project. Understanding how these factors influence gauge is essential for achieving the desired size and fit of your knitted items.
Yarn Weight and Knitting Stitches Per Inch:
Yarn weight refers to the thickness of the yarn, which directly affects the number of stitches per inch. Yarns are categorized into various weights, such as fingering, sport, DK, worsted, and bulky.
Thinner yarns (like fingering or sport weight) typically result in more stitches per inch, as they create a finer, more delicate fabric.
Thicker yarns (like worsted or bulky weight) usually yield fewer stitches per inch, as they produce a denser, heavier fabric.
When substituting yarn weights, keep in mind that you may need to adjust your needle size to maintain the correct gauge.
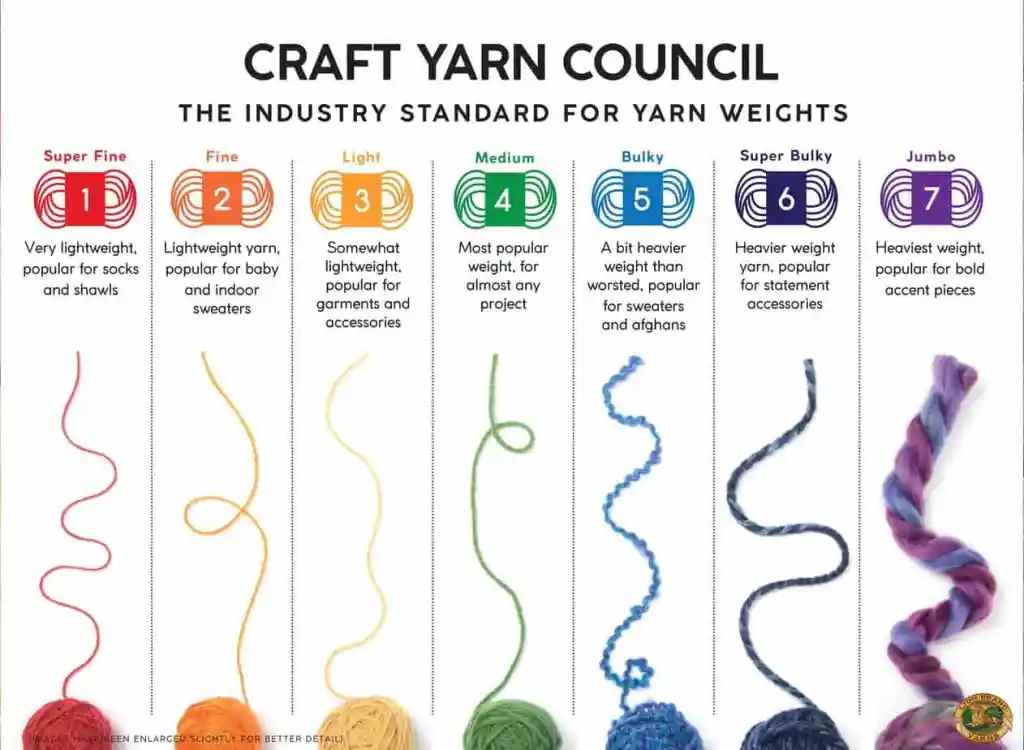
Examples: Yarn Weight & Stitches Per Inch
- Sock Yarn: 23 - 26 stitches per 4 inches (5.8-6.5 inches per inch)
- Worsted Weight Yarn: 16 - 20 stitches per 4 inches (4 to 5 inches per inch)
- Super Bulky: 7 - 11 stitches per 4 inches (1.7 to 2.7 inches per inc)
Needle Size and Knitting Stitches per Inch:
Needle size also plays a crucial role in determining the number of stitches per inch. Knitting needles come in various sizes, typically measured in millimeters (mm) or US sizes.
Smaller needle sizes create tighter, denser stitches, resulting in more stitches per inch.
Larger needle sizes produce looser, more open stitches, leading to fewer stitches per inch.
When choosing a needle size, consider the yarn weight and the desired fabric density for your project. Most yarn labels offer a recommended needle size range for achieving a standard gauge.
If you are working from a pattern, the designer will give the yarn weight recommendations and suitable knitting needle sizes. These recommendations are just that: recommended weight and needle size.
Why the Range of Stitches per Inch
As you can see, the knitting stitches per inch chart gives you a range of stitches. Take the worsted weight yarn for example, the Craft Yarn Council suggest that you should create 16 to 20 stitches per every 4 inches. Why the difference.
The answer is easy: We all knit differently. If we divide the number of stitches per 4 inches to create the number of stitches per inch, there is some differences.
Some of us make very loose stitches and others of us knit tightly. If our tension is loose, we will likely obtain a gauge of closer to 4 stitches per inch. If we knit tightly, our gauge is likely to closer to 5 stitches per inch.
You probably know whether your tension is tight or loose because you are making swatches regularily, Right? You may also know that you will need to alter the size of needles based on your tight or loose knitting style.
The pattern calls for a US 7 (4.5 mm needles)
You knit tightly: Try a US 8 (5.0 mm needles)
You knit loosely: Try a US 6 (4.0 mm needles)
You can always substitute a different type of yarn, but deviating too far from the designer’s recommendations will result in a finished product that won’t fit properly. Check out this site for more information on yarn substitutions.
But, if you are designing your own project, you may decide to make some changes. Here are a couple of reasons why you might decide to depart from the norm.
Deviating from the Norm: You the Designer
- You are creating a lace shawl or scarf, and want a more open, airy fabric but still want to use a specific yarn weight. You can try a larger needle or work with a yarn weight that is not recommended for the needles you are using.
- You want to create a fabric with a nice flowing drape such as when creating a shawl, but the recommended needle size for the yarn you have chosen for the project makes a stiff, bulky fabric. The only way to reconcile this is to find a different yarn, or use a different needle size.
A Word About Drape
In knitting and other textile arts, drape refers to the way a fabric hangs, folds, or falls when worn or draped over a surface.
It is an essential characteristic that affects the overall appearance, feel, and functionality of a knitted garment or item. Factors that influence drape include the type of yarn, stitch pattern, and fabric density.
A knitted fabric with a good drape will flow smoothly and elegantly, while a fabric with a poor drape may appear stiff, bulky, or uneven.
After you have knitted for a while, your tension will become more uniform, and you can predict with some precision how many stitches you can make per inch.
- If you use a thicker yarn than the pattern calls for, you may need to use larger needles to keep the correct gauge.
- If you use a thinner yarn than the pattern suggests, you may need to use smaller needles to achieve the right gauge.If you change the needle size without changing the yarn weight, your gauge will likely be affected.
- Using a larger needle size with the same yarn will result in fewer stitches per inch while using a smaller needle size will give you more stitches per inch.
- Always knit a gauge swatch before starting your project to ensure you have the correct number of stitches per inch. If your gauge doesn't match the pattern, adjust your needle size or yarn weight accordingly until you achieve the desired gauge.
- By understanding how yarn weight and needle size affect knitting stitches per inch, you'll be better equipped to make informed decisions when choosing materials for your projects and ensuring your finished items turn out just as intended.
Why is Gauge Important?
We measured the gauge of four different types of knitting patterns: Stockinette, Seed, Garter, and Rib. Stockinette, seed and garter all show similar gauges but ribbing was different. If I had added a lace or cable swatch to our little experiment, we would have gotten an even different gauge. So why is gauge so important?
Gauge is important because it directly affects the size and fit of your finished knitted item. If your gauge is too loose (fewer stitches per inch than recommended), your project will turn out larger than intended. If your gauge is too tight (more stitches per inch than recommended), your project will be smaller than planned.
How to Use Knitting Stitches per Inch Chart:
- Find the yarn weight you plan to use for your project (e.g., worsted, DK, or fingering).
- Locate the recommended needle size for that yarn weight on the chart.
- Knit a gauge swatch using the recommended needle size, yarn and stitch pattern you will be using in your project. A gauge swatch is a small sample of knitting, typically a 4-inch by 4-inch square.
- Measure the number of stitches and rows within a 4-inch section of your swatch.
- Compare your gauge to the pattern's recommended gauge. If your gauge matches, you can go ahead with the project. If not, adjust your needle size up or down and knit another swatch until you achieve the correct gauge.
Tips for Achieving the Right Gauge: (i.e. Number of Knitting Stitches Per Inch)
Always knit a gauge swatch before starting a project, even if you've used the same yarn and needles before.
Wash and block your gauge swatch to account for any size changes that may occur after washing your finished project.
If you're having trouble achieving the correct gauge, try adjusting your knitting tension or changing needle materials (e.g., switching from metal to bamboo needles).
By understanding the importance of gauge and using knitting stitches per inch chart, you'll be able to create projects that fit perfectly and look professional. Don't skip this crucial step in your knitting journey, as it will save you time and frustration in the long run.
Frequently Asked Questions About Knitting Stitches per Inch Chart
What is a knitting stitch per inch chart?
What is a knitting stitch per inch chart?
A knitting stitches per inch chart is a guide that shows the number of stitches and rows per inch for various combinations of yarn weights, needle sizes, and stitch patterns. It helps knitters achieve the correct gauge for their projects.
Why is gauge important in knitting?
Why is gauge important in knitting?
Gauge is important because it directly affects the size and fit of the finished knitted item. If your gauge doesn't match the pattern's recommended gauge, your project may turn out larger or smaller than intended.
How do I use knitting stitches per inch chart?
How do I use knitting stitches per inch chart?
To use the chart, find the yarn weight you plan to use, locate the recommended needle size, and knit a gauge swatch using the specified stitch pattern. Measure the number of stitches and rows within a 4-inch section of your swatch and compare it to the chart to ensure you have the correct gauge.
What if my gauge doesn't match the pattern's recommended gauge?
What if my gauge doesn't match the pattern's recommended gauge?
If your gauge doesn't match, adjust your needle size up or down and knit another swatch until you achieve the correct gauge. You may also need to adjust your knitting tension or try a different yarn weight.
Do I need to knit a gauge swatch for every project?
Do I need to knit a gauge swatch for every project?
Yes, it's essential to knit a gauge swatch before starting each project, even if you've used the same yarn and needles before. Slight variations in knitting tension can affect the final gauge.
How do different knit stitch patterns affect gauge?
How do different knit stitch patterns affect gauge?
Different stitch patterns create varying textures and densities in the fabric, which can impact the overall gauge. For example, ribbing and seed stitch tend to result in more stitches per inch compared to stockinette stitch.
Can I substitute a different yarn weight than the one recommended in the pattern?
Can I substitute a different yarn weight than the one recommended in the pattern?
Yes, you can substitute a different yarn weight, but you may need to adjust your needle size to maintain the correct gauge. Use the knitting stitches per inch chart to find the appropriate needle size for your chosen yarn weight.
How do I know if my knitted fabric has the right drape for my project?
How do I know if my knitted fabric has the right drape for my project?
The drape of your knitted fabric is influenced by factors like yarn type, stitch pattern, and gauge. A swatch will help you assess the drape and make adjustments if needed, such as using a larger or smaller needle size or choosing a different yarn.
What should I do after knitting my gauge swatch?
What should I do after knitting my gauge swatch?
After knitting your gauge swatch, wash and block it to account for any changes in size that may occur after washing your finished project. This will give you a more accurate representation of your final gauge.
Can I use the knitting stitches per inch chart for designing my own patterns?
Can I use the knitting stitches per inch chart for designing my own patterns?
Yes, the chart is a valuable resource when designing your own patterns. By understanding the relationship between yarn weight, needle size, and stitch pattern, you can create designs that are properly sized and have the desired drape and texture.
Conclusion:
Mastering the concept of knitting stitches per inch and understanding how to use a knitting stitch-per-inch chart is a fundamental skill for every knitter, whether you're a beginner or an experienced crafter. By taking the time to learn about gauge, yarn weights, needle sizes, and how different stitch patterns affect the number of stitches per inch, you'll be well-equipped to tackle any knitting project with confidence.
Remember to always knit a gauge swatch before starting a project, and don't be afraid to experiment with different yarn weights, needle sizes, and stitch patterns to achieve the perfect gauge and drape for your knitted items. Keep in mind that every knitter's tension is unique, so what works for one person may not work for another.
As you continue your knitting journey, you'll develop a better understanding of your personal knitting style and preferences, allowing you to make informed decisions when choosing materials and patterns. With practice and patience, you'll be able to create beautiful, well-fitting knitted garments and accessories that showcase your skills and creativity.
By mastering the use of knitting stitches per inch chart and understanding the factors that influence gauge, you'll be well on your way to becoming a confident, successful knitter.
